Pioneer now has two double din head units that are CarPlay compatible and feature AppRadio Mode. Both are very similarly priced and have very similar features….So what’s the difference?
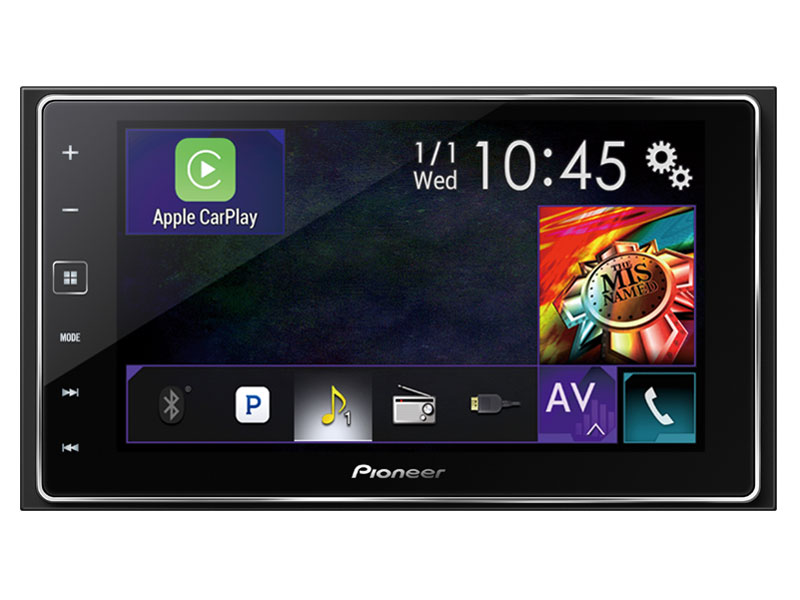
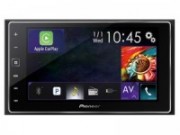
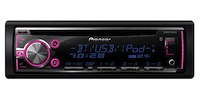
Pioneer AppRadio 4 SPH-DA120
I decided to make a helpful feature comparison chart to really see what the main differences are between Pioneer’s new AppRadio 4 and their AVH-4000NEX. Scroll to the bottom of the post to check out the chart.
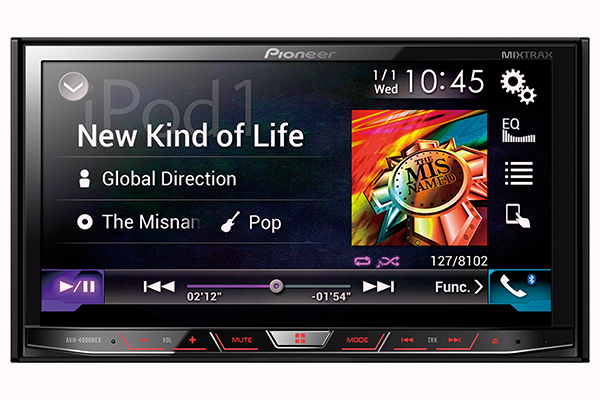
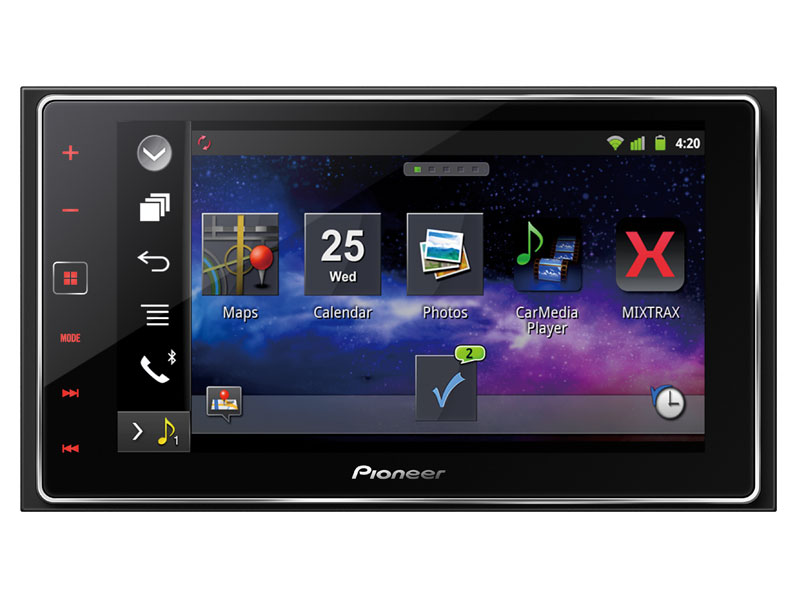
Pioneer AVH-4000NEX
Here is a summary of the main differences between AppRadio 4 and AVH-4000NEX:
Screen differences – AppRadio 4 vs AVH-4000NEX
Capacitive vs Resistive
6.2″ vs 7″
Fixed screen vs motorized and detachable
Capacitive vs Resistive
The Pioneer AppRadio 4 features a capacitive 6.2″ touch screen while the AVH-4000NEX features a 7″ resistive touch screen.
Capacitive is technically supposed to be brighter and more responsive, especially to lighter touches. Although the AppRadio 4 features a capacitive touch screen, which would imply it’s just as sensitive and responsive as your new iPhone, I doubt Pioneer is using the same type of quality capacitive touch screen as what’s in your iPhone.
When comparing Pioneer’s AVIC-7000NEX to it’s capacitive sister, the AVIC-8000NEX, most of my customers and staff did not find the capacitive version to be that much more responsive to warrant the additional cost. Additionally, both myself and consumers have been concerned about glare issues in practical applications.
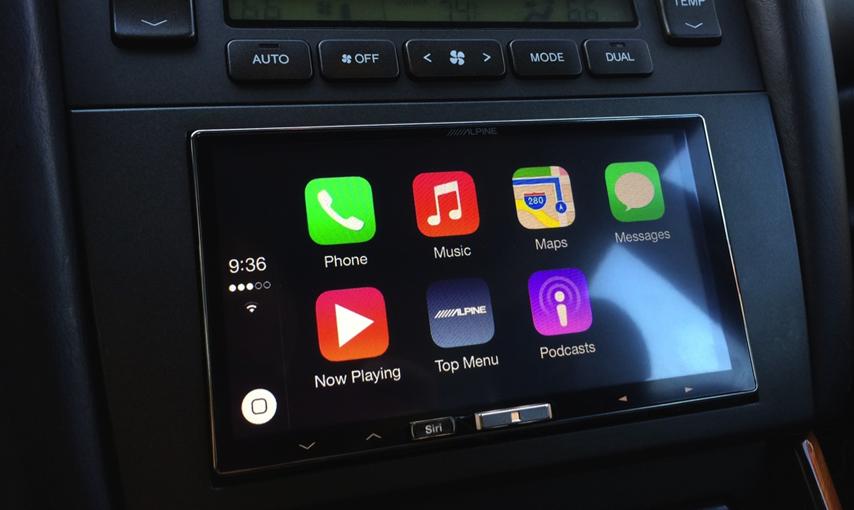
Take a look at two examples of capacitive touch screens installed in vehicles below.
Check out the glare reflecting off this capacitive touch screen from Alpine, the iLX-007.
I had recently had a customer exchange his Kenwood DNN991HD (capacitive touch screen) for a Pioneer AVIC-7000NEX. He was thoroughly annoyed at the glare he encountered and the difficulty he experienced just trying to see the screen.
Dome light reflecting off Kenwood’s DNN991HD capacitive touch screen in a Jeep Wrangler.
Aside from the style of screen and size, the Pioneer AVH-4000NEX has a motorized screen so you can adjust the angle and how it sits in your dash. Additionally, it also features the added security benefit of a detachable face.
Dual zone is a pretty cool feature largely for parents. It allows you to load a DVD in the front player and have the audio and video of that DVD fed to a rear monitor. Kids can stay entertained while they listen and watch using headphones while Mom and Dad can listen to another source on their front two speakers. Pretty cool, right?
Conclusion
Based on features alone, the AVH-4000NEX seems to be a better value. What do you think? Take a look at the feature comparison chart below and feel free to weigh in with your own comments and thoughts on the topic.
AppRadio 4 vs AVH-4000NEX feature comparison chart
Yes - Awesome feature for parents.
Allows audio and video of a DVD from front source to be routed to rear monitor. Kids can listen on headphones while parents can listen to another source on front speakers.
I’m pretty psyched about both of these two new models from Pioneer and Alpine. It’s about time Pioneer ramped up their audio section in their AppRadio. It’s nice to see they’ve finally included higher fidelity features into the new AppRadio 4 such as three 4 volt RCA preouts and a 13 band EQ. I never understood the logic, “Well if they want apps on their radio, they obviously don’t care about system expansion or sound quality.” The additional sound quality features and user friendly interface are a welcome change to the AppRadio series.
Pioneer App Radio 4 model SPH-DA120
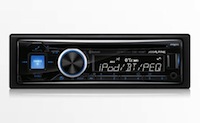
I can’t wait to test out the new iLX-007. I think the last really exciting thing Alpine did was figure out a way to interface Pandora radio into their car stereos (Side note – the digital output on their INE-W957HD is pretty cool too, but not a lot of people take advantage of that feature or even know it exists). Check out Alpine’s new CarPlay deck, looks pretty slick, right?
Alpine iLX-007 installed in dash
I’m writing this post now, because I anticipate both Pioneer’s AppRadio 4 and Alpine’s iLX-007 will become hot sellers during the upcoming holiday season. Consumers are going want to know, which is the better CarPlay deck? The AppRadio 4 of the iLX-007?
I decided to put together a feature comparison chart to best compare these two models. This way, I’ll be ready to explain the pro’s and con’s of each when the busy shopping season arrives (Might sound silly, but seriously – the holiday season is right around the corner).
Compare the features and benefits of the Pioneer AppRadio 4 vs the Alpine iLX-007
Well bum no more. It was only a matter of time. Installing an iPad into your dash as your car stereo is pretty cool, but it does (or did) have a few limitations:
No Bluetooth interface (for handsfree calling)
No reverse camera input
No steering wheel controls (for the most part – depending on your installation technique you may have had volume control, but that’s it)
Can’t see shit when the sun is glaring (consider a Moshi iVisor anti-glare screen protector)
Thankfully, someone was smart enough to come up with a solution for the steering wheel control conundrum.
iPad Car Stereo Steering Wheel Control Solution
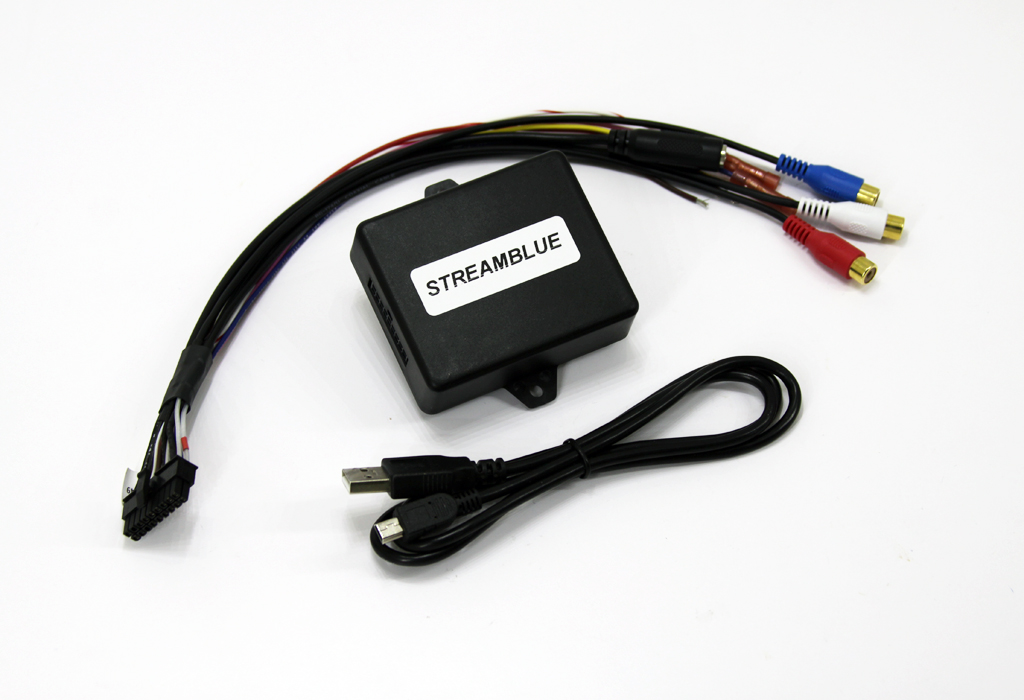
NAV TV recently announced the release of their StreamBlue iPad car stereo interface, also known as an NTV-KIT510.
This kind of makes me wish I had steering wheel controls in my Honda Element. Yet I also wish I kind of had a dash in my Honda Element.
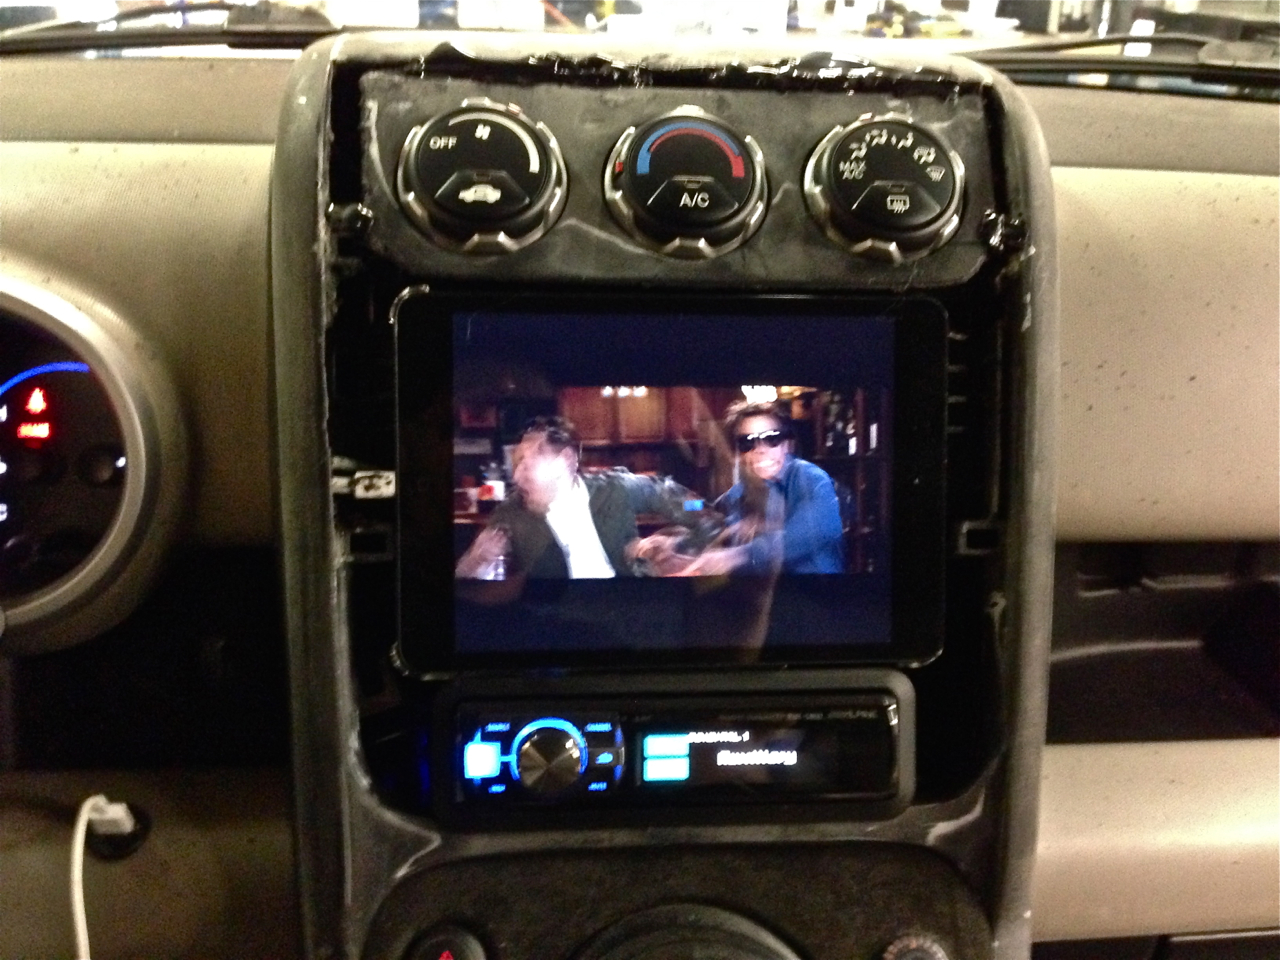
Yes, the iPad car stereo installation in our Honda Element doesn’t look like much at the moment, but more importantly, it sounds freaking awesome.
Our Honda Element is one of those continual works in progress. It was coming together really nice and it was sounding pretty awesome (using Alpine’s PXA-H800 and RUX-C800,Morel Elate Hybrid Components, JL Audio 12 W6 and Audison Amplifier), but John wasn’t happy with how the HVAC controls were sitting and decided to start from scratch, again. This poor car is like the cobbler’s kid who goes shoeless. And I am also not unlike the cobbler’s kid, check out these babies.
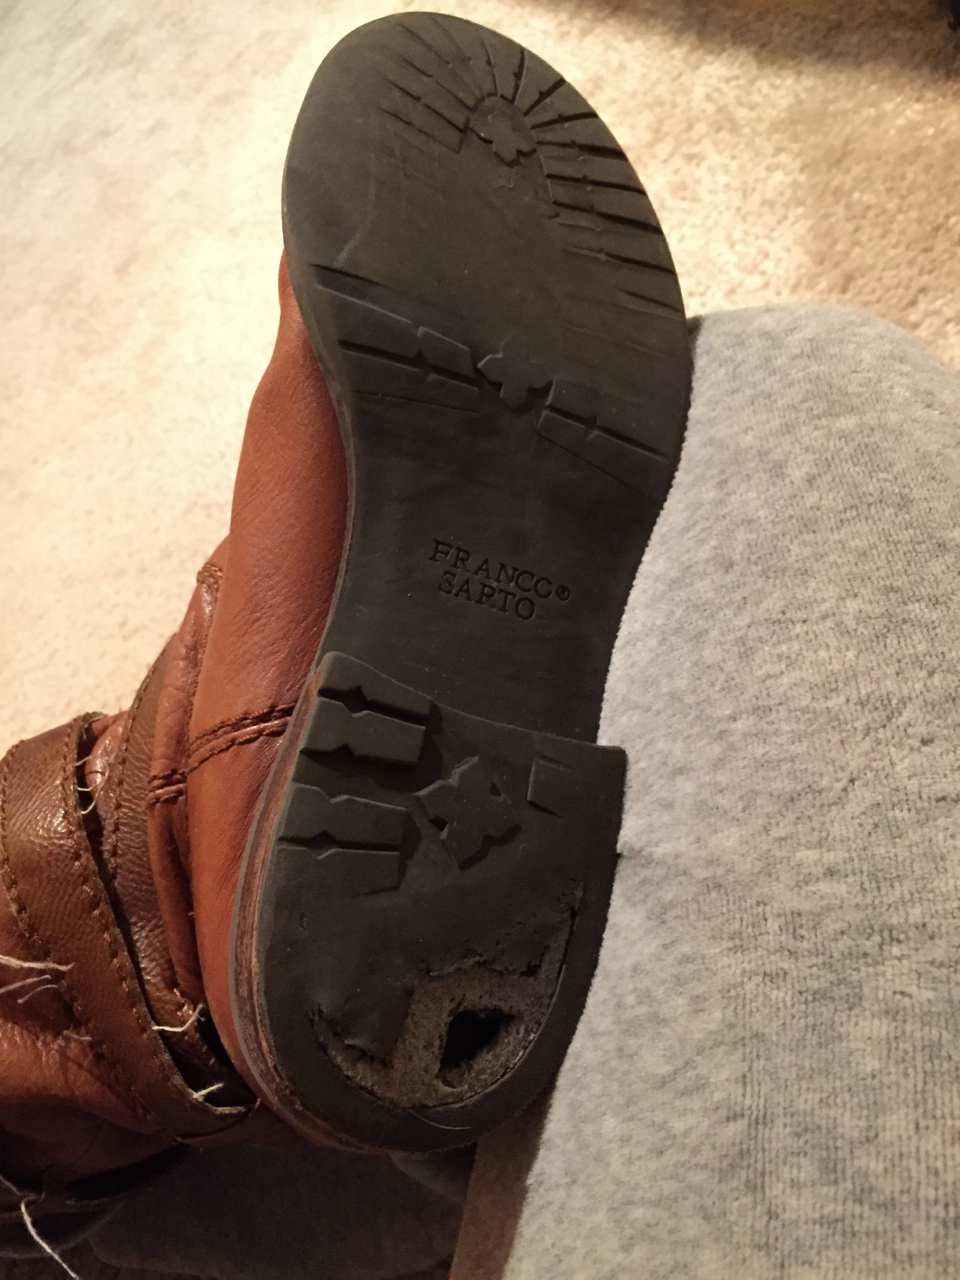
Support Car Stereo Chick, Winter’s coming and she needs new boots!
Back to the iPad car stereo interface at hand. NAV TV tells us:
“StreamBlue is a super high-quality Bluetooth 4.0 with EDR (extended data rate) audio streaming interface that provides a seamless and secure bi-directional wireless connection with your tablet or smart phone.
The included and selectable analog RCA or digital S/PDIF (electrical coaxial) outputs allow the StreamBlue to be used by directly connecting to a factory or aftermarket audio input, aftermarket amplifier, or to a third party audio processing unit with either analog RCA or digital S/PDIF input.
Pretty cool, right? Now I just need a car with steering wheel controls to try this in. The NTV-KIT510 can be purchased through an authorized NAV TV dealer. Contact NAV TV to find a dealer near you.
Thanks for reading. If you enjoyed this post, please share it!
Whether you’re looking for sound quality, high output or budget friendly choices, I will break down the options and show you the best car amplifier for your needs.
Car amplifiers can generally be broken down into 3 categories:
Mono or single channel amplifiers – used for subwoofers
4 channel amplifiers – used for interior speakers
5 channel amplifiers – used for a combination of interior speakers and subwoofers
When shopping for the best car amplifier, it is important to pay attention to the following specifications:
RMS power ratings
Total Harmonic Distortion level or THD
All the amplifiers I recommend here are excellent quality. You will see they have relatively low total harmonic distortion level, typically less than or equal to 1%. They’re also rather efficient and come in a compact size. I’ve also listed physical dimensions for your reference as well.
Check your specs
Note, all of the amplifiers I recommend follow CEA-2006 Compliance regarding RMS rating guidelines:
Number of Watts X Number Channels RMS @ Number of ohms at 14.4 volts
Make it a point to look at an amplifier’s RMS power rating and see at what impedance or ohms it is rated at. Some less than stellar car amplifier companies out there will advertise an unrealistic power handling rating just to grab your attention. Oftentimes it’s only when you look at the owner’s manual do you find these ratings are listed at an unrealistic impedance such as .5 or 1 ohms.
For interior speaker amplifiers, generally speaking, you’re always going to be running the amp at 4 ohms. For subwoofers, you want your final impedance to stay in the range of 2 to 4 ohms. Anything less than 2 ohms is typically too little resistance for an amplifier to handle effectively. When you run a car amplifier below the specified impedance capability, you risk both sound quality and damage to your amp.
So pay close attention to those RMS ratings when shopping for an amplifier. For reference, RMS stands for Root Mean Square. Simply put, it is an approximation of continuous average power.
Power vs Size vs Sound Quality vs Budget
For this post, I’ve included a basic $ rating system in the amplifier comparison charts to give you an idea of cost against power, overall size and sound quality. Here is the key for that simple rating system:
$ = $75 – $150
$$ = $150 – $250
$$$ = $250 – $400
$$$$ = $400 & up
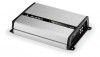
Best Mono Car Amplifiers
In the mono amp category, the more popular amps are in the 500 watt power handling range. In our shop we sell both the JL Audio JX 500/1D and the Alpine MRV-M500. Either amp is a great choice when you need a 500 watt mono car amplifier. If you are also installing the optional bass knob, JL Audio’s RBC-1 is slightly easier and cleaner to install. It’s slightly smaller so it’s easier to dismantle and mount in a stealth manner than Alpine’s RUX-KNOB.
If you need something slightly more powerful, like in the 600 watt range, I recommend the JL Audio XD 600/1 v2. It’s a great compact little amplifier that is very efficient and reliable. For a 1000 watt RMS mono amplifier, consider the JL Audio JX 1000/1D. The JL Audio JX 1000/1D puts out 1000 watts RMS at 2 ohms, but only 500 watts RMS at 4 ohms. Alpine’s PDX-M12 on the other hand has a regulated power supply and will consistently put out 1200 watts RMS whether you have a 2 ohm, 3 ohm or 4 ohm load. If you need a high output mono amplifier with a small footprint, the Alpine PDX-M12 is the way to go.
All of these amps are great options with various power handling ranges. They’re all compact and efficient. The KTP-445U is the most compact and efficient of all. Aside from power output and physical size, there is also an audible sound quality difference between all of these amps.
If you were to compare the KTP-445U to the built in amplifier of an Alpine head unit (about 18 watts x 4 RMS) you would notice a considerable difference in output, clarity and vibrancy. Yet, when compared to the JL XD 400/4 v2 amplifier, the Alpine KTP-445U sounds rather flat. If you had the opportunity to listen to these car amplifiers on a sound board (like I do) you would notice the XD 400/4 v2 sounds more lively and vibrant. If you then compared the JL XD 400/4 v2 amplifier to the Alpine PDX-F4 amplifier you would find the PDX-F4 is even more vibrant and has greater detail and subtle nuance.
Best Car Amplifier – 4 Channel
Alpine KTP-445U
JL Audio XD400/4 v2
Alpine PDX-F4
RMS @ 2 ohms at 14.4 Volts
90 x 2 (bridged to 4 ohm load per channel)
200 x 2 (bridged to 4 ohm load per channel)
200 x 2 (bridged to 4 ohm load per channel)
RMS @ 4 ohms at 14.4 Volts
45 Watts x 4
75 Watts x 4
100 Watts X 4
Sound Quality Rating
6/10
8/10
9/10
THD
<.03%
<1%
<1%
Physical Size L x W x H
7-7/16'' x 1-1/2'' x 2-1/12''
8-9/16" x 7-1/8" x 2-1/16"
10-1/8'' x 7-9/16'' x 2''
Gauge Power Wire Recommended
Minimum 18 Gauge
Minimum 8 Gauge
Minimum 4 Gauge
Price
$
$$$$
$$$
5 Channel Car Amplifiers
5 Channel car amplifiers are a convenient option for anyone looking for a space saving, total system amplifier. In my shop, we sell both Kenwood and Alpine 5 channel amplifiers. The major differences between these 5 channel car amplifiers is their power capabilities and overall size. They all have great sound quality and provide warm, rich and natural tonal qualities. The Kenwood has a very small footprint along with pretty impressive power output – note there is no optional plug in bass knob for the Kenwood. If you purchased this amplifier, you could always install a universal bass knob, like the PAC Audio LC1. That’s what we do in our shop when we sell and install this amplifier.
As you can see, there are a variety of choices and options out there when shopping for the best car amplifier. Space constraints, desired RMS power output, sound quality and budget can all factor into your decision making process when selecting the best car amplifier. I hope this post has made it a little easier to select the best car amplifier for your unique needs and vehicle application.
Still confused about the best car amplifier for your needs? Feel free to post a question in the comments and I’d be happy to clarify any details and answer any questions. Thanks for reading!
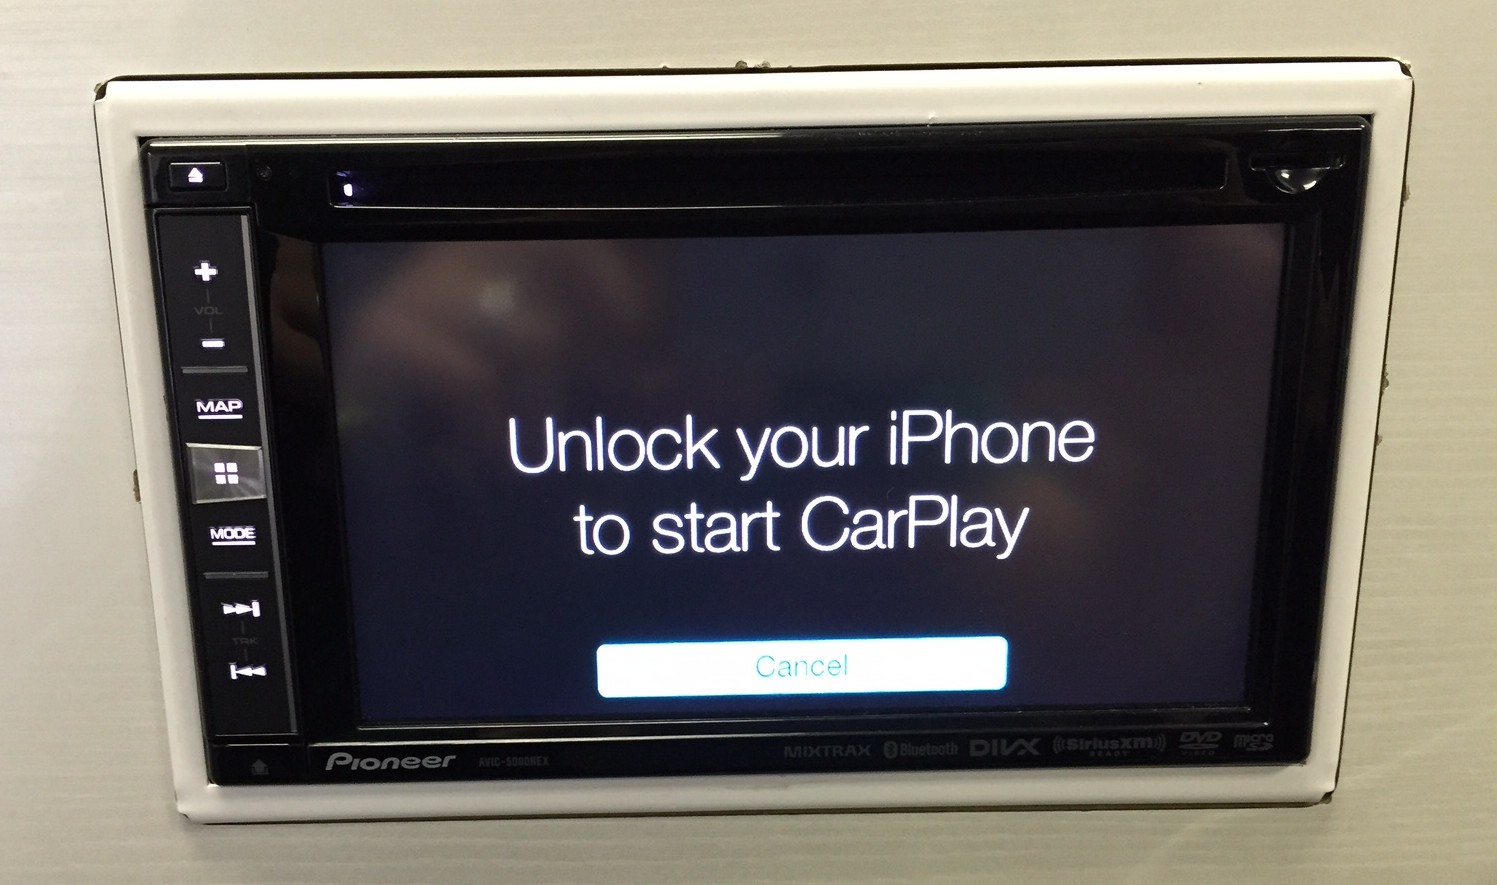
Pioneer announced the release of their much anticipated CarPlay firmware update early this morning. Pioneer’s servers were inundated with users trying to download the update and many users, myself included, experienced difficulties and delays in trying to download the file.
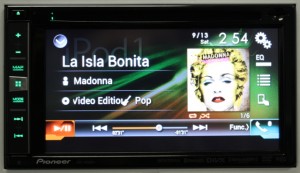
Pioneer AVIC-5000NEX after CarPlay update installed and iPhone 6 screen unlocked.
Luckily for me it was kind of a slow day in the shop, so I had all day to putz around with it. I finally got it going around 5:30 PM after a second download attempt.
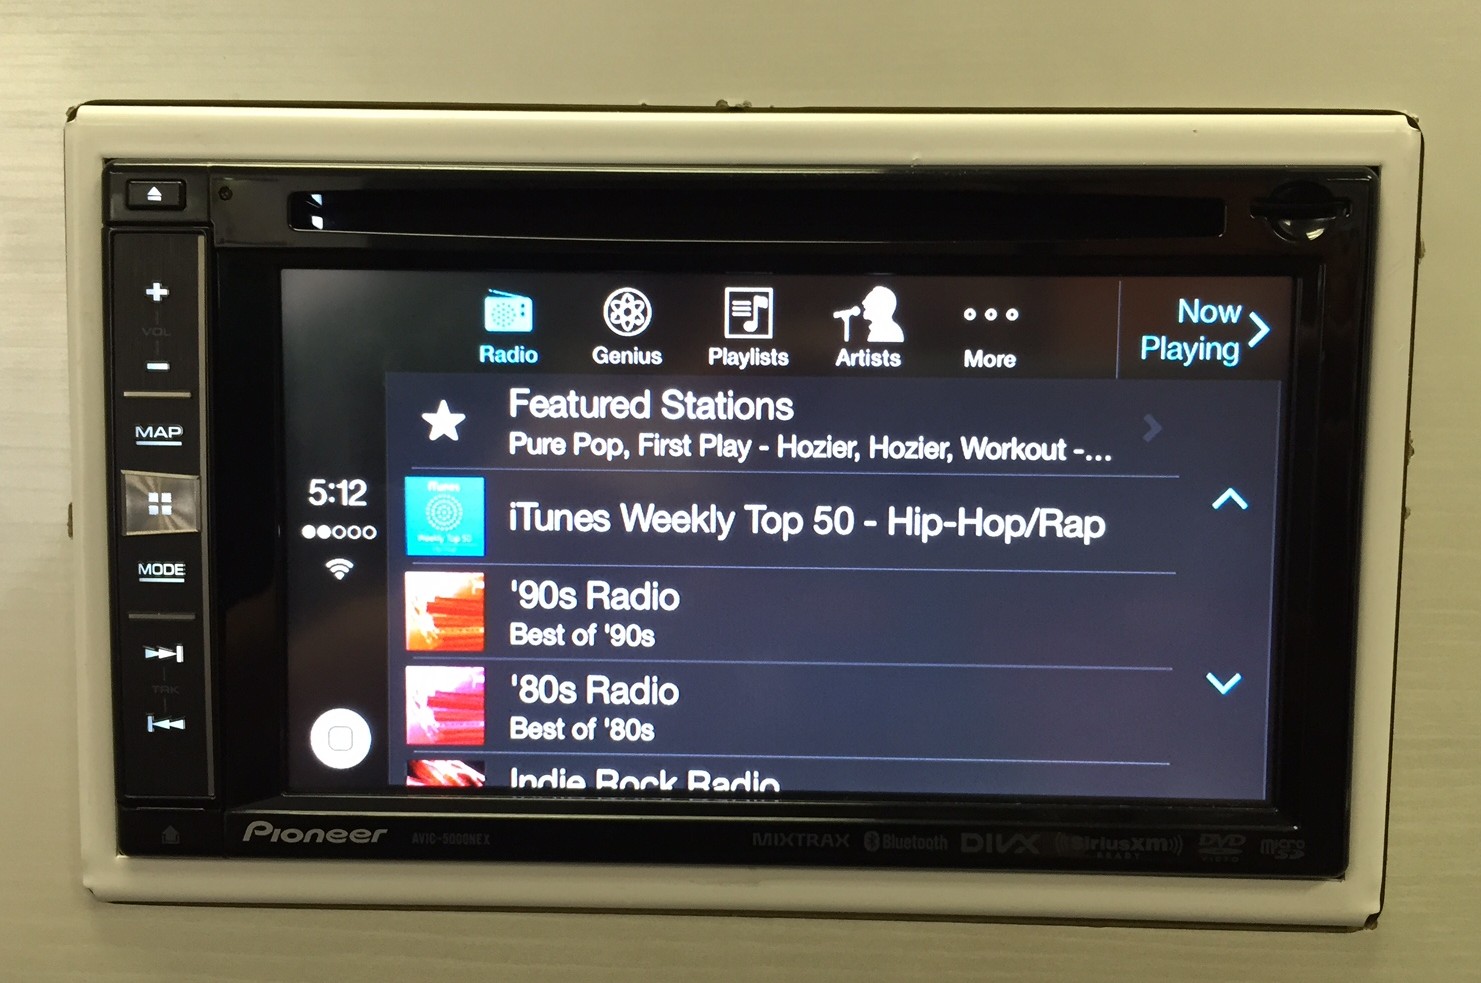
Pioneer AVIC-5000NEX displaying iTunes Radio after CarPlay update.
The new update adds Apple CarPlay capability to the AVH-4000NEX, AVIC-5000NEX, AVIC-6000NEX, AVIC-7000NEX and AVIC-8000NEX. The new firmware allows users to easily access their contacts, listen to their text messages, pull up their artists, songs, playlists and even access iTunes radio.
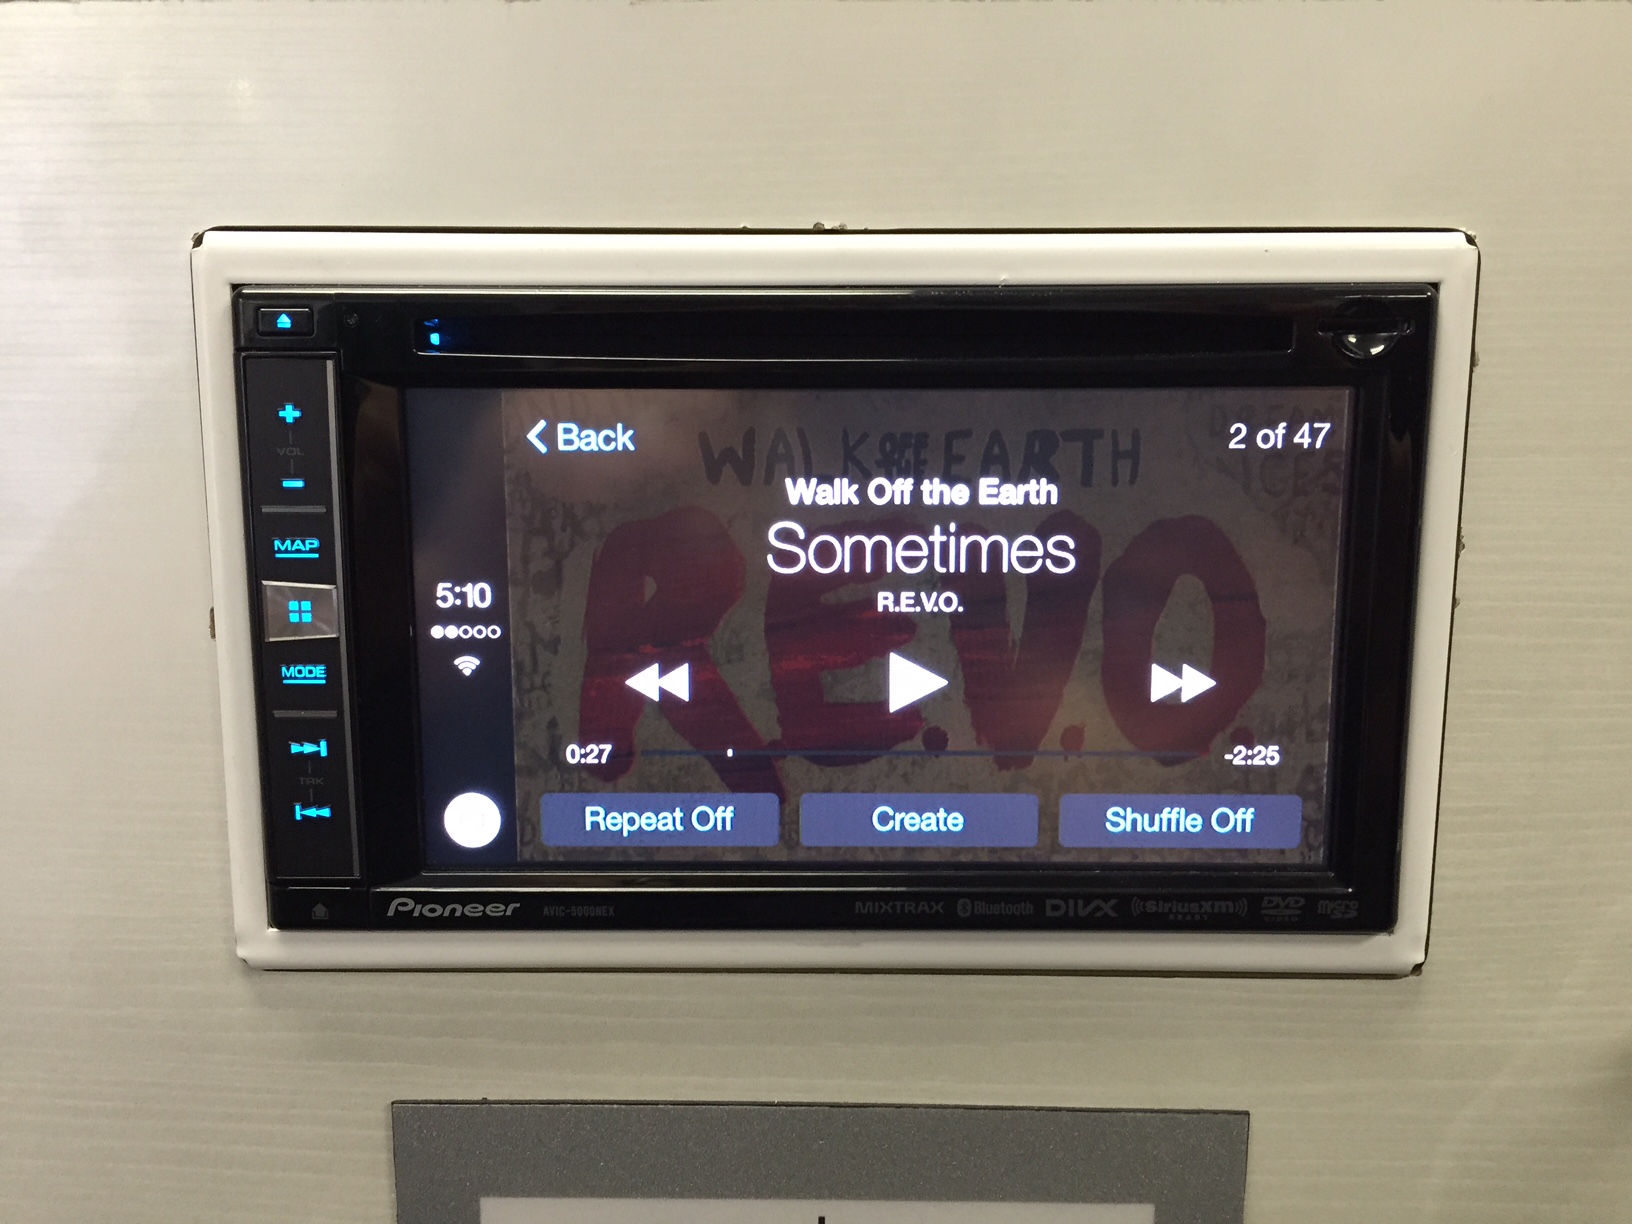
Pioneer AVIC-5000NEX displaying iPhone artist information after CarPlay update.
The free update can be obtained here at Pioneer’s website. Please note there are different downloads depending on which model receiver you have.
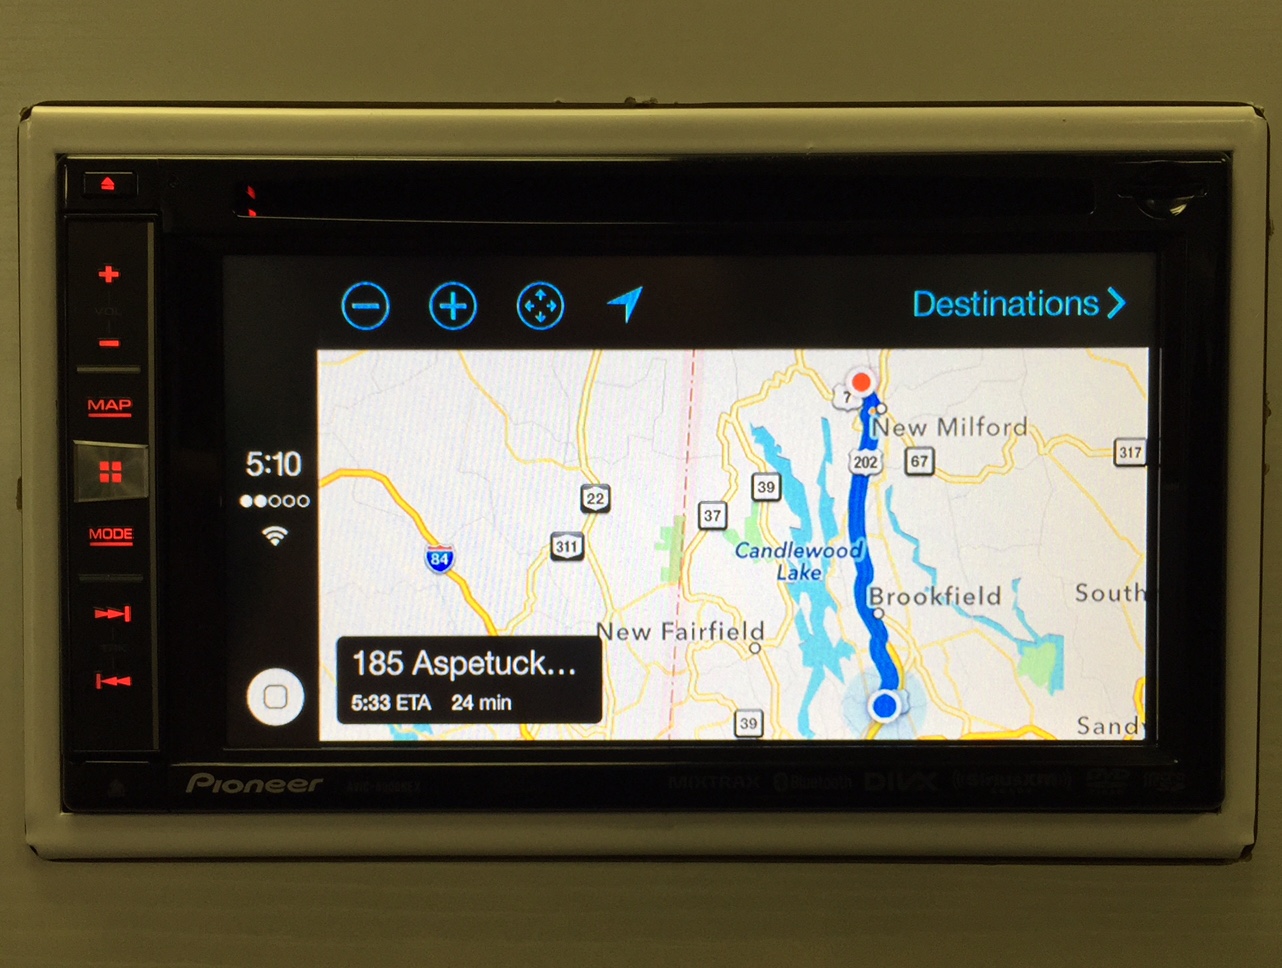
Pioneer AVIC-5000NEX with CarPlay update displaying Maps
Additionally, Pioneer announced the release of a new model, the CarPlay capable AppRadio 4.
Pioneer has announced that it has started shipping the all new AppRadio 4, model number SPH-DA120, to its dealers and distributors. The AppRadio 4 is also CarPlay compatible.
It’s nice to see there has been a pretty big improvement in sound quality features in the new AppRadio 4. Things like equalization control and high voltage pre outs were always lacking in previous AppRadio models.
The new AppRadio 4 features a 13 band EQ, 4 volt pre outs and time alignment. It appears to share the same graphic user interface as the current NEX models. The NEX line has proven to be sound quality oriented as well as user friendly.
AppRadio 4 SPH-DA120 – NEX style user interface
New features of the AppRadio 4 include:
6.2″ capacitive touch screen
HDMI input
Bluetooth
Apple CarPlay (for iPhone 5 or later)
App Radio Mode for iPhone (4s and up – typical App Radio Mode accessories required, see connectivity notes)
App Radio Mode for Android (typical App Radio Mode for Android accessories required, see connectivity notes)
Dual rear USB Port
3 preouts rated at 4 volts
13 Band EQ
Digital time alignment
Siri
Google Voice
AM/FM Tuner
AppRadio Mode Connectivity Kit
Depending on what device you have, you will still need an additional connectivity kit. Pioneer lists the same accessories that were applicable to previous App Radio models.
To access AppRadio Mode, iPhone 5 users will still need a CD-IH202, Apple Lightning to USB and Apple Digital A/V Adapter). Android users will need a CD-AH200. iPhone 4/4s users can use a CD-IU201S. The Apple CarPlay feature requires no additional parts, simply connect to the USB using a standard USB to lightning cable. Keep in mind, you will not be able to easily utilize CarPlay and AppRadio Mode at the same time as each use different style connections and both connect to the USB 1 port.
If you own a 2007 up JK 2 door or 4 door Unlimited, you know what I’m talking about. At lower volume levels the Jeep Wrangler stereo is tolerable. However, as soon as you try to crank it up – like when the is top off – forget it. You can’t turn it up loud enough to hear over the wind noise.
You may also notice this other annoying peculiarity in your Jeep Wrangler stereo. As you turn the volume up, the only frequencies that seem to get any louder are upper mid range and treble frequencies. The bass level stays kind of flat. This self attenuation feature is to prevent you from blowing stock speakers and to save Jeep the cost of having to replace them under warranty.
There are a number of things working against you with the factory Jeep Wrangler stereo. Luckily, it’s relatively easy to overhaul this system and do a Jeep Wrangler stereo upgrade.
Where to start with your Jeep Wrangler stereo upgrade?
We see a lot of Jeep Wrangler’s in our shop and for the most part, we’re replacing and upgrading everything – head unit, speakers, amp, subwoofer. I realize, that’s not always in everyone’s budget and for a lot of people out there, you may have to do your Jeep Wrangler stereo upgrade in different phases. I recommend you start with what is going to give you the biggest impact and biggest improvement overall – the subwoofer.
Even if you installed the best 6.5″ speakers money could buy, they would still be incapable of reproducing the natural frequency range so effectively produced by an aftermarket subwoofer.
When adding a subwoofer to a upgrade a Jeep Wrangler stereo, most of my customers are looking to keep the installation discreet for a couple reasons.
There’s not exactly a ton of extra cargo space in these things to begin with.
They’re such easy targets for theft (I will address this as well later on in the post – there is an easy way to add an alarm to these vehicles. I recommend you protect your investment and you can do so without any additional remote control. The alarm I recommend works off the factory key).
For a Jeep Wrangler stereo upgrade, I highly recommend installing JL Audio’s Stealthbox subwoofer.
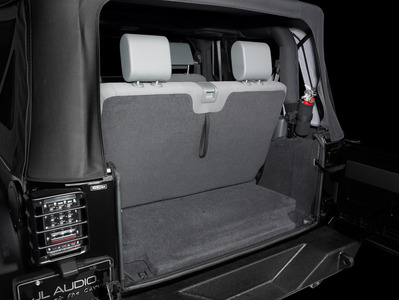
Stealth Subwoofer Enclosure by JL Audio for 2 door model Jeep Wrangler 07 up
They offer it for both the two door model and 4 door unlimited. Check it out.
Stealth Subwoofer Enclosure by JL Audio for 4 door model Jeep Wrangler Unlimited 07 up
Note – if you have the factory subwoofer enclosure in the Unlimited model (2011 and up), you will also want to purchase these two additional Mopar parts to replace the trim that goes around the seat belt bolt. A plain (without subwooofer) passenger side rear cargo trim panel (part #1PU12DX9AG) and a cover for the upper seat belt / roll bar (part #1PU18DX9AD) from Jeep/Mopar parts. If you have the rear 12 volt outlet as well, you will lose that feature.
If you start your Jeep Wrangler stereo upgrade by adding one of these options, you will also need to add a separate amplifier as well. Additionally, if you’re going to be running this off the stock head unit, I also highly recommend using Audio Controls LC2i line output converter. This product helps to correct any factory attenuation that occurs in the signal being fed to your new amplifier and subwoofer. In this scenario, with the factory Jeep head unit maintained, we’re still receiving audio signal from the factory stereo. The same factory stereo that limits the increase in bass frequencies as you turn the volume up. Because of that attenuation feature, it’s beneficial to have a line output converter that is designed to integrate with such a head unit. The Audio Control LC2i will provide a more seamless and smooth increase in subwoofer volume as you turn your stock volume knob up. If you’re doing an aftermarket head unit at the same time, don’t worry about this aspect. Replacing the stereo also addresses this annoying attenuation feature.
Either way you go with your Jeep Wrangler stereo upgrade, you will want to have a separate subwoofer control knob.
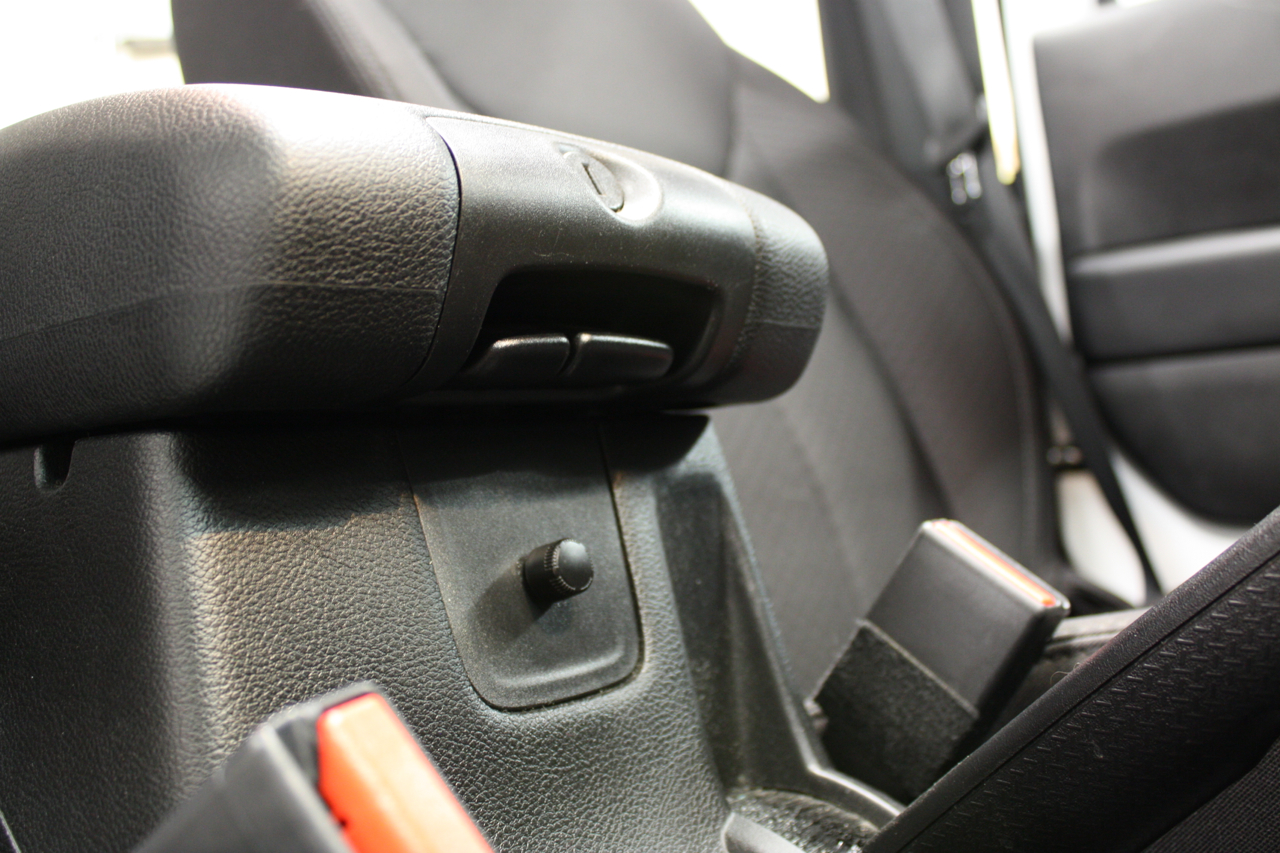
Bass knob for Jeep Wrangler stereo upgrade
I think this is a must in any installation, factory head unit or aftermarket. Especially if you listen to a variety of music. Every recording is different; some songs have more bass, some have less. A bass knob gives you an easy way to tweak the bass level on the fly from song to song for ultimate listening enjoyment. In the Jeep Wrangler, there is room right in front of the center console behind the shifter for such a knob.
Let’s talk amplifiers for your Jeep Wrangler stereo upgrade
Okay, so hopefully I’ve convinced you to invest in one of the subwoofers discussed above in order to upgrade your Jeep Wrangler stereo. And by now you realize you will also need an amplifier to power it up. If you see yourself also eventually upgrading and amplifying the speakers (highly recommended) then you’ll want to buy yourself a nice, high powered, yet small, 5 channel amplifier. Remember, space is limited in these vehicles.
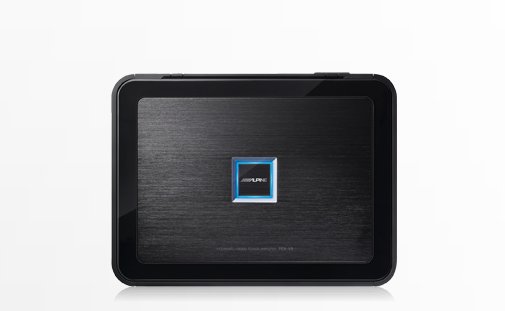
My favorite amp for a Jeep Wrangler stereo upgrade is the Alpine PDXV9.
Alpine PDXV9, perfect 5 channel amp for a Jeep Wrangler stereo upgrade.
This baby puts out 100 watts X 4 RMS to the interior speakers and a whopping 500 watts RMS to the subwoofer. For comparison, most stock head units put out around 10 -15 watts RMS per channel, aftermarket head units are around 18 watts RMS per channel. So in terms of power and output, this is a huge upgrade.
If you’re building your system in stages, you can always wire up the amp for the subwoofer channel only until you invest in some higher quality interior speakers. The bass knob for this amp is the RUX-KNOB, pictured above in my own Jeep Wrangler center console area.
There is room to mount the amp under the passenger or driver seat in either the 2 door or 4 door model.
If you’re feeling a little sticker shock on the price of the amp, I do have an alternative suggestion. Consider purchasing an Alpine head unit like the CDE-153BT and using the Alpine KTP-445A power pack amplifier. It’s very tiny, compact amplifier that is easy to install and it will boost power to your interior speakers to 45 watts x 4. It’s designed specifically for Alpine head units. It’s pretty easy on the wallet too. You could then purchase a mono or single channel amplifier such as JL Audio’s XD 600/1V2 for the Unlimited enclosure or the XD 300/1V2 for the 2 door enclosure. Both of these JL Audio amps will work with the HD-RLC bass knob.
Let’s talk about your source for your Jeep Wrangler stereo upgrade
One thing I always stress with customers in my own shop is this. The source of your music is like the heart of your stereo system. You could buy and install the best car audio speakers and amplifiers money can buy, but if it’s all being pushed through a crummy, basic stock head unit, it’s like taking two steps forward and one step back. You’re still limited to the sound quality and capability of your source. Technically speaking, you could install something like JL Audio’s Cleansweep processor and keep the stock head unit. However, it’s really not the same as an aftermarket head unit. That’s just cleaning up and leveling out what’s already there. The Cleansweep is not really capable of improving detail and resolution. That still comes down to your head unit’s digital to analog convertor.
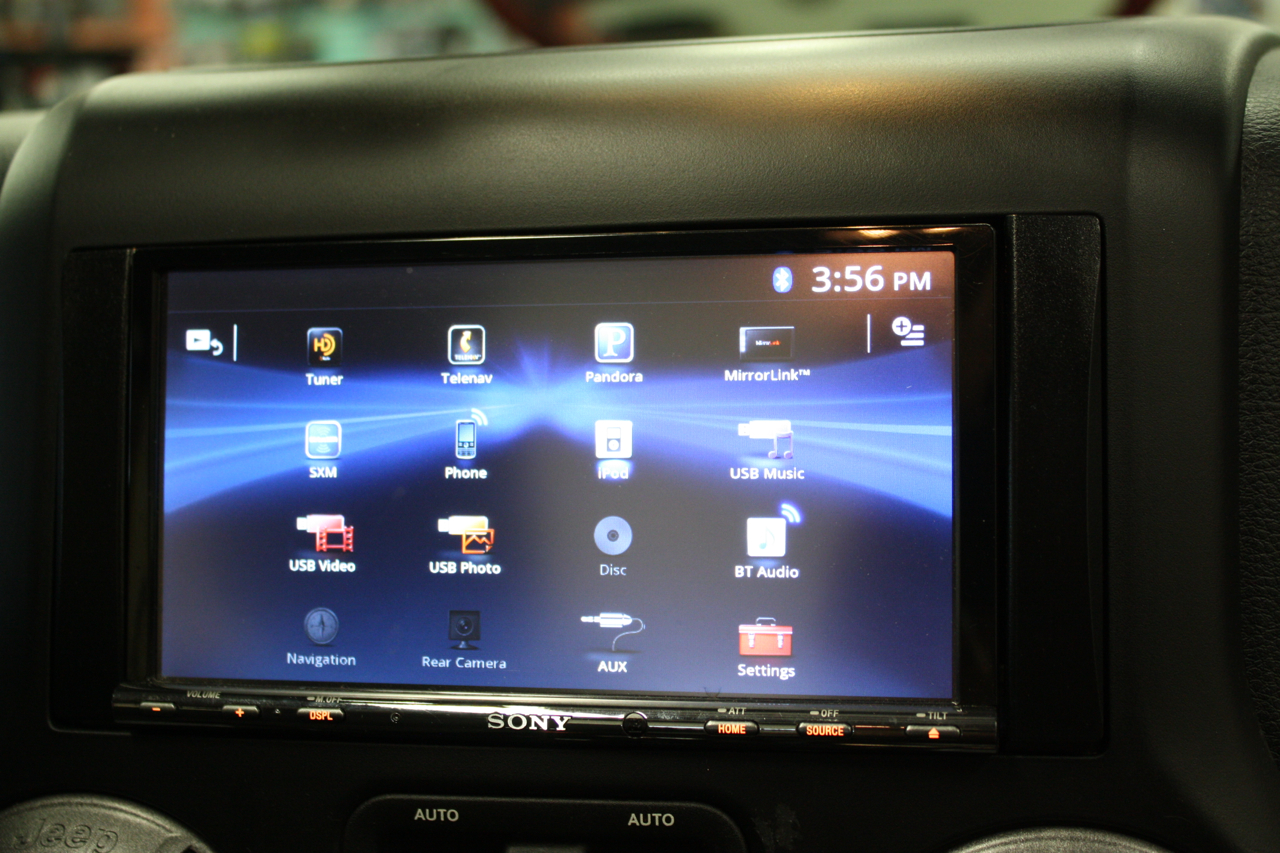
Desirable features like detail, richness and vibrancy come across in the quality of your head unit’s digital to analog convertor. Because of this, I highly recommend replacing the stock head unit. If you have the budget, I recommend you go for a nice double din touch screen head unit.
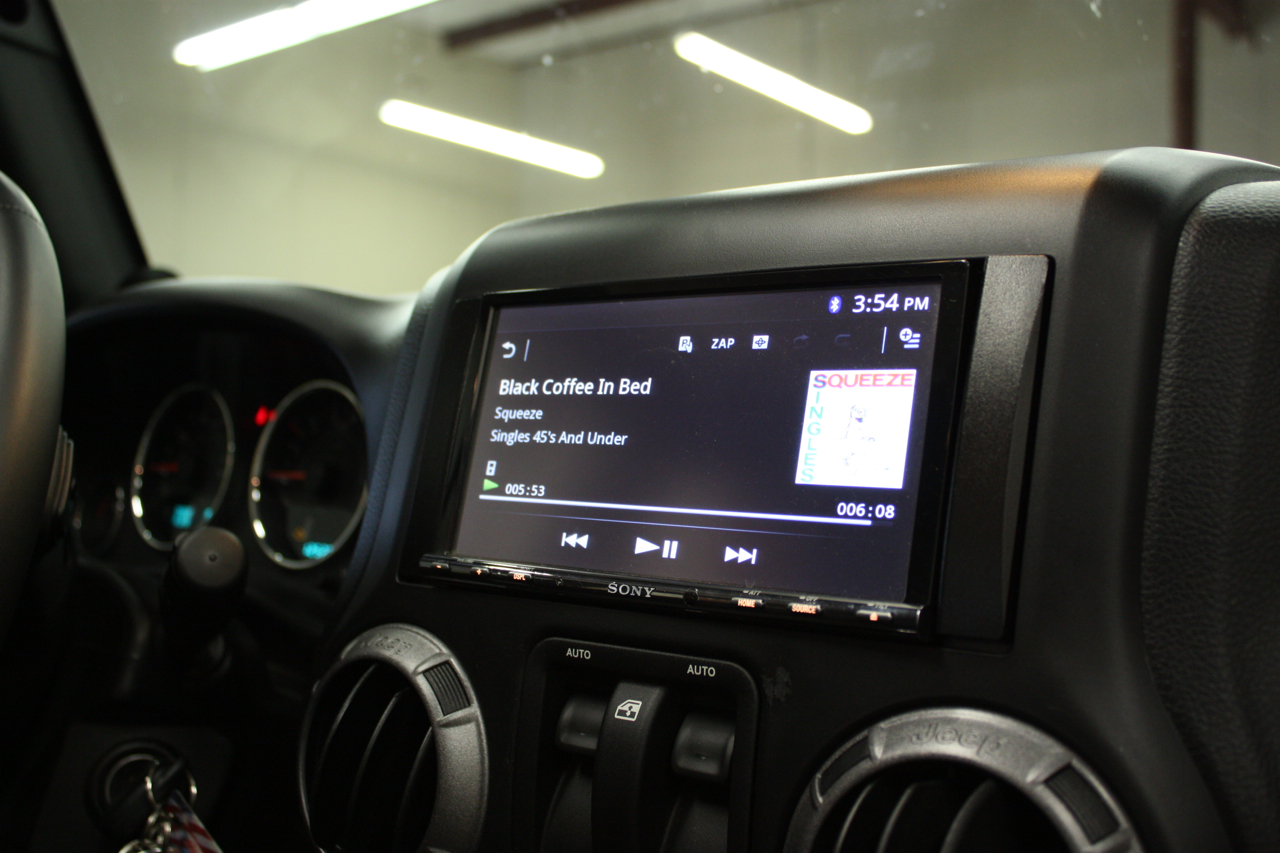
Double Din Sony in my Jeep Wrangler
Having the large touch screen just makes it so much easier to access and search all your music sources. Connect an iPod and search by artist, playlist, song title, etc. Stream Pandora from your phone and search by channel and category.
Whether you decide to go for a single din or double din head unit, you need to be aware of some key features that will be beneficial to your Jeep Wrangler stereo upgrade. When shopping for head units, look for features like these:
3 high voltage RCA preouts 4-5 volts (the higher the sensitivity here, the more kick and efficiency you will get out of your amplifier)
Bluetooth (seriously, everyone should have this feature by now. It’ so convenient and in some states legally required for making and receiving calls. Android users – this feature will also allow you to stream your music pre-amp level which is better sound quality than through a head phone jack connection)
USB (best sound quality for iPod or iPhone. In general, try to avoid connecting any device via headphone jack. When you connect via the head phone jack, this uses the amplifier in the device, as well as the amplifier in your stereo – so it’s like amplifying an amplifier – not the cleanest way to listen to your tunes)
Steering Wheel Control Capability (most Jeep Wranglers stereos have this and it’s a really nice feature to retain – consider PAC Audios RP4-CH11 to make your installation easier)
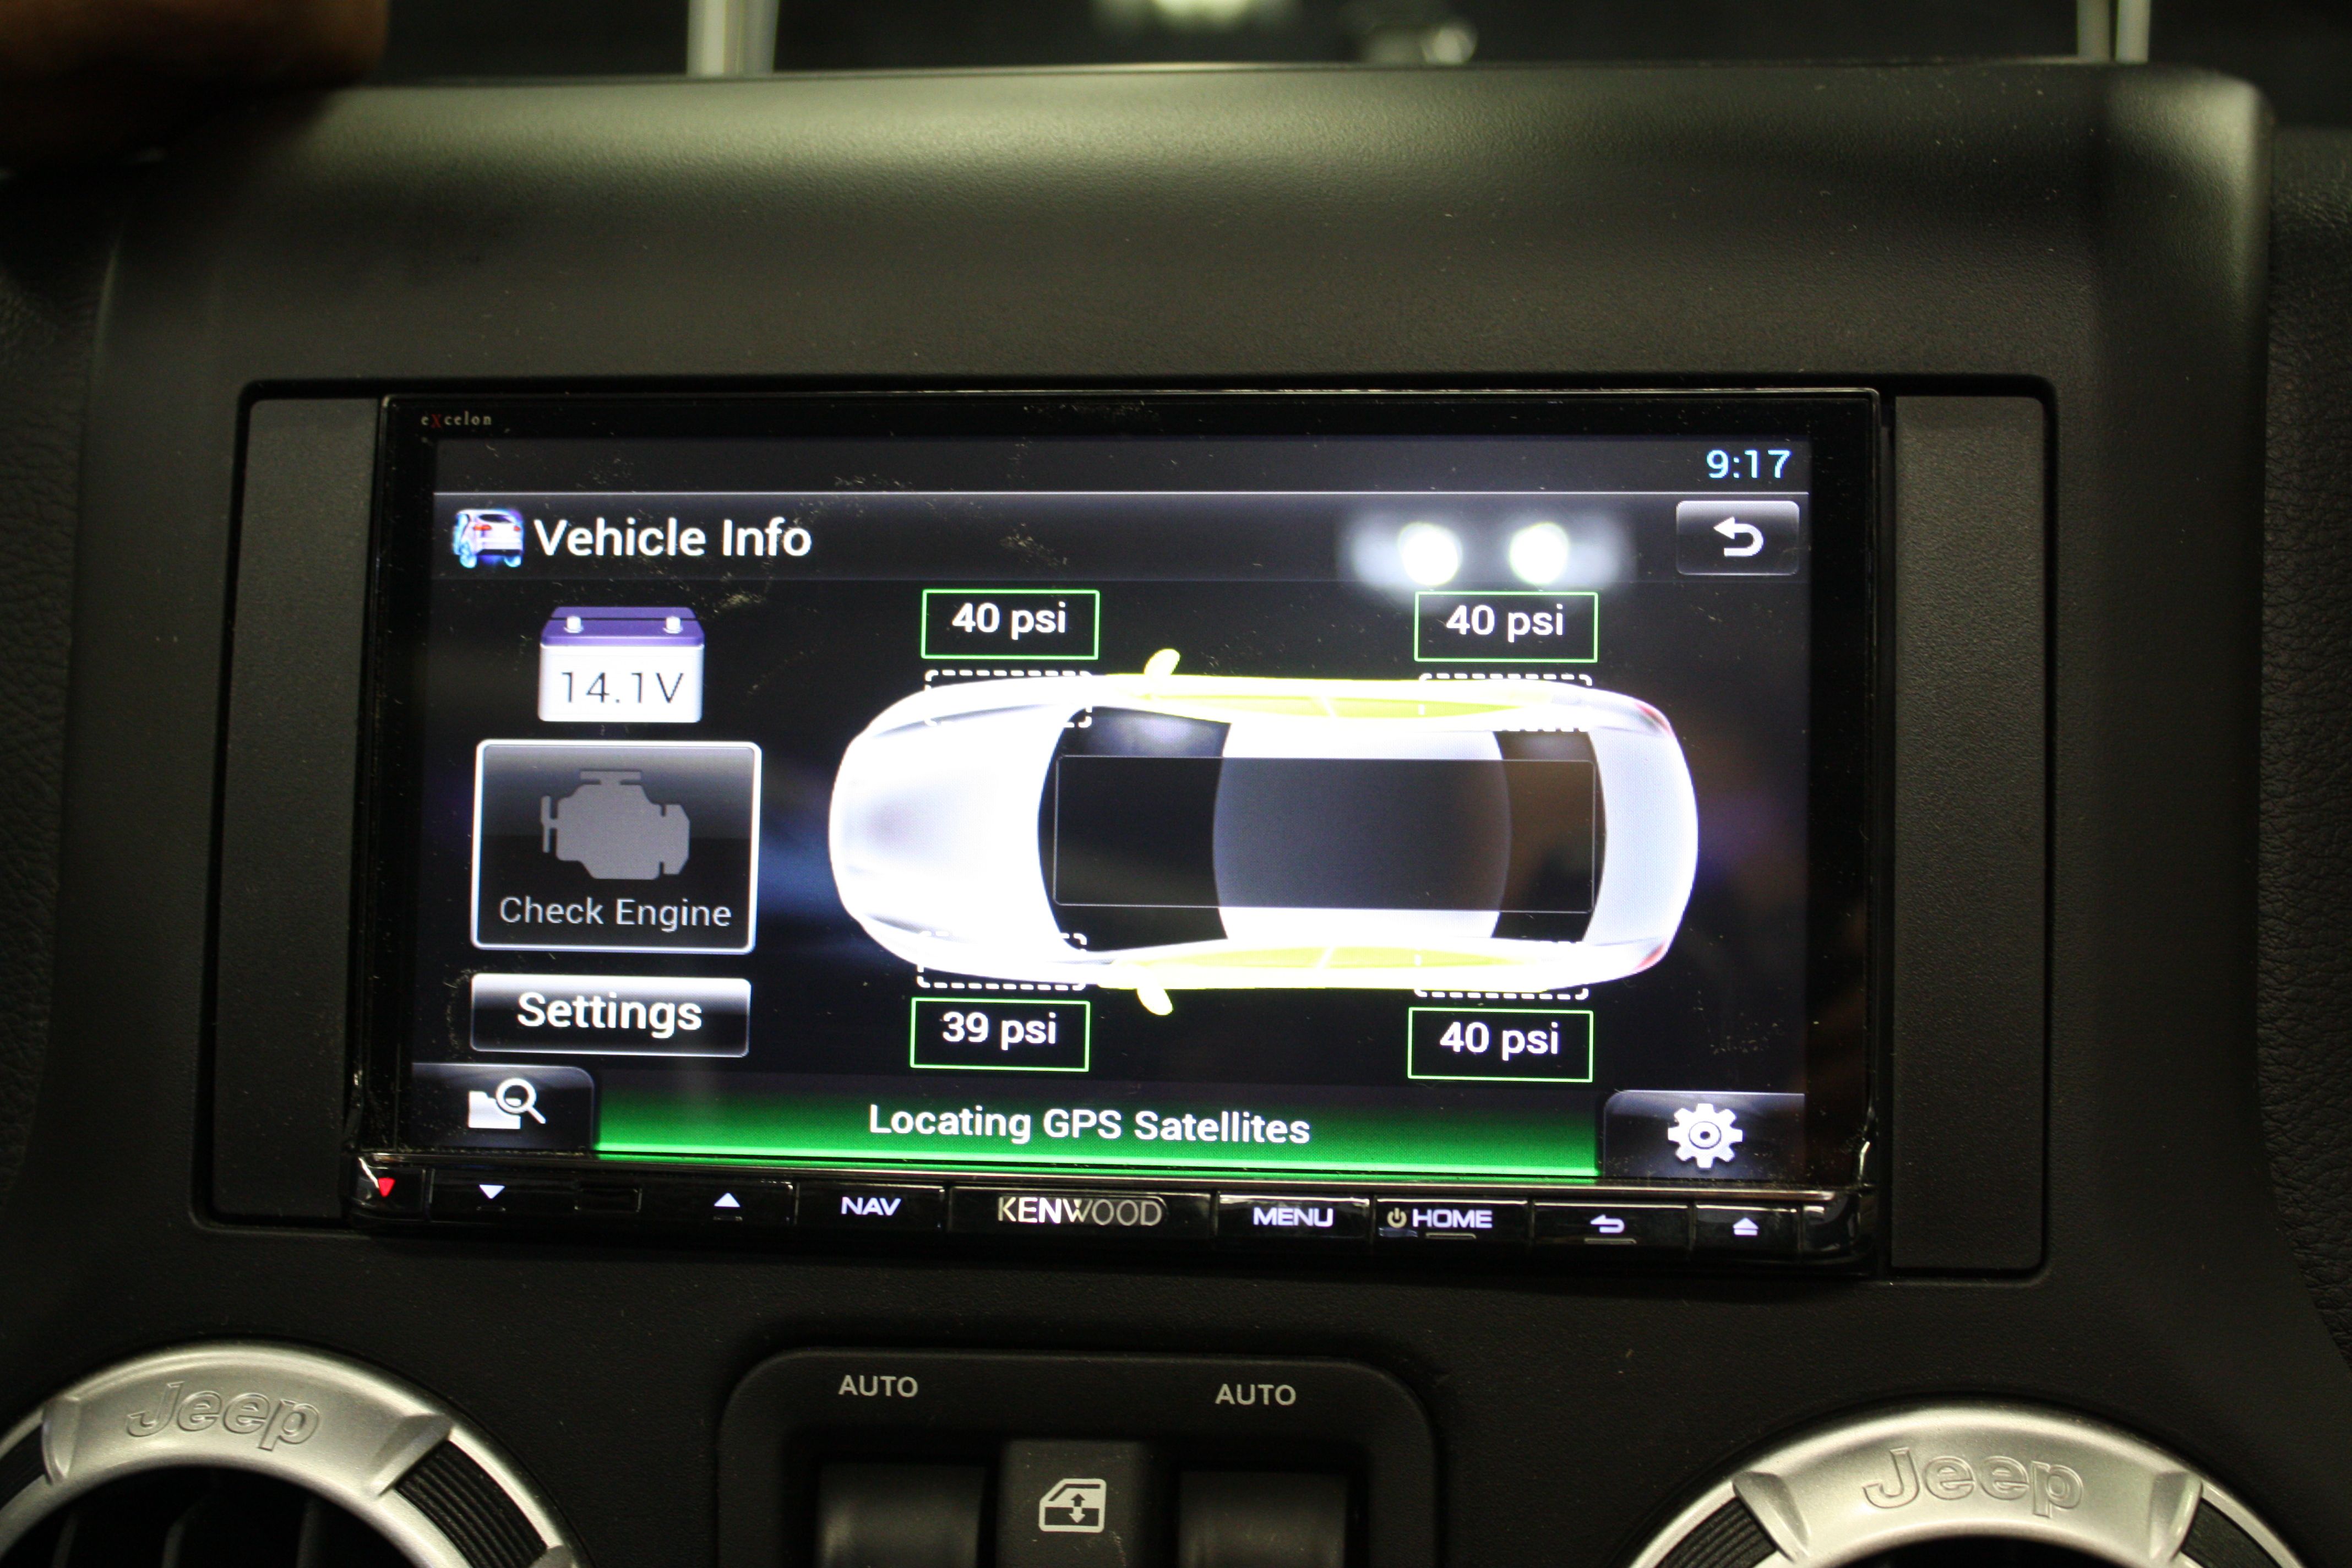
Jeep Wrangler owners should consider the new Alpine X009-WRA which is the biggest, baddest and coolest double din head unit I think you’ll ever see for a Jeep Wrangler. However, it isn’t cheap so if the cost of this head unit is beyond your budget, you can check out this post for help selecting the best double din head unit. Or if you’re interested in a navigation double din stereo, check out this post.
Okay, so we’ve addressed the subwoofer, the amplifier and we’ve addressed your source for your Jeep Wrangler stereo upgrade. Now let’s talk about speakers. The stock Jeep Wrangler stereo system was redesigned in 2007. This redesign eliminated the previous standard issue front 4″x6″ speaker housing. We can now accommodate a standard 6.5″ component system.
I can has tweeters?
Thanks to the assistance of one of Alpine’s engineers, who worked with Jeep on this redesign, Wrangler owners now have standard sized speakers front and rear.
Jeep Front Speakers – Don’t believe Crutchfield, you can fit a 6.5″ there no problem.
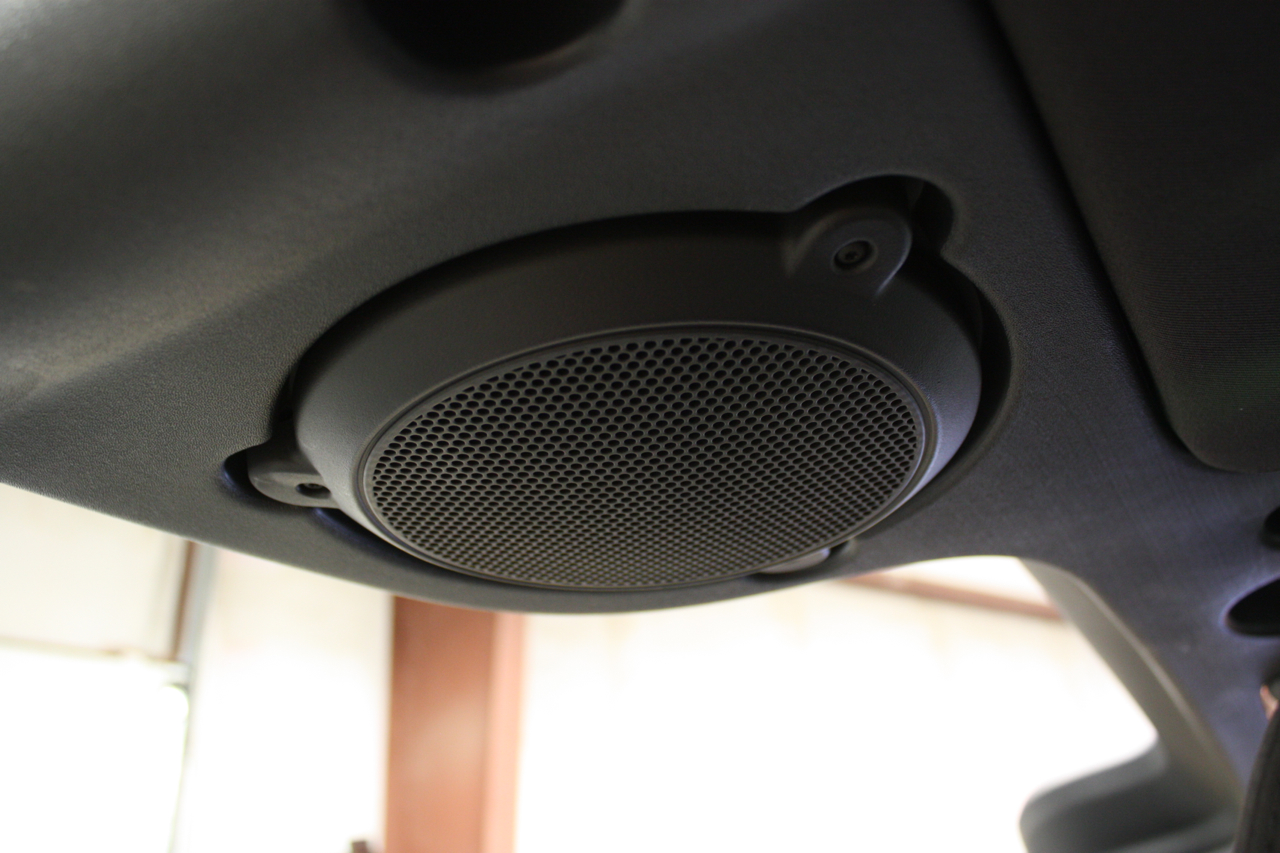
The rear sound bar accommodates 6.5″ coaxial speakers.
Jeep Rear 6.5″ Coaxial Speakers
Previous model Jeeps were very limited in speaker size and thus potential output – it’s not exactly easy to find a good quality, high power handling 4″ x 6″ speaker. Luckily for 2007 and up Jeep Wrangler owners, it’s pretty easy to find good quality, high power handling 6.5″ speakers.
Pick the best of the best
When it comes to purchasing car stereo equipment for your Jeep Wrangler stereo upgrade, I always recommend to cherry pick among brands. Alpine tends to excel in those PDX series amps – they’re the best sounding, high powered, compact amplifiers I’ve heard in the past 14 years. JL Audio tends to excel in their XD series amplifiers and their American made subwoofers and Stealthbox enclosures.
Every company excels in a couple areas. It varies from brand to brand and price point to price point and that also changes from year to year. However, when it comes to speakers, I recommend choosing a company that specializes in speakers.
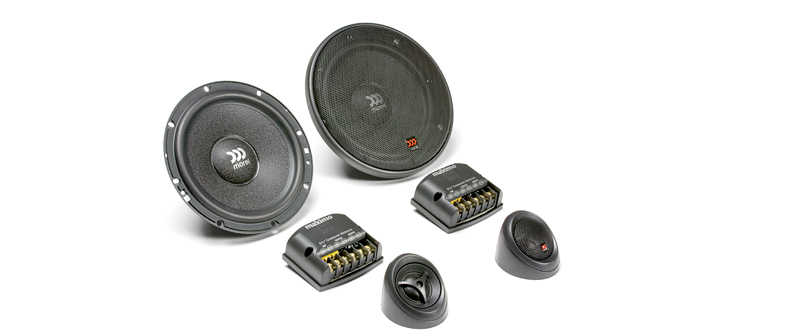
Morel is one such company, they excel in speakers. That is all they do. From $100 speakers to $10,000 speakers and everything in between. So for speakers in your Jeep Wrangler stereo upgrade, I recommend Morel.
Morel has a few different series speakers in their line up and I will describe the pros and con’s of each.
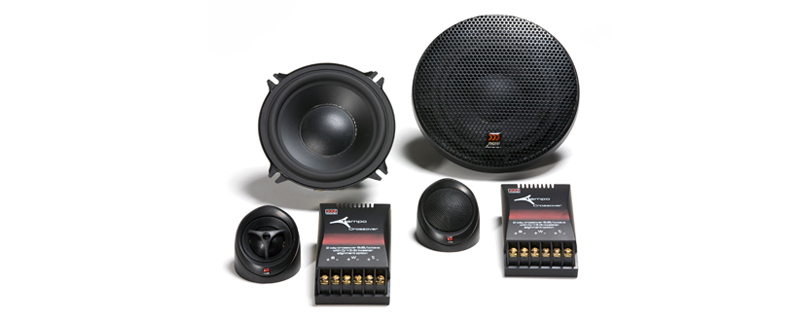
Morel Maximo Series – Entry level
Morel Maximo Series ranging from 80 – 90 watts RMS
The Morel Maximo series are considered entry level, but they’re an excellent value and perform well against other entry level brand speakers. The tweeter is very detailed, yet still smooth and the mid range is a clear improvement over stock. These speakers are pretty efficient and will perform with limited power output. However they can also handle a decent amount of power and thus perform even better with proper amplification. In the front, you could do the Maximo6 and in the rear, the Maximo6C. The mid range is not as clean as what you will find in the next level up from the Tempo series. However, you will still find these speakers give you a night and day difference in performance and quality over stock.
Morel Tempo Series – Mid level
Morel Tempo Series speakers, handle between 110 – 120 watts RMS
These are some of my favorite speakers that we sell in our shop. The tweeter is very smooth and mellow, and the mid range is very warm, clean and punchy. However, these babies really need an amplifier to perform and achieve their full potential. Capable of 110 – 120 watts RMS, that Alpine PDXV9 will do them well. In the front, you could use the Tempo6 components and in the rears, the Tempo6c coaxes. If you prefer more detail in your tweeter, consider the Hybrid series.
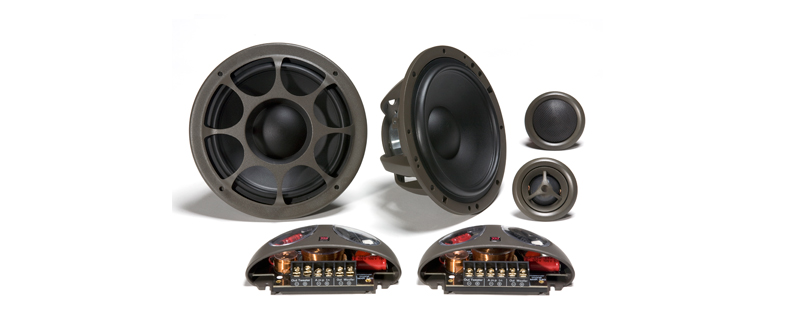
Morel Hybrid Series – High end
Morel Hybrid series speakers are very smooth, detailed, accurate and warm. Handling between 100 – 140 watts RMS.
The Morel Hybrid series speakers are really quite awesome. The tweeter is very open and airy, yet incredibly smooth and delicate to the ears. The mid range is clean, accurate, warm and natural. This is what we have in our own Jeep Wrangler, but honestly there’s no way I can appreciate the full quality of these when the top is off. Here in Connecticut, we typically have the top off for only 3-4 months out of the year, so we definitely have plenty of time during the rest of the year to appreciate their performance and quality. In the front, you could use the Hybrid 602’s and in the rear, the Hybrid Integra 602’s.
Ultimate performance and quality does come at a premium price. For practicality purposes, many of my customers choose the Tempo series or Maximo series and are quite happy with their choice. Keep in mind, speakers are just one piece of the puzzle in your Jeep Wrangler stereo upgrade.
Installation gear for your Jeep Wrangler stereo upgrade
Whenever you install an aftermarket amplifier in a vehicle, you will need quality power and ground cable, a fuse, fuse holder, speaker wire and RCA cables. Always choose 100 percent oxygen free copper. We use Stinger wire and Stinger RCA cables in our own shop. If you’re installing the amp under the front passenger seat, you can get away with 6 foot RCA’s.
Metra and Best Kits both make a double din dash kit for this car, however we prefer the fit and finish of the Best Kits BKCDK642 kit.
Depending on whether or not your car has steering wheel controls, you will probably want to buy a PAC Audio interface harness. The C2R-CHY4 is fine if you do not have steering wheel controls (provides retained accessory power, turns on any stock amp if equipped and if being retained) or go for the combo piece RP4-CH11 if you do have steering wheel controls.
Sound deadening material – Dynamat definitely helps to cut down on rattles and reverberations in all vehicles. I highly recommend it to any customer who is upgrading their stereo. In the Wrangler, I would recommend a Trunk kit and a Wedge pack. Definitely do the back cargo area and sound bar area. It really does improve sound quality, cut down on rattles and road noise. Overall, it helps to give you a cleaner bass and mid range response.
Protecting your investment – get an OEM style alarm for your Jeep Wrangler
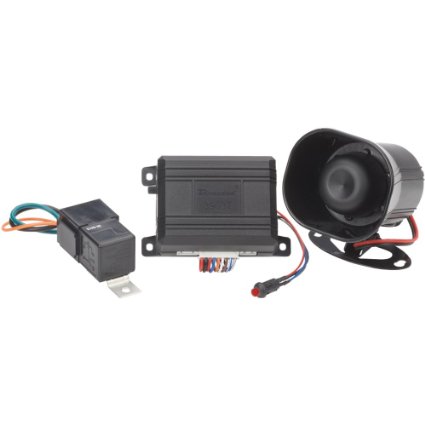
These vehicles are easy targets for theft so you want to think about protecting what you’ve invested in your Jeep Wrangler stereo upgrade. Consider the add on alarm available from DEI aka Directed Electronics (parent company of Viper).
3903T Jeep Add on Alarm System
The 3903T is an aftermarket alarm designed to work with your factory Jeep key. It adds basic alarm features such as a shock sensor, starter kill relay and it also comes with a standard outboard 6 tone siren. Besides the 3903T, Jeep owners should really add the 508D proximity sensor.
When properly installed, the 508D creates a radar bubble around the vehicle. The sensor can be installed under the center console. You really want it towards the center of the vehicle for best performance. If that field is disturbed – say by someone reaching into the open vehicle – the alarm goes off. It’s a great theft deterrent.
It’s very important to have this type of product professionally installed. You need to adjust the proximity field to the point where it is effective and not over sensitive. It’s easy to over do it. If the radar bubble is too large, the alarm will go off anytime anyone walks by your car in a parking lot.
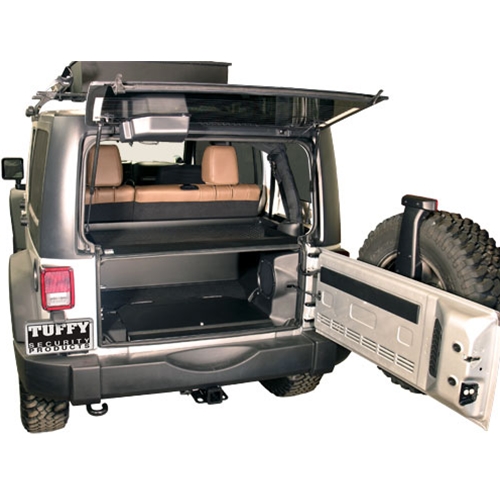
Here is another cool product to consider from Tuffy. Keep in mind, it does require modification to the JL Audio Stealthbox Unlimited enclosure. That enclosure sits higher than the Tuffy security deck is designed for (speaking from experience here).
Protect your stuff in your Jeep Wrangler when the top is off
In my own 2 door Wrangler, we’ve removed the backseat and have fabricated a custom down firing subwoofer enclosure mounted where the backseat was. Next Spring, we will be installing the Tuffy Security Deck. Note, if you have the 2 door like we do with backseat removed, you will want to order the 4 door model security deck to cover the full cargo area.
Jeep Wrangler Stereo Upgrade Conclusion
As you can see, it’s not that difficult or complicated to upgrade the stereo in a Jeep Wrangler. We do it all the time at our shop in Brookfield, CT.
If you have to build your system in phases, I would recommend starting with the subwoofer. Add in the frequency range that you’re missing. Next step would be an aftermarket head unit. This gives you more output and control over the stock speakers. Most aftermarket head units have crossovers built in. This feature will allow you to filter out the bass that would normally go to the stock speakers. This will allow them to play only mid range and treble frequencies while the subwoofer plays all the bass. After that, I recommend upgrading your speakers and lastly, make sure you amplify those speakers.
The end result? Investing in these quality car audio products, and having them properly installed and tuned, will do wonders for your Jeep Wrangler driving experience. When you upgrade the stereo in your Jeep Wrangler, you’ll be able to crank it up and actually hear and enjoy the stereo system.
Just a quick post to let you know I recently switched to Bluehost from Yahoo. The site speed was atrocious and customer service non existent at Yahoo. With CES 2015 fast approaching, I wanted my readers to have the best experience on my site.
One thing that has happened is all posts/articles have slightly different names now and I have done everything I can do to repair broken links and replace images, but in case I missed any, please let me know!
The end result is the site should load much quicker and run much faster. For anyone considering making the move, Bluehost is awesome. Amazing customer service and helped me through the entire process with little to no down time.
Thank you for your understanding and assistance in this matter.
Nearly every day in my own shop I help customers upgrade to a Bluetooth car stereo. Most consumers are simply looking to upgrade their basic stock stereo in order to add the latest features such as Bluetooth, USB and Aux. For this type of consumer, I typically recommend the Pioneer DEH-X6700BT or the Alpine CDE-143BT. Both are easy to use and feature Bluetooth handsfree, Bluetooth audio streaming, front USB, front Aux port, single CD and regular AM/FM tuner.
The Pioneer offers multicolor illumination. This is a really nice option if you are looking to match your interior dash lights or customize the look of the stereo to suit your taste. The Pioneer will also support a large contact list. I recently had a customer with over 1000 contacts in their phone. We tried pairing his phone to several different models. The Pioneer didn’t flinch. The Alpine on the other hand, behaved a bit quirky. After contacting Alpine technical support, I was advised this can happen with a rather large contact list. I would say anything over 300 is considered large.
The Alpine does have some appeal over Pioneer for certain customers. It has a slightly brighter dot matrix display which may make it easier to see in bright sun and glare. However, it lacks the multicolor illumination feature. The button color will always remain blue. Both models are quite reliable and quite popular choices; both are Car Stereo Chick approved.
Best Bluetooth car stereo for system expansion
If you’re looking to build a system in your car, then you will want to step up to something like either the Kenwood eXcelon KDC-X798 or KDC-X998. Both part of the eXcelon family of products, these Bluetooth car stereos feature Kenwood’s superior digital to analog convertor. Both the KDC-X798 and KDC-X998 feature 3 RCA preouts rated at 4 volts. They also both offer multicolor illumination, built in crossovers and dual USB ports (front and rear USB).
The KDC-X998 features advanced equalization control, however it may be a bit more difficult to use for some consumers than the KDC-X798. For an in depth review on both, check out my post here.
Best Single Din Head Units for Bluetooth, USB/Aux
Features
Pioneer DEX-X6700BTVery easy to use. Will support a large contact list. This is a top seller in our shop as it comes with a lot of features for the money. This model features Bluetooth handsfree calling, Bluetooth audio streaming, front USB/Aux, multicolor illumination and voice dial capability.
Alpine CDE-143BTAnother very easy to use single din CD deck with Bluetooth for handsfree, Bluetooth audio streaming, front USB/Aux and voice dial feature. Although it lacks the multicolor feature, the actual dot matrix display is sharper and easier to read in sunlight/glare conditions.
Bluetooth Handsfree with Voice Dial Feature
Yes
Yes
Bluetooth Audio Streaming
Yes
Yes
Front USB
Yes
Yes
Rear USB
No
No
Front Aux
Yes
Yes
Steering Wheel Control Ready
Yes
Yes
Multicolor Illumination
Yes
No
Satellite Radio Ready
No
No
RCA Preouts
Yes, but only 2, rated at 2 volts
Yes, but only 2, rated at 2 volts
EQ
3 Band
3 Band
Crossover
HPF and LPF, both adjustable between 50 Hz - 200 Hz
HPF and LPF, both adjustable between 60 Hz-160 Hz
Ease of Use Rating
10/10
10/10
Sound Quality Rating
7/10
7/10
Equalization Control and Tuning Capability
6/10
6/10
Best Single Din Head Units for System Expansion
Features
Kenwood KDC-X998Advanced equalization control featuring 13 band EQ, digital time alignment, individual channel gain adjustment, option to run tweeter, mid and sub rather than front, rear and sub with advanced crossover adjustments, 4 Volt preouts, 24 bit DAC, multicolor illumination and more.
Kenwood KDC-X798Ease of use and sound quality are at the heart of the KDC-X798. Although this model lacks advanced equalization control, it still has 3 preouts rated at 4 Volt, built in crossovers, bass/mid/treble adjustments, 24 Bit DAC, multicolor illumination and radio preset buttons.
Bluetooth Handsfree with Voice Dial Feature
Yes
Yes
Bluetooth Handsfree Audio Streaming
Yes
Yes
Front USB
Yes
Yes
Rear USB
Yes
Yes
Front Aux
Yes
Yes
Steering Wheel Control Ready
Yes
Yes
Multicolor Illumination
Yes
Yes
Satellite Radio Ready
Yes
Yes
RCA Preouts
3 Preouts, 4 Volt
3 Preouts, 4 Volt
EQ
13 Band EQ with digital time alignment.
3 Band EQ
Crossover
Highly adjustable, Front, Rear and Sub 30 Hz - 250 Hz OR Tweeter (1-12.5 kHz), Mid and Sub along with adjustable slope 6-24 dB/Oct
Yes, but only adjustable 100 - 150 Hz
Ease of Use Rating
6/10
10/10
Sound Quality
10/10
9/10
Equalization Control and Tuning Capability
10/10
6/10
Shopping tips to find the Bluetooth car stereo
There are a lot of different Bluetooth car stereos out there, don’t become overwhelmed by the choices and selection. Usually the biggest difference between models are subtle features. The differences between the entry level Pioneer and the top of the line Kenwood are mainly the expandable features. Both have USB, Bluetooth and multicolor illumination, but the Pioneer is geared more towards ease of use and adding the main features lacking in most basic stock stereos:
Bluetooth
Bluetooth Audio Streaming
USB
Aux
When you go up from there, you add in additional features that you may or may not need or use. That’s why I recommend if you plan on building a nice little system, even if it’s just adding one amplifier and subwoofer, to step it up to a model that will support that expansion. Bottom line? Remember these two rules when shopping for a Bluetooth car stereo:
Don’t pay for features that you don’t need or will never use
Don’t skimp on the features that will benefit you in the future (like if you want to add an amp and sub eventually, plan ahead, buy a deck that will support that feature now)
I hope this post will make your search for a Bluetooth car stereo much easier. Thanks for reading!
If you are shopping for a double din navigation, the Pioneer AVIC-5000NEX is a great option. It is the best selling navigation in our shop, which is not surprising considering all that it has to offer. The AVIC-5000NEX is a great value and it truly performs quite well in several different categories.
I will be doing a series of product reviews which focus on several key aspects that should be considered in any double din navigation purchase.
For an entry level navigation system, the Pioneer AVIC-5000NEX provides more than entry level features, including:
Navigation with 7.9 Million points of interest with text to speech (“turn right onto Main Street”) covering US, Alaska, Hawaii, Canada and Puerto Rico
Bluetooth handsfree for calling and audio streaming, featuring voice control function
iPod search functionality via included USB pigtail
Pandora control for iPhone users through USB connection or via Bluetooth for Android
13 Band EQ with 3 RCA preouts, 4 Volt
SiriusXM Ready
Dual Rear View Camera Capability (Front Camera and Dedicated Reverse Camera)
Rear Aux in
Steering Wheel Control Ready (update will be available to add iDatalink Maestro control)
Dual Zone capability (great feature for parents! With a rear headrest monitor or flip down DVD monitor that supports IR headphones, you can load a DVD in the Pioneer AVIC-5000NEX, press play and the kids can watch on rear monitor and listen using wireless headphones while you can listen to another source on front speakers)
AppRadio Mode for iPhone (additional parts required)
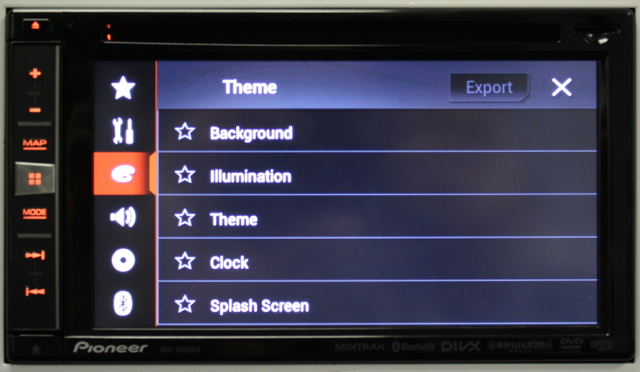
Various screen adjustments for illumination options, background images, brightness, contrast and adjust
Ease of use
The overall layout of the Pioneer AVIC-5000NEX is very intuitive and user friendly. There is a dedicated home button on the left of the stereo. Users can simply tap that and quickly make a selection whether they’re looking play their iPod, make a phone call, access Navigation or launch an app (will support iPhone when Carplay update is released, or through AppRadio Mode feature which requires additional parts and this feature will only support iPhone – Android users would need to step up to the AVIC-6000NEX which features an HDMI input and Appradio capability for Android operating systems – limitations apply).
Pioneer AVIC-5000NEX Home Screen
There is a nice big clock, which is awesome, I don’t know why it’s taken radio manufacturers so long to add this sought after feature. To the right of the clock is the settings icon which brings up another easy to navigate menu.
Appearance Menu AVIC-5000NEX
Notice to the left of the screen the easily recognizable icons representing the various types of settings and adjustments available. The artist pallet represents the various theme and display adjustments available. The wrench icon allows you to adjust system settings. The speaker icon brings you into the audio menu. The Disc icon brings up various DVD options and the Bluetooth icon into Bluetooth settings – pretty self explanatory right?
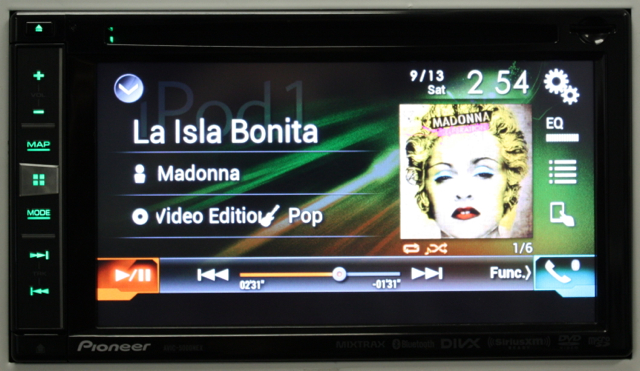
Searching for music on your iPod is a breeze too. Check it out. This is the main screen once you’ve selected iPod as a source. You can still easily access the phone menu, audio menu, system settings etc. all right from this screen. The layout is quite functional.
Album Art View iPod AVIC-5000NEX
From this screen, you can simply tap the list icon to the right to bring up the following search menu. Alternatively, if you prefer to search from the device, there is a “hands on” icon right below the list icon that unlocks the iPod and allows you to search from the device itself.
iPod Search AVIC-5000NEX
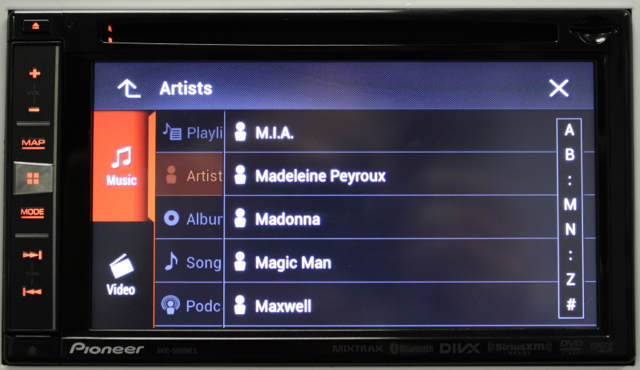
The list icon loads quickly and efficiently. From here simply select the type of search you’d like to perform. I selected an artist search. Notice there is also an alphabet search option to the right of the list. In this case, I selected “M” and jumped straight down the list to artists beginning with “M”.
Artist Search AVIC-5000NEX
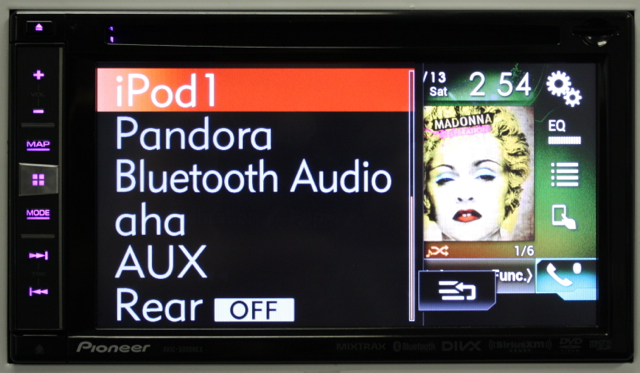
The thing I love about this unit is there is no one way to do anything. For example, if you want to switch sources you don’t have to go back to your home screen to do so. A quick tap of the arrow on the top left of the screen opens up a nice large source selection menu showing you what source you are currently on and other sources available. Change your mind? Tap the back button on the bottom right.
Easy Source Select AVIC-5000NEX
When it comes to ease of use and functionality, I think Pioneer has Kenwood and Alpine beat. The menu and layout of the NEX series is by far the easiest and most intuitive I have seen in a long time (and I mean a long time – I’ve been selling car stereo products for 14 years now).
Navigation Functionality
With 7.9 million points of interest, the Pioneer AVIC-5000NEX ranks higher than Alpine or Kenwood (advertised 6 million points of interest). Competitors argue it’s the way Pioneer counts their points of interest. I have nothing to validate that claim, but the argument is they may count a Gas Station with an attached Convenience Store as 4 different points of interest – Gas, Grocery, Coffee Shop, Convenience Store.
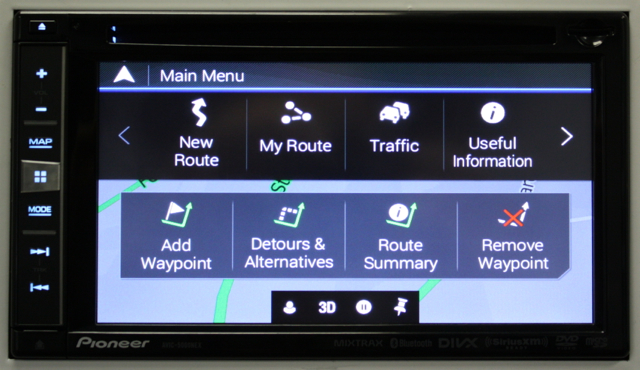
From a functionality standpoint, it is easy to use and I have not had customers complain about a lack of points of interest. Check out the main menu for the navigation where you can easily access various settings or begin destination entry.
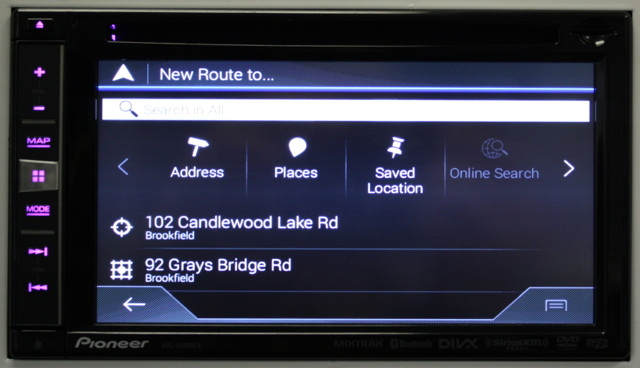
Selecting New Route brings up this menu below allowing you to either search a point of interest or simply plug in a known address.
Destination Entry AVIC-5000NEX
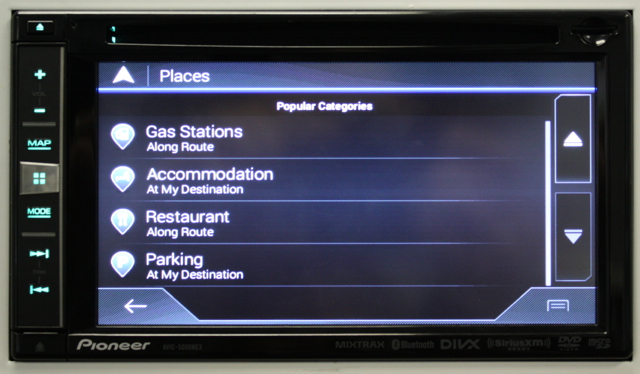
Selecting “Places” brings up the point of interest search which has a default menu of the more popular points of interest. Alternatively, you can perform a quick point of interest search by simply spelling the name of the point of interest.
Point of Interest Search AVIC-5000NEX
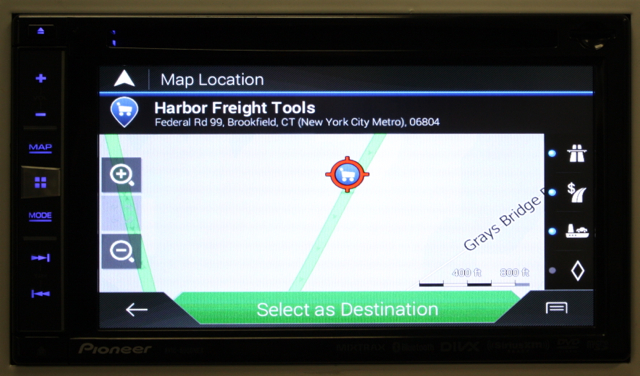
In this case, I began typing in “Harbor Freight” and the AVIC-5000NEX quickly found and narrowed down my search result with the quickness and efficiency of a google search. The processing speed on this and other NEX units is fantastic.
Navigation in Progress AVIC-5000NEX
Bluetooth functionality
In terms of Bluetooth functionality, the AVIC-5000NEX performs quite well. Call sound quality has never been an issue for any of our customers and the pairing is a simple process.
Phone Menu AVIC-5000NEX
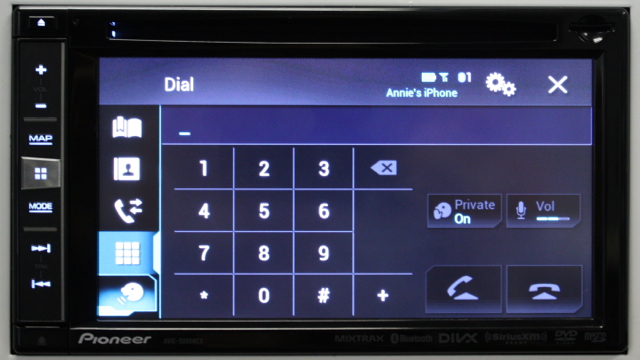
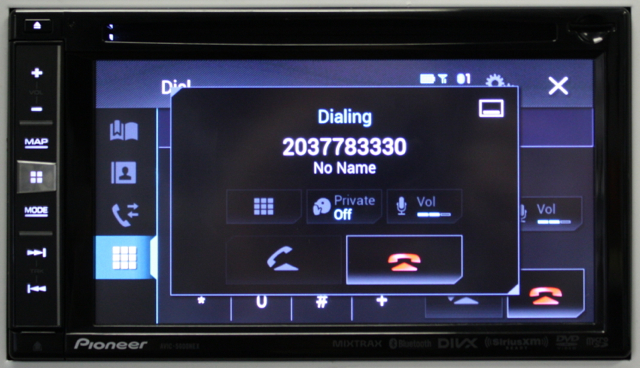
A simple press of the phone icon seen on either the source screen or home screen brings up this menu shown here. Users can select between a keypad, phone book, received/dialed calls or select the voice icon which will prompt the voice dial feature of your phone.
Call in Progress AVIC-5000NEX
Once actively in a phone call you can easily switch to the actual phone headset for privacy, adjust microphone volume or disconnect the phone. When a call comes in you see a similar menu. The audio is then muted and you hear the phone ring through the stereo speakers. At that point you can either press the left phone icon, which would be green at that point, or the red icon to reject the call.
Sound Quality
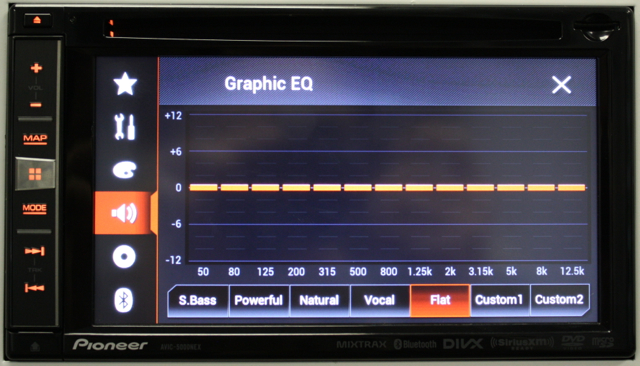
The Pioneer AVIC-5000NEX features a 13 band EQ and 3 RCA preouts rated at 4 volt. As you can see there are preset equalization options and customizable presets you can define. There is also a great time alignment feature with preset listening positions and from that same menu you can easily adjust the measurement to suit your unique vehicle and seating position. End result? You can definitely build a nice little audio system with this navigation stereo.
EQ Menu AVIC-5000NEX
Display and Appearance
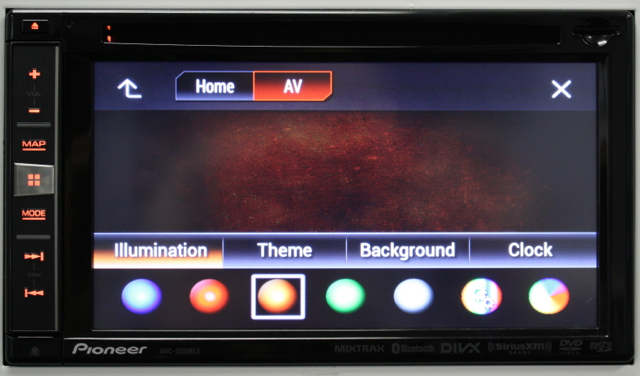
The Pioneer AVIC-5000NEX is not a plane Jane looking stereo. It’s bright, it’s colorful, but it’s also highly customizable and tweakable.
Appearance Options AVIC-5000NEX
From the appearance menu you can see that you can change the illumination of not only the buttons on the left, but the background illumination as well. For background image, there are a number of preset images and designs, however you could even load your own image. There are even 3 different settings for what type of clock to display or you can turn the clock off completely. The AVIC-5000NEX has lots of customization, lots of options, which means you can really make the display and appearance work for you.
Processing speed
This thing is responsive. I mentioned that earlier, but it’s something that really effects user experience. In this fast paced digital world filled with instant downloads and lightning fast internet, no one wants to sit around and wait for anything – including waiting for their iPod artist list to populate so they can make their music selection. With the AVIC-5000NEX you won’t have to wait, it’s definitely fast and responsive unlike other choices on the market (ah-hem, Kenwood).
Conclusion
Overall the AVIC-5000NEX is an awesome choice for anyone looking to upgrade to a double din navigation stereo. Android users interested in AppRadio Mode and simply mirroring video from their devices (video only, no control) will want to consider the AVIC-6000NEX, AVIC-7000NEX or AVIC-8000NEX all of which can support select Android devices and operating systems with additional parts. If you plan on doing that, I highly recommend you contact Pioneer directly to confirm compatibility with your device and what parts you will need. In this area their user manuals leave a lot to be desired (I plan on doing a post on that from a recent AVIC-7000NEX install paired up with a Samsung Note 3).
As for AppRadio Mode with the Pioneer AVIC-5000NEX? I would advise iPhone 5 users to simply wait for the Carplay release, it will arrive eventually and will be the most effective and seamless way to integrate apps into this stereo. iPhone 4/4s users can simply purchase a CD-IU201S cable and take advantage of the somewhat quirky AppRadio Mode feature. For me, it’s truly not a selling point. With or without Carplay or AppRadio Mode, this is a full featured double din navigation stereo that rightly shines on its own.
Car Stereo Chick Approved, the Pioneer AVIC-5000NEX Double Din Navigation