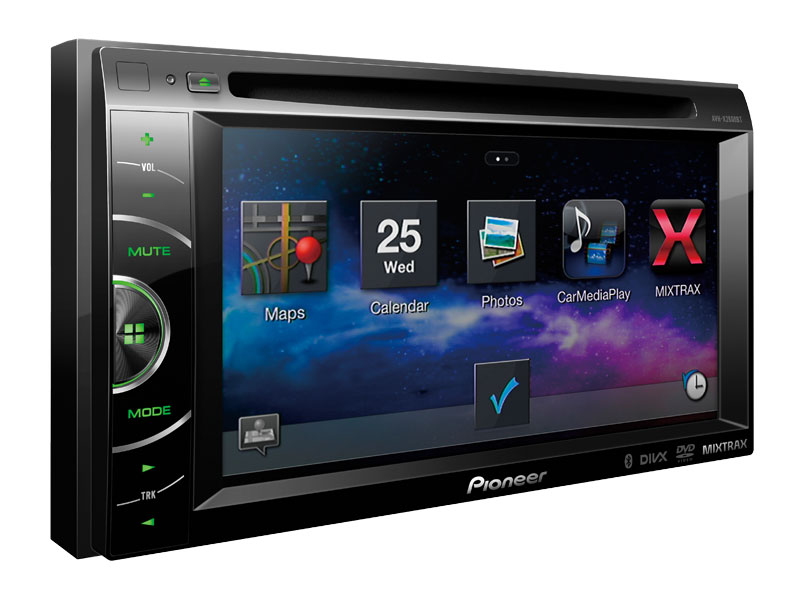
Reading through Pioneer’s facebook page, it’s quite apparent there are a lot of angry customers out there wondering if and when this Carplay software release is ever going to happen.
Who can blame them? Looking at Pioneer’s website, there have not been any updates or changes to their Carplay description which clearly states an expected firmware update to be released by Summer 2014. With the end of Summer quickly approaching, customers are becoming fed up and wondering if this feature is ever going to be released.
As an industry insider, I can sympathize with both frustrated customer and the manufacturer, who presumably has run into delays and is operating at the mercy of Apple. Regardless, I strongly believe Pioneer should say something – anything – just at least acknowledge the delay and reassure customers the release is on its way. However, legally, they may actually be unable to do so. At this point Apple may be controlling the show.
Any company who works with Apple (and wants to legally bare the Apple badge on their product) has to undergo Apple Certification which can be a long and lengthy process. If Apple is going to allow you to use their logo, they want to be certain your product holds up to the same kind of quality and standards as their own.
A few weeks ago, I spoke to a source close to Pioneer regarding Carplay. They were pretty sure the Carplay firmware update would make the Summer 2014 deadline and assured me that Pioneer was doing everything they could to make it happen. They informed me that Pioneer had flown in engineers from their corporate headquarters in Japan, and that they were diligently working side by side with Apple 7 days a week to try and meet that deadline.
Today I was told that after extensive product testing, Pioneer is all done on their end and are simply waiting for Apple to give the okay. It is rumored that Apple may be waiting until the release of their iPhone 6 which is scheduled to go on sale September 19th – which is still technically Summer 2014.
Aside from Carplay, Pioneer fans have also been waiting for a firmware release to integrate iDatalink Maestro capabilities. When pressed for an update on iDatalink Maestro integration, I learned this update was sort of placed on the back burner until all the Carplay bugs were worked out and the firmware was released.
Pioneer and Apple fans alike will just have to hang in there a little bit longer – hopefully, not too much longer.
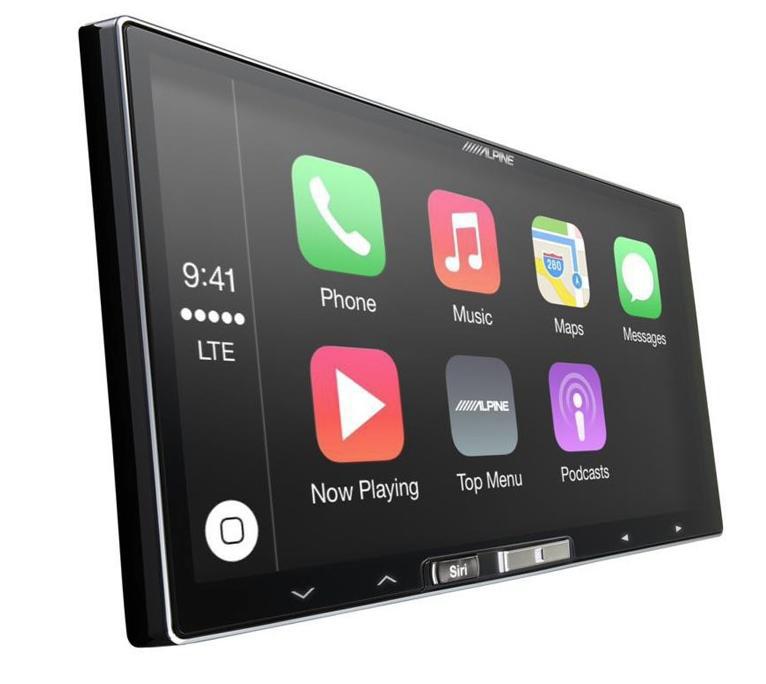
According to Alpine, this is the world’s first car stereo dedicated to the Apple CarPlay experience. The iLX-007 is a Mech-Less unit (meaning no CD mechanism) which is a growing category in this industry. This new CarPlay model from Alpine features a 7″ capacative touch screen designed to look, feel and fit just like an iPad or in your dash. CarPlay will allow iPhone users to access apps such as Maps, Spotify, iHeart Radio and Beats as well as utilize Siri to send, read and reply to text messages for you.
Like most Alpine car stereo models, this new model is Power Pack ready. Additional features include 3 preouts (2 volt), back up camera input, and aux input. This new tablet style stereo from Alpine also lists the feature “CarPlay wifi ready”. Without any further elaboration at this point from Alpine, I am assuming this means it tethers off of your iPhone for internet access allowing users to access many of the apps on screen that require internet access (much like Kenwood’s wifi enabled receivers such as the DNN991HD).
The new Alpine CarPlay head unit is mechless and thus 1/2 as deep as traditional double din stereos.
It’s possible users will be able to access an internet browser from the dash when the vehicle’s parking brake is engaged, but at this point that is my own personal speculation. We will have to wait for further information. More details are expected to become available after Apple’s press event currently scheduled for Tuesday September 9th where industry analysts expect the iPhone 6 to be announced.
This model does not feature iDatalink Maestro integration, however we may see additional models come out in the future that do support this feature (hopefully along with other desired features such as 4 Volt preouts and 9 Band EQ maybe?). This may be the first in a whole new line of CarPlay head units from Alpine. Alpine’s anticipates this model to be released and begin shipping this month. If that’s the case, you can expect to see this model in stores in early October.
Surely a simulated image of the new Alpine CarPlay head unit the iLX-007
This is kind of a trick question. The best car speakers for bass are….subwoofers! Adding a subwoofer to your car audio system is one of the easiest way to enhance your car sound system. You’ve simply got to add back in what’s missing. I’m talking about a bass. And to accurately reproduce those natural bass frequencies, you need a large surface area. Something larger than your average 6.5″ car speaker. Additionally, you’ll also need a decent amount of power to push this speaker. In other words, you’ll need an external amplifier.
Now, before you cringe at the words “amplifier” and “subwoofer” – like most of my adult/professional/non teenaged customers do when they first hear me say this – let me describe what adding a subwoofer actually does and doesn’t do. And If you think you’re too old for a subwoofer, think again. I think it’s safe to say that everyone – regardless of age, demographic, gender, etc. – can appreciate accurate and natural sound reproduction.
Adding a subwoofer enhances your car audio system by creating more natural and lively sound reproduction. You’re just adding back in what’s missing. These lower bass frequencies naturally occur when someone is playing a bass guitar, or pedaling a kick drum or strumming a cello.
Even premium 6.5″ car speakers are typically missing an audible presence of a whole range of naturally occurring frequencies. These frequencies are usually at the lower end of the spectrum, around 40 – 80 hertz, also known as bass. This lower frequency range is best reproduced by a speaker with a large surface area. Subwoofers are able to produce these frequencies with an audible presence with the assistance of an external audio amplifier.
Adding a subwoofer to your car audio system doesn’t necessarily mean you’ll be rattling your rear view mirror and trunk lid or drawing attention to your car at stop lights. You could if you wanted to, but most people are not trying show off – they’re concerned with how it sounds on the inside of the vehicle. You’re looking for an easy way to improve your car stereo system, right? Know that when installed, set up and tuned properly, that’s exactly what adding a subwoofer will do for you.
Normally in my showroom, I just demonstrate this on our sound board. It’s fun to watch a customer’s initial cringe shift to raised eyebrows, pleasant surprise and curiosity. Most people don’t realize this is what they’re missing until they hear it.
Once they hear what a subwoofer can do, the next obstacle is understanding how putting a speaker in their trunk accomplishes this. They’re next question is, “I have to put that in my trunk? I don’t understand, why can’t I just put better speakers in my car to get that kind of sound?”
Great question. Let’s explain why.
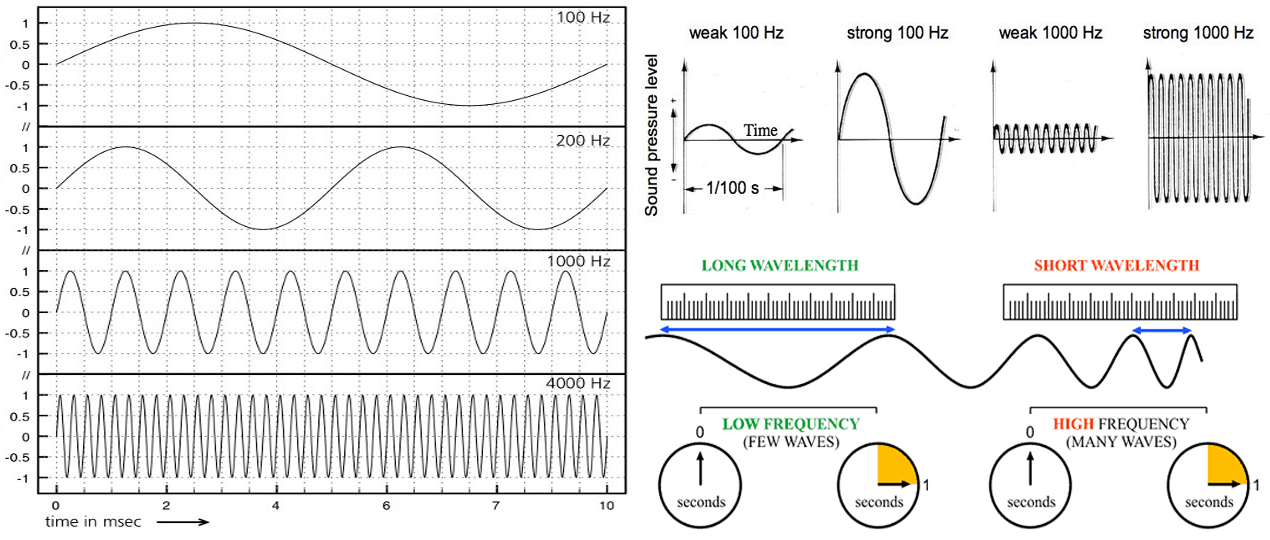
The human ear is capable of hearing frequencies in the range of 20 Hz to 20,000 Hz. What we are actually hearing are pressure waves. The lower the frequency, the longer and larger the wave length. 20 Hz is 20 cycles per second. The higher the frequency, the tighter and shorter the wave length. 20,000 Hz is 20,000 cycles per second.
Hertz or Sound Waves Explained Visually Courtesy of www.themusicespionage.co.uk
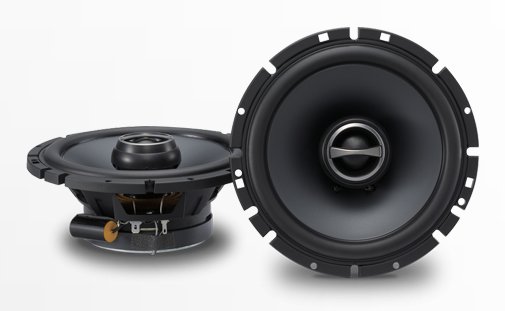
The average size of a car speaker these days is 6.5″. So let’s look at what frequencies the average 6.5″ speaker is capable of reproducing. Let’s take a basic 6.5″ coaxial speaker like this Alpine Type S speaker.
Example of Entry Level 6.5″ Coaxial Car Audio Replacement Speakers
This speaker is considered an upgrade over your average stock speakers. According to Alpine, it is capable of frequencies in the range of 70Hz – 22,000Hz. Notice it starts at 70Hz. So for arguments sake, right off the bat you are missing between 20Hz -69 Hz. Alpine may tell you the frequency range the speaker is capable of, but they don’t tell you at what sound pressure level or what volume? This will depend on the amplifier and how much power is being put to the speaker. Yet, even with the recommended 75 watts RMS power supplied, it may only be capable of reproducing 70Hz at a minimal audio level. One that may be hard to hear compared to the audio level of the other frequencies it is reproducing.
This is going to be pretty much the same story for any 6.5″ speaker. Even a set of premium Morel Hybrid 2 way speakers that are capable of frequencies as low as 50 Hz are going to be audibly lacking in this lower bass frequency range when compared to a 10″ or 12″ subwoofer. The difference is in the audible level. Especially in an automobile which generates road noise and tire noise in the 40 – 60 Hz range. You need to be able to reproduce these frequencies with enough volume to overcome things like road noise and still be noticeably present and naturally blended into the volume level of the rest of the audio system.
So how much do you need?
How much of this natural frequency range is missing? In my experience, for most vehicles, you would want to add an amp and subwoofer in the 250 – 600 watt RMS range. It will really depend on what type of car you have and what kind of space you have to work with.
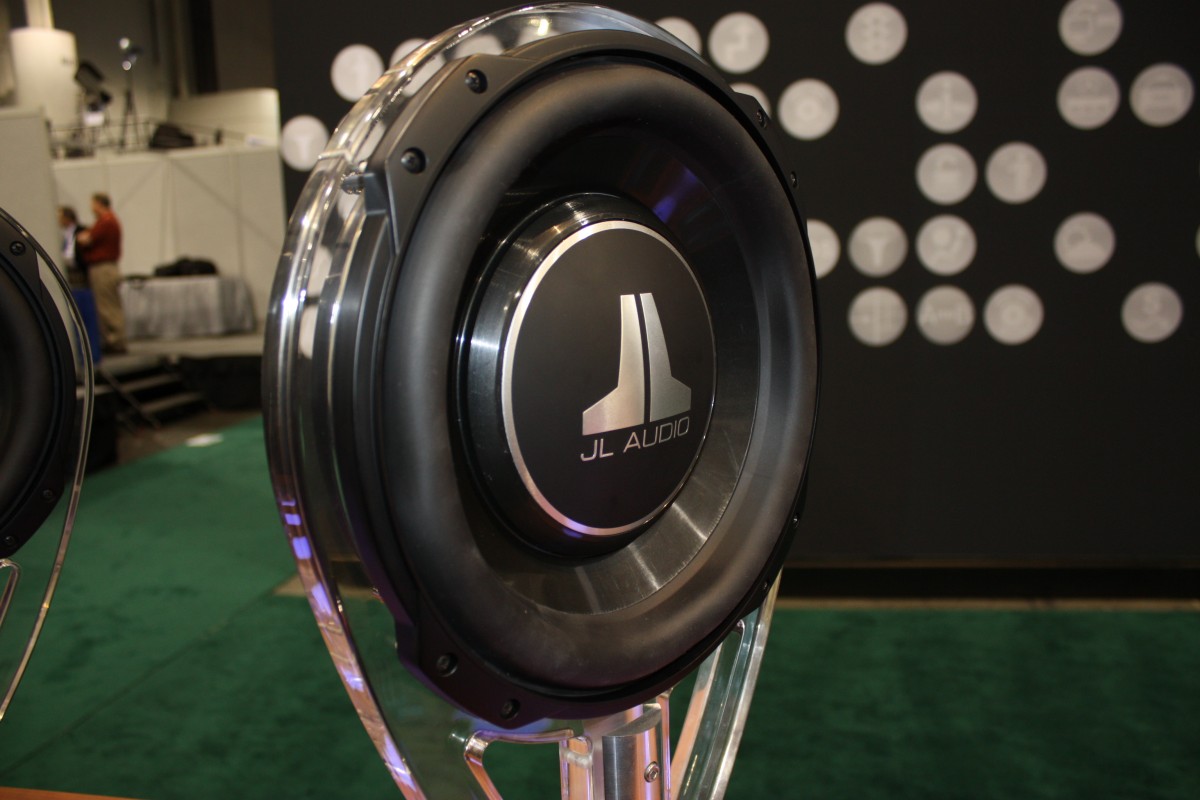
I would say that most pick up trucks and hatchbacks would benefit from a single subwoofer, either an 8″ or 10″ around 250 – 400 watt RMS. Some personal favorites are from JL Audio.
JL Audio is one of the few American car audio companies out there that:
has maintained itself as a privately held company with original co-founder Lucio Proni still heavily involved in the designing and engineering of high fidelity audio products for Home, Car, Powersports and Marine application for more than 20 years
continues to design and manufacture products in the USA
has maintained consistent focus on quality, performance and providing innovative solutions
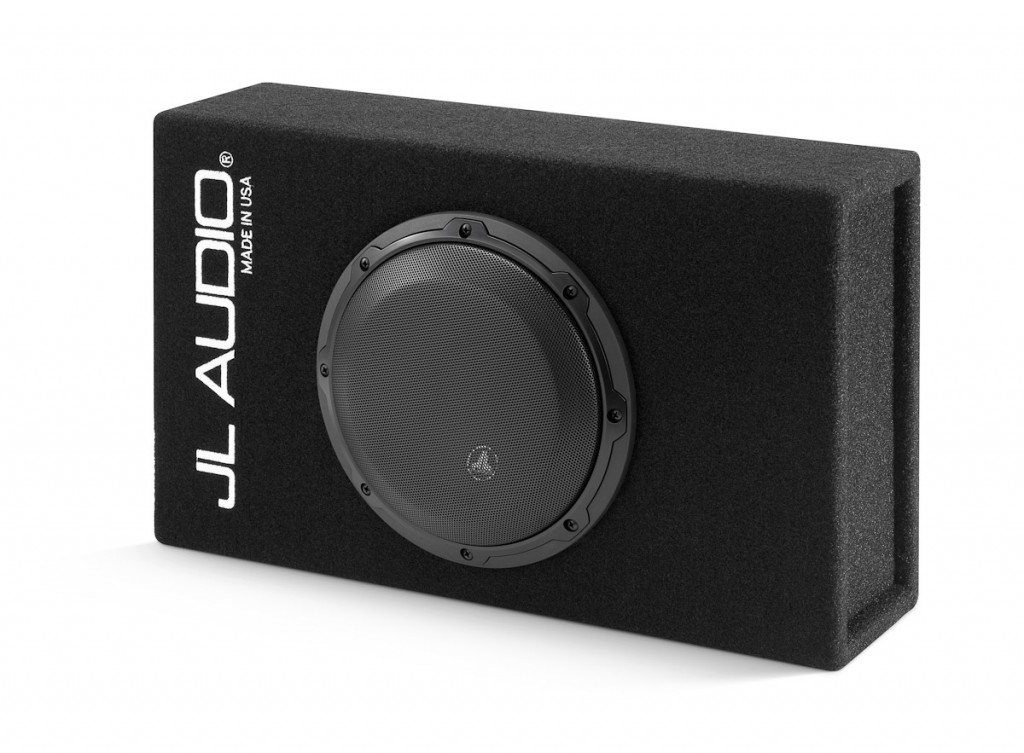
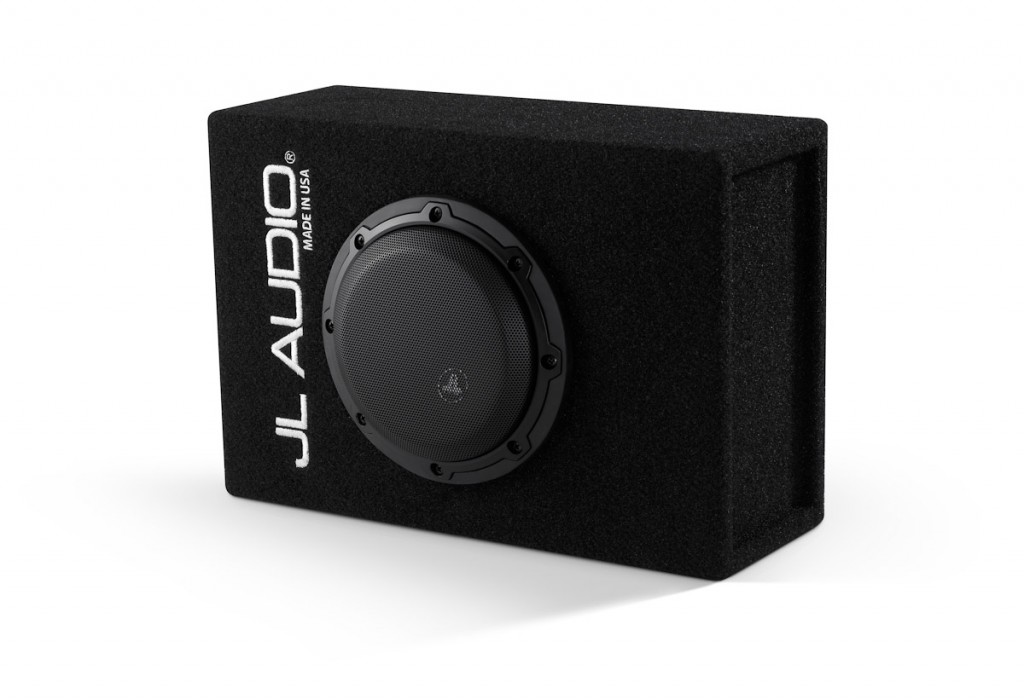
My favorite space saving, but high performing 8″ subwoofer is the 8w3 which JL offers in this great enclosure which measures in at only 18 5/8″ x 11″ x 5 1/8″.
JL Audio’s CP108LG is a great option for adding bass to a tight space
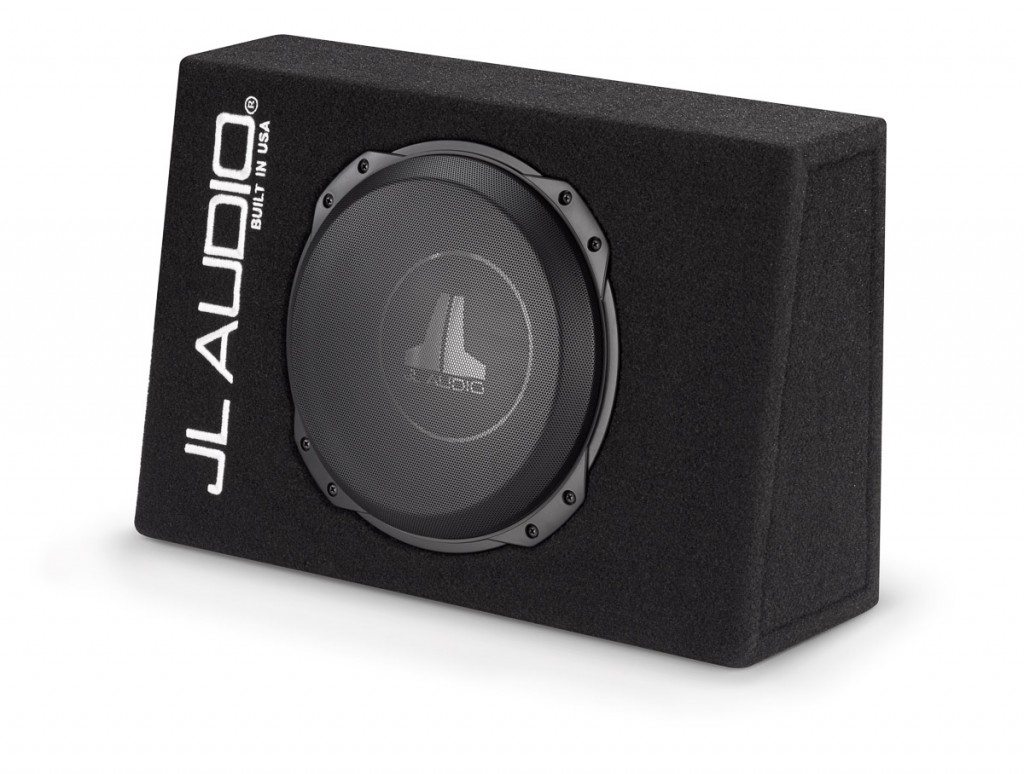
The 8″ CP108LG-W3V3 is a ported enclosure. Ported enclosures tend to be more efficient than sealed and tend to provide more output in the 50 Hz range compared to a sealed enclosure. However, sealed enclosures tend to be tighter and punchier than ported. If you have room for slightly more than this, consider their 400 watt RMS 10″ TW3 subwoofer conveniently offered in their own enclosure, either in an angled hatchback style or flat rectangular box.
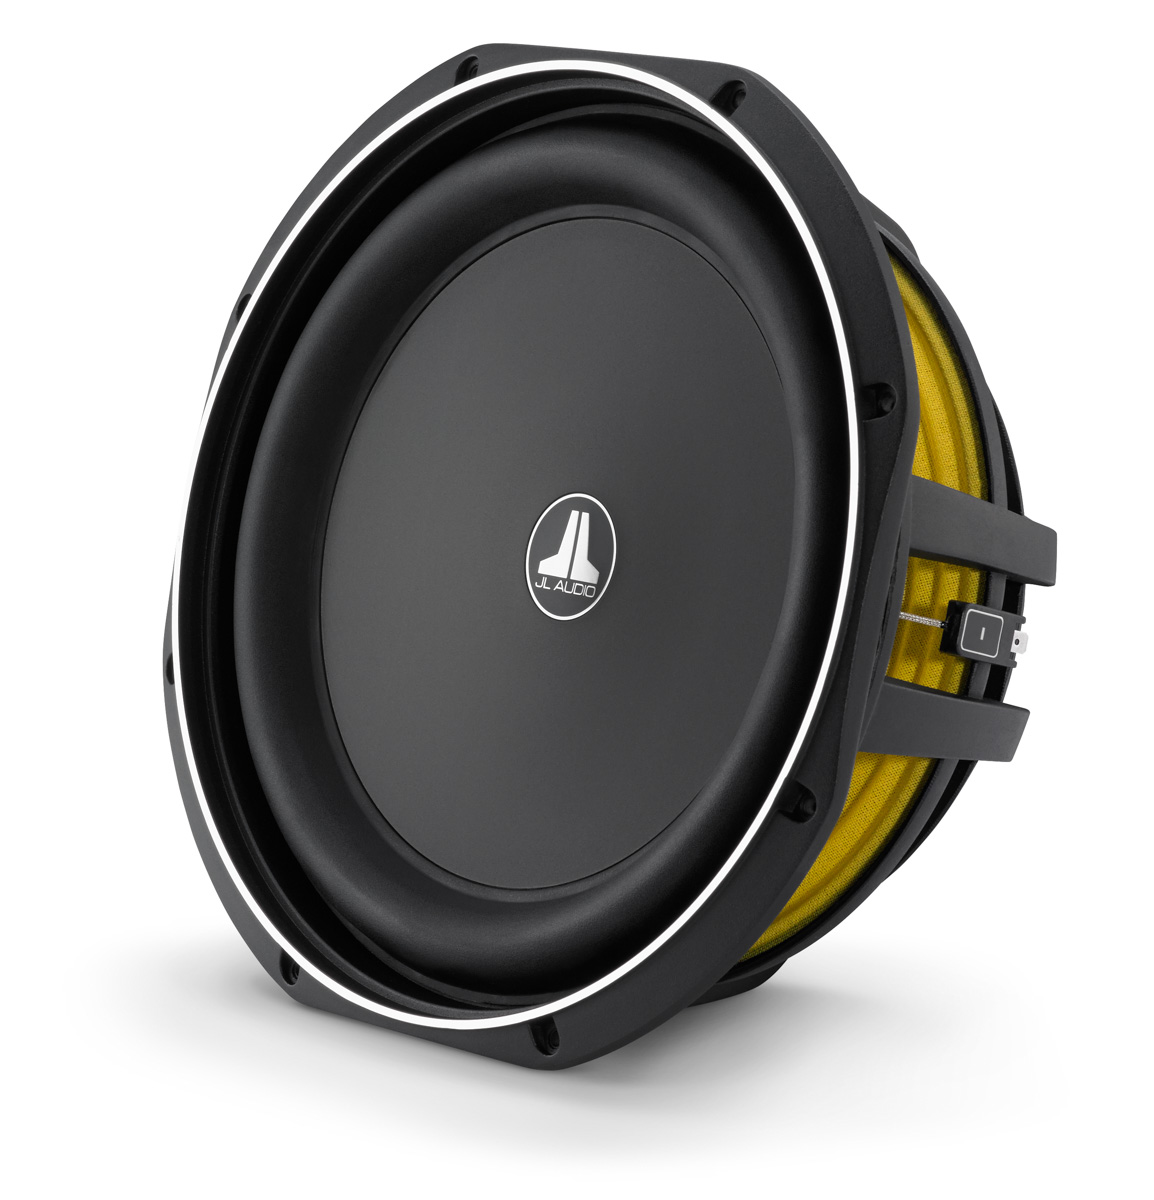
The 10″ TW3 enclosure shown below is sealed. Because it is a 10″, larger surface area, it does extend slightly lower and deeper than the 8″ option discussed above.
JL Audio’s 10″ TW3 offers sound quality and performance in a unique space saving design.
The TW3 line is a perfect example of the many innovations we’ve seen from JL Audio. Everyone wants the best car speakers for bass, but very few people want to give up a large amount of trunk space to achieve this. The design of the TW3 subwoofers is unique to JL Audio. They first debuted the technology in 2007 with their TW5 series. They hold several patents on the technology and have started implementing it in several new subwoofer models. The end result is a very shallow subwoofer that requires very little airspace to operate from and yet still delivers an outstanding performance. They’ve managed to accomplish this without sacrificing sound quality and this is something I truly feel is unique to JL Audio.
JL Audio TW3, new shallow mount sub revealed at CES 2012
If you have very little space to work with and a small open cab such as a 2 door mini cooper or single cab pickup truck (don’t put this in a trunk of a large 4 door sedan and expect to be thoroughly impressed) consider the 6″ W3 microsub which is the smallest, best sounding subwoofer with prefabricated enclosure that I have heard professionally. Like the 8″ microsub enclosure discussed above, this is also a ported enclosure.
6″ W3 with microsub enclosure. The ultimate compact subwoofer and enclosure – this is great for small cabin vehicles and tight spaces.
What works best in sedans or coupes?
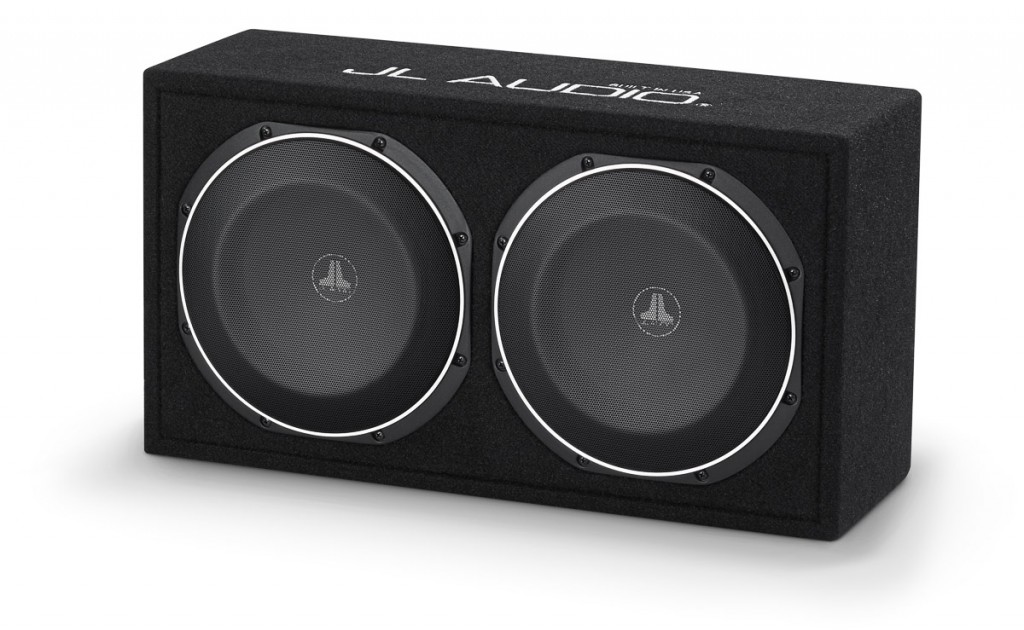
The options mentioned above are probably best for open cabin vehicles such as wagons, SUV’s, pickup trucks or hatchbacks. When your only placement option for a subwoofer is in the trunk of a sedan or coupe (which is sealed and closed off to the interior cabin), you’re better off going for more power and/or more surface area. Some vehicles conveniently have a center armrest/skibag area that can be folded down and act as a port into the cabin. In this case, you may find the 10″ TW3 performs well with the armrest open, but shut the armrest and maybe not so much. So to err on the side of caution, in sedans and coupes I usually recommend going with either a single 12″ subwoofer or two 10″ subwoofers and staying in the 400 – 600 watt RMS range.
Consider JL Audio’s new TW1 subwoofer offered conveniently offered in dual 10″ or dual 12″ enclosures
JL Audio’s new TW1 subwoofers handle slightly less power than the TW3 at 300 watts RMS a piece, however they require even less volume to perform. The TW3 operates in an enclosure with a volume of .5 cubic feet. The TW1 only requires .35 cubic feet. That’s the same as the 8″ W3!
JL Audio’s new TW1 subwoofer requires only .35 cubic feet to perform!
To learn more about JL Audio’s patent pending, space saving design and performance, check out this video featuring JL Audio’s own Manville Smith, VP or Marketing.
For a space saving, sound quality subwoofer enclosure in a sedan or coupe, I would recommend either the dual 10″ TW1 enclosure or dual 12″ TW1 enclosure.
Dual 10″ TW1 Enclosure – 600 watts of power handling, 20″ of subwoofer in a little over 1 cubic foot! Also, made in America!
This new enclosure from JL Audio is the most impressive I have seen and heard to date. It’s sound reproduction is tight, punchy and natural. In my own 2 door coupe, I have two 10″ TW3’s, but I could definitely use a little more trunk space and am considering swapping those out for this awesome enclosure. The dual 10″ TW1 enclosure measures only 22″ x 11 3/4″ x 7 5/16″. The dual 12″ TW1 enclosure measures only 26 1/4″ x 14″ x 8 7/8″.
The reason I have focused largely on space saving designs is this is what most of my own customers are looking for. They want the best car speakers for bass, but they don’t want to take up previous trunk space. They’re looking for innovative solutions that provide performance and sound quality without sacrificing their trunk in the process. JL Audio has wisely committed to this path and has countless vehicle specific options as well known as a JL Audio Stealthbox.
For many consumers, there may not be a Stealthbox available for their vehicle. Even if there is, they may find the additional cost prohibitive. That is why I focused largely on these universal, space saving designs that deliver top quality sound and performance. If a Stealthbox is available for your vehicle and within your budget, I highly recommend them.
Things to consider when adding a subwoofer to your stock car stereo system
You will need a separate amplifier to power this new subwoofer and that amplifier will need to receive an audio signal from your stock stereo. There are a few ways to do this. Some amplifiers have a line output adapter built right into them like the JX series from JL Audio or V power series from Alpine. This allows you to tap into the positive and negative of existing full range speakers (or if present stock subwoofer) and send audio to the amp.
There is a potential drawback to using this feature, however. Many stock audio systems typically have their own self attenuator designed to prevent you from distorting and thus damaging the stock speakers. One way to tell if your car does this is to turn the bass up to an audible level and turn the volume up. Focus on listening to the bass, the mid range and treble independently as you turn the volume up. See if you notice that certain frequencies appear louder than others. What you may find is the bass pretty much stays at the same constant audible level while only mid range and treble audio levels appear boosted. I can tell you my stock 2013 Jeep Wrangler stereo definitely has this built in. It’s annoying and there’s two ways to work around this when adding a subwoofer to a stock stereo.
One solution is you can add a separate bass knob. I suggest this option either way only because bass levels naturally vary from recording to recording and you’ll want to have a way to adjust that. Your stock stereo most likely will not have any kind of subwoofer control. I have seen this option in a few Honda’s and Acura’s that actually have a stock subwoofer, so check to see if you have a stock subwoofer and stock subwoofer audio adjustment level. It would be right along with the bass, mid range, treble, balance, fader adjustments, but it’s not a common feature among stock stereos. You will definitely want to have a way to independently adjust your newly added frequency range in an easy manner.
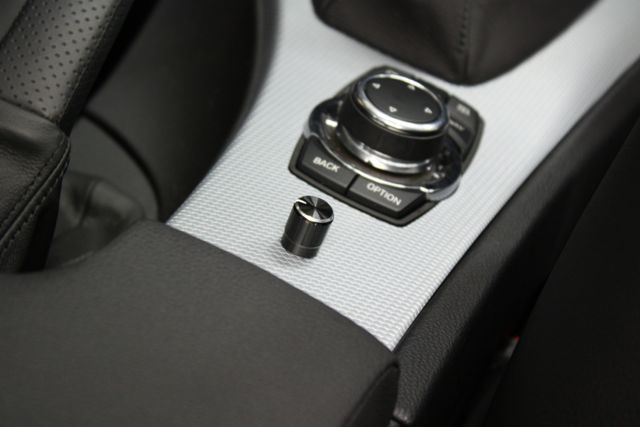
Example of PAC LC1 universal bass knob installed in a BMW 3 series
Most amplifiers offer their own convenient plug in bass knob. Between Alpine and JL Audio, I do believe the JL Audio style knob is much cleaner and more discreet. It’s more easily disassembled and designed to be mounted in a stealth manner like the photo above. Please note, JL Audio has two different bass knob model numbers. The HD-RLC is for their XD and HD series amplifiers while their RBC1 is for their JX and Slash series amplifiers. There are also universal bass knob options such as the LC1 from PAC shown in the image above.
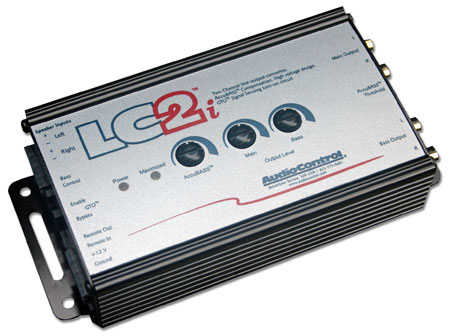
Don’t want to be playing with the bass knob every time you crank it up? Consider using Audio Controls advanced line output convertor, the LC2i.
Audio Control LC2i is an advanced line output convertor specifically designed to compensate for an bass attenuation created by a stock audio system.
This cool little interface has circuitry within it designed to compensate and correct any bass attenuation created by a stock audio system. I highly recommend using this outboard line output convertor (along with a bass knob) if your stock audio system has self attenuation properties. It provides a more seamless integration when adding a subwoofer to a stock audio system.
The devil is in the details
So now you know the best car speakers for bass are subwoofers and you know that subwoofers don’t have to take up all your cargo space. There are a few more details to be aware of in order to achieve the bass response you are looking for. Everything needs to be installed correctly and the amplifier needs to be properly tuned.
If you are bringing this to a professional, it’s important that they understand what you are trying to achieve. In this post, I’m really focusing on sound quality and audio enhancement. I like to reassure my own customers that any subwoofer added will be tuned in a way that is blended with the rest of the audio system. If you’re going to tackle this installation yourself, you may want to read my post on how to do just that – installing an amp and subwoofer with a stock audio system along with the post on how to tune a subwoofer amplifier.
Selecting the best touch screen car stereo can be an overwhelming and confusing process. I’m here to help break it down for you and make your selection easier.
There are subtle differences in features between these touch screen car stereo models that make one option a better choice over another depending on your needs and individual taste.
Each touch screen car stereo reviewed here comes with the expected standard features such as:
USB
Bluetooth
Single CD/DVD
AM/FM tuner
Reverse camera input
Rear aux in
Unbiased information to help you choose
My aim with this post is to provide you with the same knowledge and guidance that I provide to customers in my own shop. My job is to merely present you with the features, benefits, pros and cons of each touch screen car stereo in unbiased manner. I do this so that you, the individual consumer, can decide which model is best for your own unique needs.
In our shop, we carry three touch screen car stereo models from Pioneer, three models from Kenwood and one model from Sony. In case you’re wondering why I don’t carry Alpine double din touch screen car stereos, it’s because they tend to be lacking in features and value in this particular niche. For example, the Alpine touch screen car stereo model IVE-W535HD is not even SiriusXM Ready – yet for about the same price you can buy an Alpine touch screen car stereo with navigation and SiriusXM capability.
So who has the best double din touch screen car stereo?
It truly depends on what features are most important to you. Read on to find the best touch screen car stereo for you.
Entry level touch screen car stereo models from Pioneer and Kenwood
I recently reviewed our two entry level double din head units from Kenwood and Pioneer, the DDX371 and the AVH-X2600BT in a more detailed review found here. If you’re looking to stay in the entry level price range, you’ll want to read this in depth post detailing the pros and cons of each unit. In this more elaborate double din head unit post, I’ll briefly summarize the pros and cons of these two entry level double din head units.
Pioneer’s entry level double din touch head unit for 2014 is the AVH-X2600BT.
Mirrorlink Capable (CD-MU200 required and Mirrorlink phone required – According to Pioneer, this allows you to access music and phone from your stereo)
Only 2 Volt Preout (not good for sound quality if you’re adding amplifiers)
Requires tricky parking brake bypass or additional TR7 interface
No Volume Knob – Volume rocker instead, however this double din is Steering Wheel Control ready.
Does not come with Double Din Sleeve and Trim ring, designed for iso mount only – if your car does not have iso mount kit option you will need additional part ADT-VA133 (think VW Jetta 2002 – 2005).
NO SiriusXM compatibility – This unit is not Sat Ready and I know that can be a deal breaker for some, but you can stream Bluetooth Audio with your phone using Pandora or other music apps that sound WAY better anyways – SiriusXM is majorly compressed audio, like 32 kbps (yuck). That compression rate is fine for talk/entertainment, bad for music.
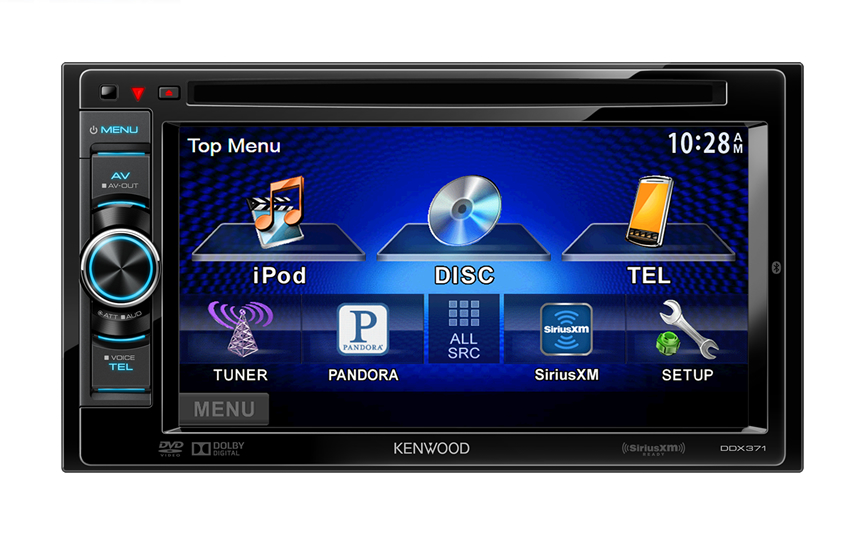
Introducing Kenwood’s entry level double din head unit, the DDX371.
Volume Knob – Many consumers find this much easier to use even if their car is equipped with Steering Wheel Controls (which by the way both radios support with additional SWC interface)
4 Volt Preouts for Front, Rear and Sub (Provides better sound quality when using external amplifiers connected through RCA)
Easy Parking Brake Bypass
Comes with mounting sleeve and trim ring if needed (Which can save some car owners $35)
Poor Bluetooth Sound quality for handsfree calling – Kenwood has not updated the Bluetooth processor or mic in this unit – it’s the same as last years model and if you’re on the phone a lot, the Pioneer definitely has better sound quality for handsfree calling. You may get complaints like “you sound like you’re under water”, “are you in a tunnel or something?” or plain old and pissed off “I can’t hear/understand you, call me later” Click. If you’re using the Bluetooth mainly to stream your music, this may not be a concern.
Slower searching on iPod when connected to USB compared to the Pioneer – not by a lot, maybe 2-3 seconds, but for many consumers every second counts and when I show them the difference on our display, that makes their decision. If you’re the type of consumer who will just leave their iPod on random anyways and skip tracks, that won’t really effect you – same if you’re using Bluetooth audio as you’ll mainly be controlling/selecting music from your phone and just streaming it wirelessly to the stereo.
Extremely limited App Mode Feature – designed only for iPhone 4/4s users, mainly for Garmin app priced at $49.99, requires KCA-ip202 accessory – limited music search and control if operating on anything newer than IOS 5.1.1
Mid level touch screen car stereo models from Pioneer and Kenwood
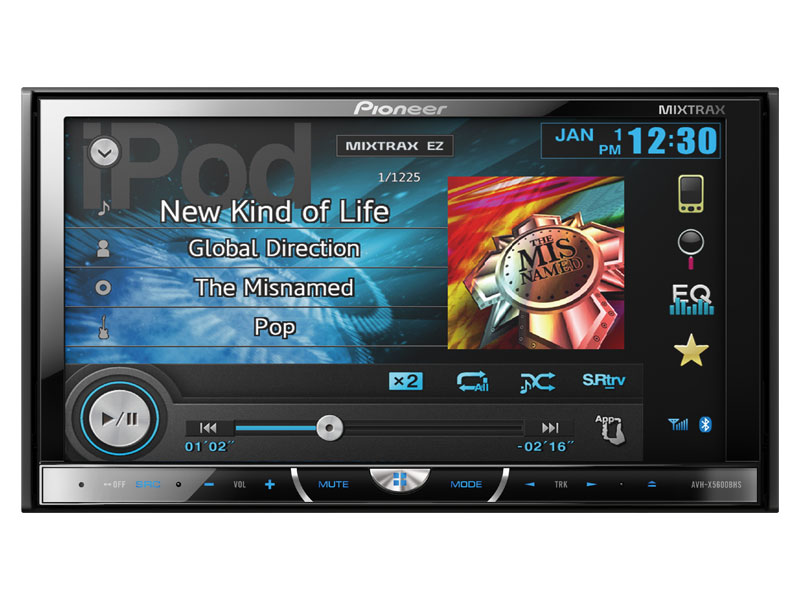
Pioneer offers two different 7″ double din touch screen car stereo models. The AVH-X5600BHS and the AVH-4000NEX.
Meet the first 7″ touch screen car stereo in Pioneer’s line up, the AVH-X5600BHS.
Pioneer’s AVH-X5600BHS 7″ Double Din Touch Screen Car Stereo – Best Double Din Head Unit? Maybe for your unique needs.
AVH-X5600BHS – The 7” Pioneer double din touch screen adds a few benefits over the 6.1” option such as:
SiriusXM capability
Built in HD Radio
4 Volt Preouts
Motorized screen with optional tilt adjustments
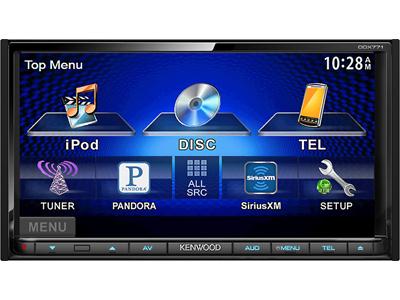
Kenwood’s 7″ double din touch screen car stereo is the DDX771.
Kenwood’s 7″ Double Din Touch Screen Car Stereo 2014
Kenwood’s DDX771 adds little over the DDX371 other than it’s 7” motorized touch screen with tilt and angle adjustments.
Curiously, both the DDX371 and DDX771 display the Waze icon on their website, however I could not find any detailed information in the owners manuals or supplemental documentation provided by Kenwood on how to utilize this app. I inquired about this with my Kenwood rep and was slightly disappointed with what I found out. Their answer was this, “Technically you can mirror Waze, or any video content from an iPhone 4/4s, by using the Kenwood video iPod cable”. To me, that doesn’t really warrant displaying the icon as you still have to control and operate everything from the phone, not the stereo itself. To get into any sort of real app mode with Kenwood, you need to step up to a model with an HDMI input such as the DDX8901 from their Excelon series.
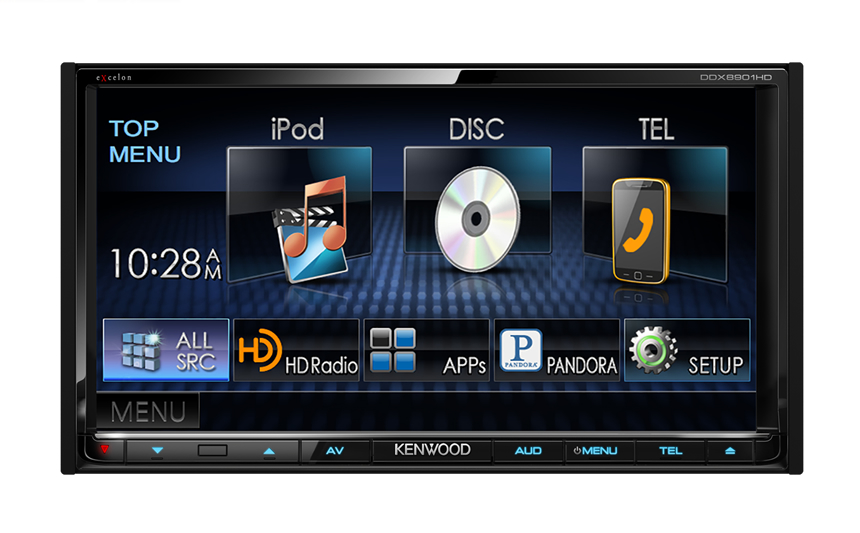
Looking for app integration with Kenwood? Check out the DDX8901.
Kenwood’s Best Double Din 7″ Touch Screen Car Stereo with App Control feature
The DDX8901 is part of Kenwood’s Excelon series which features 2 year warranty, better sound quality, and more equalization control. Within the DDX8901 there is an app mode for both iPhone and for Android and like Pioneer there is a long list of compatible phones, requirements and limitations which can be viewed in this PDF here:
Like most touch screen car stereos featuring app mode for iPhone, you will need a regular USB to lightning cable, an HDMI cable and Apple’s lightning to digital A/V adapter. Kenwood’s app mode for iPhone is somewhat disappointing. Even though the DDX8901 features touch screen control over the Waze app, it does not integrate with the Apple keyboard, meaning you still have to input address information from your phone. Also, Waze is the only compatible app for iPhone 5 users.
When it comes to mirroring and controlling Android devices, it’s a different story. It’s actually not too difficult to set up. You’ll need an HDMI to MHL cable (Kenwood has one, the KCA-MH100) and depending on what type of phone you have, you may need one of those 5 to 11 pin tip adapters (I needed that for my Samsung Galaxy S4). You’ll also need Kenwood’s app installed on your phone, the Kenwood Smartphone Control App.
With the few Samsung phones I’ve tried this with, I’ve found no matter what I do, the home screen is always in the upright position, even if I turn the phone horizontally. Once I open up an app, it switches to the proper orientation. The other really quirky thing to note here is the control. Yes, it’s two way control and mirroring, but it’s not very responsive or accurate. On the Kenwood touch screen you see a little mouse cursor. And it seems no matter how many times I calibrate the screen, I can never get that cursor to respond and actually select where I’m trying to select.
I’ve showed this feature to a few customers who were eager to see Kenwood’s mirroring for their Samsung phones and they were sorely disappointed. The interface leaves a lot to be desired. If it’s difficult to control standing around in a stationary showroom, imagine how difficult it would be to use while driving.
I wish I could say Pioneer does mirroring and app interfacing better, but in my experience, (for Android users anyways) it’s still kind of an uphill battle. Another thing to note, the screen quality on the DDX8901 does not appear to be as sharp and vibrant as the DDX371 or DDX771. I think this may have to do with the two way control and mirroring capability.
There are some true benefits of the DDX8901 over the DDX771 which include:
Excelon sound quality and equalizer with advanced audio control
5 Volt preouts
Better handsfree sound quality with noise cancellation and microphone adjustments
Top of the line double din touch screen car stereos from Pioneer and Sony
For high end touch screen car stereos, we will discuss the AVH-4000NEX from Pioneer and the XAV-712HD from Sony.
Pioneer’s other 7″ double din touch screen car stereo features Apple CarPlay.
Pioneer’s Best Double Din Touch Screen Car Stereo Featuring Apple Car Play
When we look at Pioneer’s top of the line double din touch screen non navigation car stereo, we come to the AVH-4000NEX. I feel this model is definitely the most promising for consumers that want phone mirroring and integration. Again, depending on what phone you have and what software version, there are limitations to what apps are compatible and truly functional.
Limitations aside, there are a lot of additional features with the AVH-4000NEX compared to the AVH-5600BHS.
Compatible with Apple’s CarPlay for iPhone 5 (via a free software update and just your standard USB to lightning cable).
Pioneer’s Supertuner for FM/AM
13 band EQ with digital sound retriever circuit and digital time alignment
SD Card slot
2 USB ports
A note about mirroring. I’ve mentioned this in other posts, but I’m going to assume readers of this post haven’t read every one of my posts. Mirrorlink, App Radio Mode, Car Play and plain old mirroring your iPhone are actually 4 different things.
Mirrorlinkis a very iffy technology. I’ve talked to Pioneer tech support about this and the problem is that it’s not a consistent or truly standardized technology. Mirrorlink can go ahead and certify a phone to be Mirrorlink compatible, the phone manufacturer can go ahead and slap the Mirrorlink logo on their product and at the last minute the phone manufacturer can decide to produce the phone without the technology actually built in. If it does get produced with Mirrorlink technology, there’s no guarantee firmware updates by the phone manufacturer won’t make the feature obsolete.
It’s up to developers to write the software, not Pioneer. As a result, there have been other apps developed to allow full connectivity and full mirroring. A popular one is called App Radio Unchained, but it does require users to root their phones and install a few other apps and I’d say my average every day customer isn’t comfortable doing that and are not that tech savvy. If you are, you can read about the process in this great write up from CNET. For Android users that don’t want to root their phone and install unapproved developer software, stick with Pioneer’s App Radio App.
In a recent install with a Samsung Note 3 and Samsung Galaxy S4 we had a lot of glitches. The picture was cutting in and out on certain apps, but working fine on others. It’s not uncommon to have to do things like unplug the phone and plug it back in if it’s not working properly. You may even have to reset the app, reset the stereo or reset the phone occasionally.
This is a new frontier for car stereo and it’s going to have a lot of hiccups and bumps along the way. Consumers need to realize it’s not perfect. I’ve also found there’s very little obvious information and support from manufacturers. This is unfortunate because consumers like to make their decisions and assumptions based on recognizable app logos and brief product descriptions. Unfortunately, those don’t tell you the whole story and in many cases neither does the owner’s manual.
For some consumers, the ideal solution may be a more simplified set up. For a simpler way to integrate your cell phone apps to your car stereo, consider investing in a quality cell phone holder (check out Pro Clip USA) and vehicle specific bracket from Panavise.
All of these touch screen car stereos have bluetooth audio streaming capability. So if you’re listening to bluetooth audio as your source and have the navigation going on your phone, you will hear the navigation prompts from your phone over the stereo. If you need a visual map, you can glance at your phone in its nice holder to the right of your stereo.
This is probably the safest and most reliable way to utilize navigation apps from your phone through your stereo (short of Pioneer’s Apple CarPlay interface which is only compatible with iPhone 5 and up). With cell phone screen size continually increasing and screen quality continually improving, it’s not like your car stereo’s touch screen is THAT much bigger and that much easier to see than your phone’s touch screen.
In conclusion, if sound quality and ease of use is your main concern, consider Sony’s XAV712HD.
Sony’s 7″ Best Double Din Touch Screen Car Stereo Head Unit Features Great Sound Quality
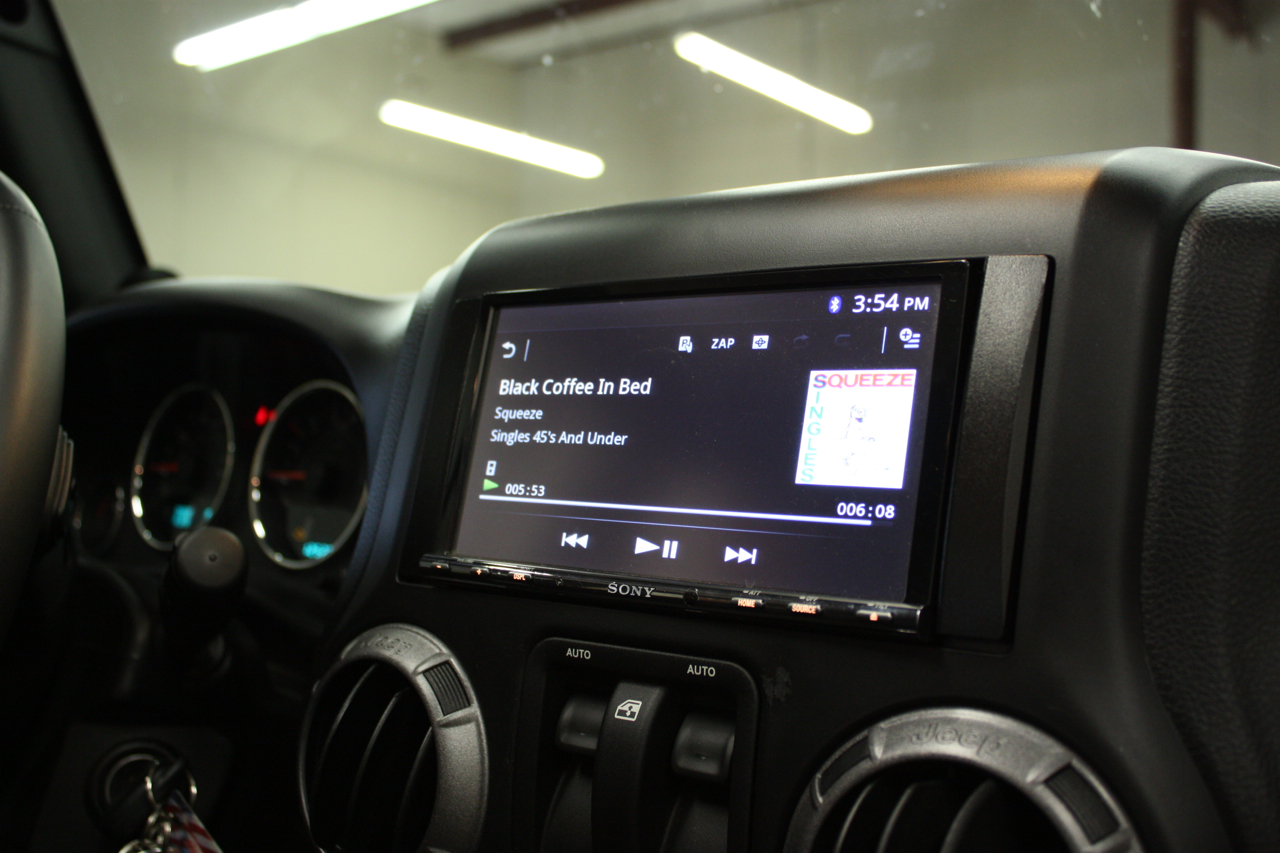
I have last year’s version of this in our Jeep and it is a great sounding unit. This is actually the only Sony head unit I carry and it’s right up there next to Kenwood Excelon in terms of sound quality (maybe even better). It comes with a 3 year warranty and is part of Sony’s premier line, kind of like their old Mobile ES series products (better sound quality). In addition to an awesome digital to analog processor, it features:
5 volt preouts
Digital time alignment and 7 band EQ
Great Sony picture quality
Two USB ports
HDMI input (so you could technically display your phone with some adapters, but no on screen control).
Sony pushes their Mirrorlink feature with this model, but again, unless you truly have a compatible phone or feel like installing a hacked developer app, forget it. Samsung users have to use the Drivelink App which crashes before it ever even loads. One drawback to note with this Sony double din stereo is the large lip on the front of the unit. Depending on what kind of car and what kind of dash kit is available, this can usually be recessed nicely, but it all depends on the application.
Sony Double Din Installed in 2013 Jeep Wrangler
.
Aside from sound quality, features and ease of use – looks should be considered in your double din car stereo purchase as well.
Pioneer units do not come with a mounting sleeve – as long as you can iso mount using the dash kit, you’re good and it will look nice and flush. Depending on your install skills, if you go motorized 7” with any model, there may be some tweaking and shaving necessary to allow the motorized screen to open and close properly. Kenwood double dins always come with a nice mounting sleeve and trim ring and the Sony does as well.
So who has the best touch screen car stereo for 2014?
As you can see, there are a lot of different double din touch screen head units out there and they all have subtle differences between them. I hope this post has helped explain the differences in features, pros and cons on each model allowing you to choose the best double din head unit for your needs. Thanks for reading!
Wondering what the differences are between Alpine, Kenwood and Pioneer double din car navigation systems for 2014? Let me break it down for you. In our shop, we carry all three brands and several different models from each. For this post, I will focus on the 6 that we carry, but I will also briefly mention the differences within each line up.
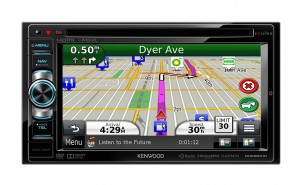
Starting in the entry level double din car navigation category, here is what we have to offer. The following three models all feature a 6.1″ touch. From Kenwood, we carry their eXcelon series DNX691HD. From Alpine we carry the INE-W940 and from Pioneer we carry the AVIC-5000NEX. For our higher end models, featuring a 7″ touch screen, we will go over the Kenwood eXcelon DNN991HD, Pioneer AVIC-7000NEX and Alpine INE-W957HD.
Pioneer AVIC-5000NEX Car Navigation
Let’s start with the Pioneer AVIC-5000NEX which I feel offers a lot of features for your hard earned money.
Pros
The Pioneer AVIC-5000NEX is a pretty popular double din car navigation at our shop. It’s not the cheapest navigation we offer, but I definitely think it has a great value. This double din car navigation unit has a very attractive graphic user interface (I think it’s pretty). It’s also nicely customizable as far as button color and background color so you can nicely match it to your vehicle’s interior illumination. It also has great brightness and contrast adjustments (one setting for day and one setting for night). It’s also relatively easy to use. The AVIC-5000NEX manages to pack a good amount of features in without being overwhelming to most users.
There is a clearly defined home button which helps you to navigate the various options and sources of the navigation system. There is also a handy settings icon on the top right. When accessed, it quickly breaks down the various settings available into sub menus on the left. There are separate tabs for Audio, Appearance, Bluetooth, System etc depicted with simple easy to understand icons (example – the Appearance icon is denoted by the image of an artist’s palate).
Sound quality wise – it comes equipped with a 13 band graphic EQ, built in crossover adjustments, subwoofer level control and 4 volt RCA preouts – which is great if you plan on using external amplifiers. The higher the voltage, the more kick you will get out of the amp or the more sensitive the stereo will be to the amp.
It also comes with the standard features most consumers expect these days along with a few unexpected perks:
Rear USB connection
7.9 Millions Points of Interest
Reverse Camera input
SiriusXM ready (requires SXV200 tuner)
Steering Wheel Control ready (requires additional interface varies from year, make and model vehicle)
Rear Aux in (will require extension cable or optional flush mount kit)
Bluetooth for handsfree (featuring Siri Voice Control button which is accessed via the Bluetooth menu)
Bluetooth audio streaming
Text to speech navigation (“turn left onto Main street”)
Pandora Control with iPhone (connected via USB cable and standard iPod to USB cable)
App Radio Mode (for iPhone only on the AVIC-5000NEX, for Android you would have to step up to either 6000, 7000 or 8000)
Dual Zone capability (Great feature if you have kids and plan on adding a rear seat entertainment system – you can load a DVD in the Pioneer and send the audio and video to a rear monitor that transmits audio via wireless headphones. At the same time you can launch another source entirely for the front speakers in the car such as Bluetooth Audio, USB, SiriusXM)
Apple Car Play – This feature is available pending a free software update from Pioneer. Once available, users will be able to connect their iPhone 5/5s and launch select apps on screen as well as control various apps and send/receive text messages.
iDatalink Maestro Control – Another feature that will be available, currently pending a software update from Pioneer. With select vehicles, you have the option to integrate vehicle information, as well as OEM features such as SiriusXM, into the Pioneer system. In some vehicles, you are able to view tire pressure monitor, reset check engine lights, etc. iDatalink Maestro is not only an advanced steering wheel control interface, it also relays select data from your car to the radio. Features vary greatly from year, make and model vehicle as well as stereo model. See what is available for your car here.
Cons
No HD Radio
No Nav Traffic information
No HDMI input
Cannot customize home screen shortcuts
Lacks 3D Landmarks in Navigation
Pioneer AVIC-7000NEX
When you step up to the 7″ version, the AVIC-7000NEX, you can forget the cons mentioned above.
Customizable home screen short cuts (also available on the AVIC-6000NEX)
Some other cool features about Pioneer Double Din Navigation systems that are not really mentioned in their literature
Responsive – Compared to Kenwood and Alpine, Pioneer’s operating system is very responsive. Alpine is pretty close in overall speed and performance, but I do believe Pioneer has a slight advantage in terms of processing speed.
App Mode and Mirrorlink capable – Pioneer was really the first (you could say the pioneer) in the industry to really try to interface with iPhone and Android cell phones. I have to say, as confusing as the process is in confirming device compatibility, proper cables and interfaces, correct software and settings on phone – once it’s set up, it is pretty cool. Just to be clear – Mirrorlink, App Mode, Car Play and simply mirroring your iPhone are four different things.
Pioneer has an app called the AppRadio app for both Apple and Android devices that allows the control and interfacing of select apps from your phone on the stereo touch screen (additional parts are required and vary from radio model and phone model). This app works on Pioneer stereos that feature App Mode. Due to legal reasons and safety concerns, the types of apps you can access are limited so it’s not a true and direct mirroring of what’s on your phone on the stereo (do you really need to read emails and drive at the same time?).
Mirrorlink is a broad term given to phones that are built with Mirrorlink technology capabilities. You can check Mirrorlink’s product listing to see what phones have this technology built in. Also know that just because a radio says it’s Mirrorlink compatible, does not mean you can just plug your phone in and mirror everything on the screen. I wish it was that simple, but in my experience it’s never that easy.
If you want full mirroring and full control of your phone from the touch screen (and it’s Android based) there are other developer apps out there that do appear to accomplish this, but they require you to root your phone among other things and they actually work off the App Radio platform and require App Radio parts. You can read about the process on this great write up from CNET.
To connect your Mirrorlink compatible phone to any a Pioneer NEX model using Mirrorlink, you will also need the interface from Pioneer, the CD-MU200. According to Pioneer, this allows you to access music, map services and phone from your stereo.
A glance at the Mirrorlink section of the owner’s manual of the AVIC-NEX7000 clearly shows and describes 2-way control and the appearance of apps on the screen, home icon and back button. However, it is very vague and littered with limitation and warnings such as “Multi-touch gestures may be disabled depending on the MirrorLink device model that is connected” and “Depending on the type of Mirrorlink Device, this key is not appears”. That is not a typo, that is exactly how it reads and that is stated several times in the manual referring to navigation keys when in the Mirrorlink mode. Obviously something has been lost in translation here. Additionally the final warning on limitations is “Compatibility with all MirrorLink devices is not guaranteed. For details about MirrorLink device compatibility with this product, refer to the information on our website.”
When we go to their website under the required part number, CD-MU200 we find even more limitation warnings such as “Proper app installed on the Samsung compatible Mirrorlink smartphone is required (not sold or distributed by Pioneer).” Okay, so what app do we need if we have a Samsung Mirrorlink phone? The Drivelink app?
I did have the chance to speak with a very helpful product support technician from Pioneer. Even though Mirrorlink is a branded name and phones can be produced with Mirrorlink Certification, the phone manufacturer can back out at the last minute and opt not to install the hardware into their device OR if they do produce it, there’s no guarantee the feature will always work. What they’ve found is devices that were compatible have often become incompatible due to software updates by the phone manufacturer. So although this product is Mirrorlink compatible, the chances of successfully connecting and maintaining a functioning Mirrorlink connection seem slim.
To take advantage of Pioneer’s App Mode with an Android based phone, you will have to step up to the AVIC-6000NEX, AVIC-7000NEX or AVIC-8000NEX and purchase a CD-AH200 and possibly an additional adapter for your phone. See Pioneer’s compatibility chart here. Most of the popular Samsung phones such as the Galaxy Note 2, Galaxy Note 3, Galaxy S3 and Galaxy S4 will require a Samsung tip adapter, the ET-H10FAUWESTA Micro USB to HDMI or the EPL-FU10BEBSTD 5 to 11 pin convertor.
iPhone users can also operate App Mode on any of the NEX head units with a few additional parts. With the right adapters installed, you can also choose to simply mirror your iPhone by selecting the “hands on” icon on the bottom right of the screen when on the iPod source. In this mirroring mode, there is no on screen control of the iPhone, however there is on screen control when using the App Mode.
If you have an iPhone 4/4s you can get away with one cable, the CD-iu201s. This cable will work with any of the NEX model navigation systems.
The end result in the last two options is not the prettiest looking pigtail, you would really have to have a good location in your dash or glove box for either of those options.
What if you prefer Garmin Navigation?
Kenwood uses Garmin for their mapping system in their double din navigation systems (6 million Points of Interest). So on the navigation side of the DNX691HD, you may find yourself in very familiar territory. Switch over to the audio side of this unit and you may get lost.
Kenwood DNX691HD Car Navigation System
The Pros and the Cons of Kenwood eXcelon Double Din Navigation Systems
The Kenwood DNX691HD does feature a volume knob which customers seem to either love or hate. It also features the Kenwood eXcelon Sound Excellence DSP processor, a 13 band EQ, digital time alignment, 5 volt RCA preouts and various types of audio control/adjustments.
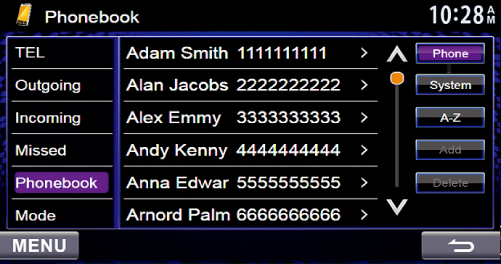
This double din car navigation system sounds great and is a wonderful option if you’re building a high fidelity audio system. However, if you want to adjust the level of your subwoofer, you better install a bass knob otherwise you’re going to have to access 4 different pages of menus before you actually reach the subwoofer level adjustment in the stereo. Also, if you have more than 250 contacts in your phone you will be disappointed to hear that Kenwood cannot support more than 250 contacts.
These units are not perfect. If you’ve had Kenwood radios before, you know what I’m talking about. They pack a lot of features into their radios and it’s easy to get lost in their menus sometimes from something as simple as trying to adjust the bass on your stereo. Once you’ve had a Kenwood eXcelon unit though, you tend to look past the initial user difficulties because you appreciate the excellent sound quality. If sound quality is important to you and you are the type of consumer that can hear and appreciate the subtle differences and nuances between digital to analog convertors among brands, you will appreciate the superior sound quality in this deck. Some customers in my showroom can pick this difference out right away, others can not. My recommendation? If you can’t hear the difference, don’t pay for it – go with what works best for you.
This unit does add a few features over Pioneer’s AVIC-5000NEX such as:
HD Radio
Advanced Equalization Capabilities, Excellence Sound Processor and 5 Volt RCA preouts
Volume Knob (may be a pro, may be a con, depends on your taste)
Not only Pandora control, but also iHeart app control for both iPhone and Android
Set up memory – awesome feature if you plan on taking full advantage of all the various Equalization features. Allows you to easily memorize and then recall all settings if power is disconnected and the unit is reset to default settings.
Kenwood Excelon DNX891HD
Looking for all that a little more?
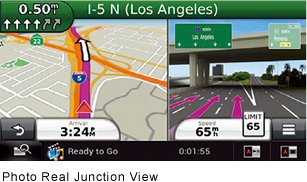
Like Pioneer, Kenwood also offers a 7″ Version of this stereo – the DNX891HD. Additional features over the DNX691HD include Dual rear USB ports and photo real junction view. And if you’re not totally confused by Kenwood’s menu system, you may want to check out the DNN991HD – the ultimate in features for your money.
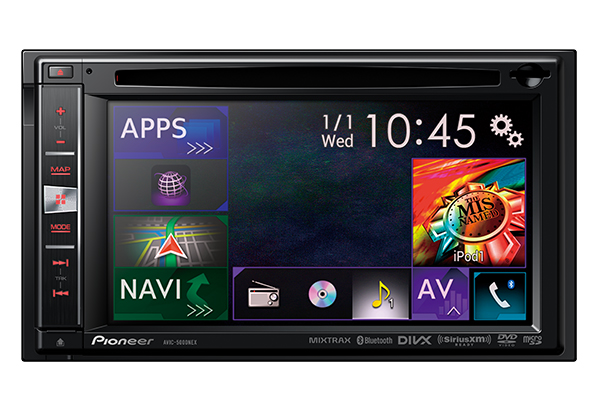
Kenwood eXcelon DNN991HD
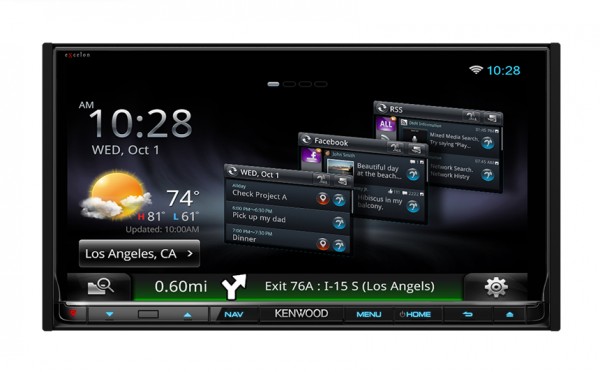
Totally Connected or Totally Confused?
This is part of Kenwood’s connected series head units that allow you to actually tether off your cell phone (or other wireless hotspot) and access crazy things like an internet browser, weather reports, email, Facebook etc. – all with the parking brake engaged of course. The DNN991HD also features a killer high definition glossy screen, something you just may have to see in person to really appreciate.
This thing is like a computer for your car and it sounds awesome like most Kenwood eXcelon products do. The only drag? You might have to study the 178 page user manual for a while until you get the hang of it (yes that’s just one language). Another really important draw back to note here is the overall processing speed leaves a lot to be desired.
This model also comes with a push to talk button designed to work with select voice control commands. In my experience, this feature has never worked well on any Kenwood stereo, but it is a feature nonetheless. I wouldn’t buy this stereo based on that feature alone though, I think you would be disappointed.
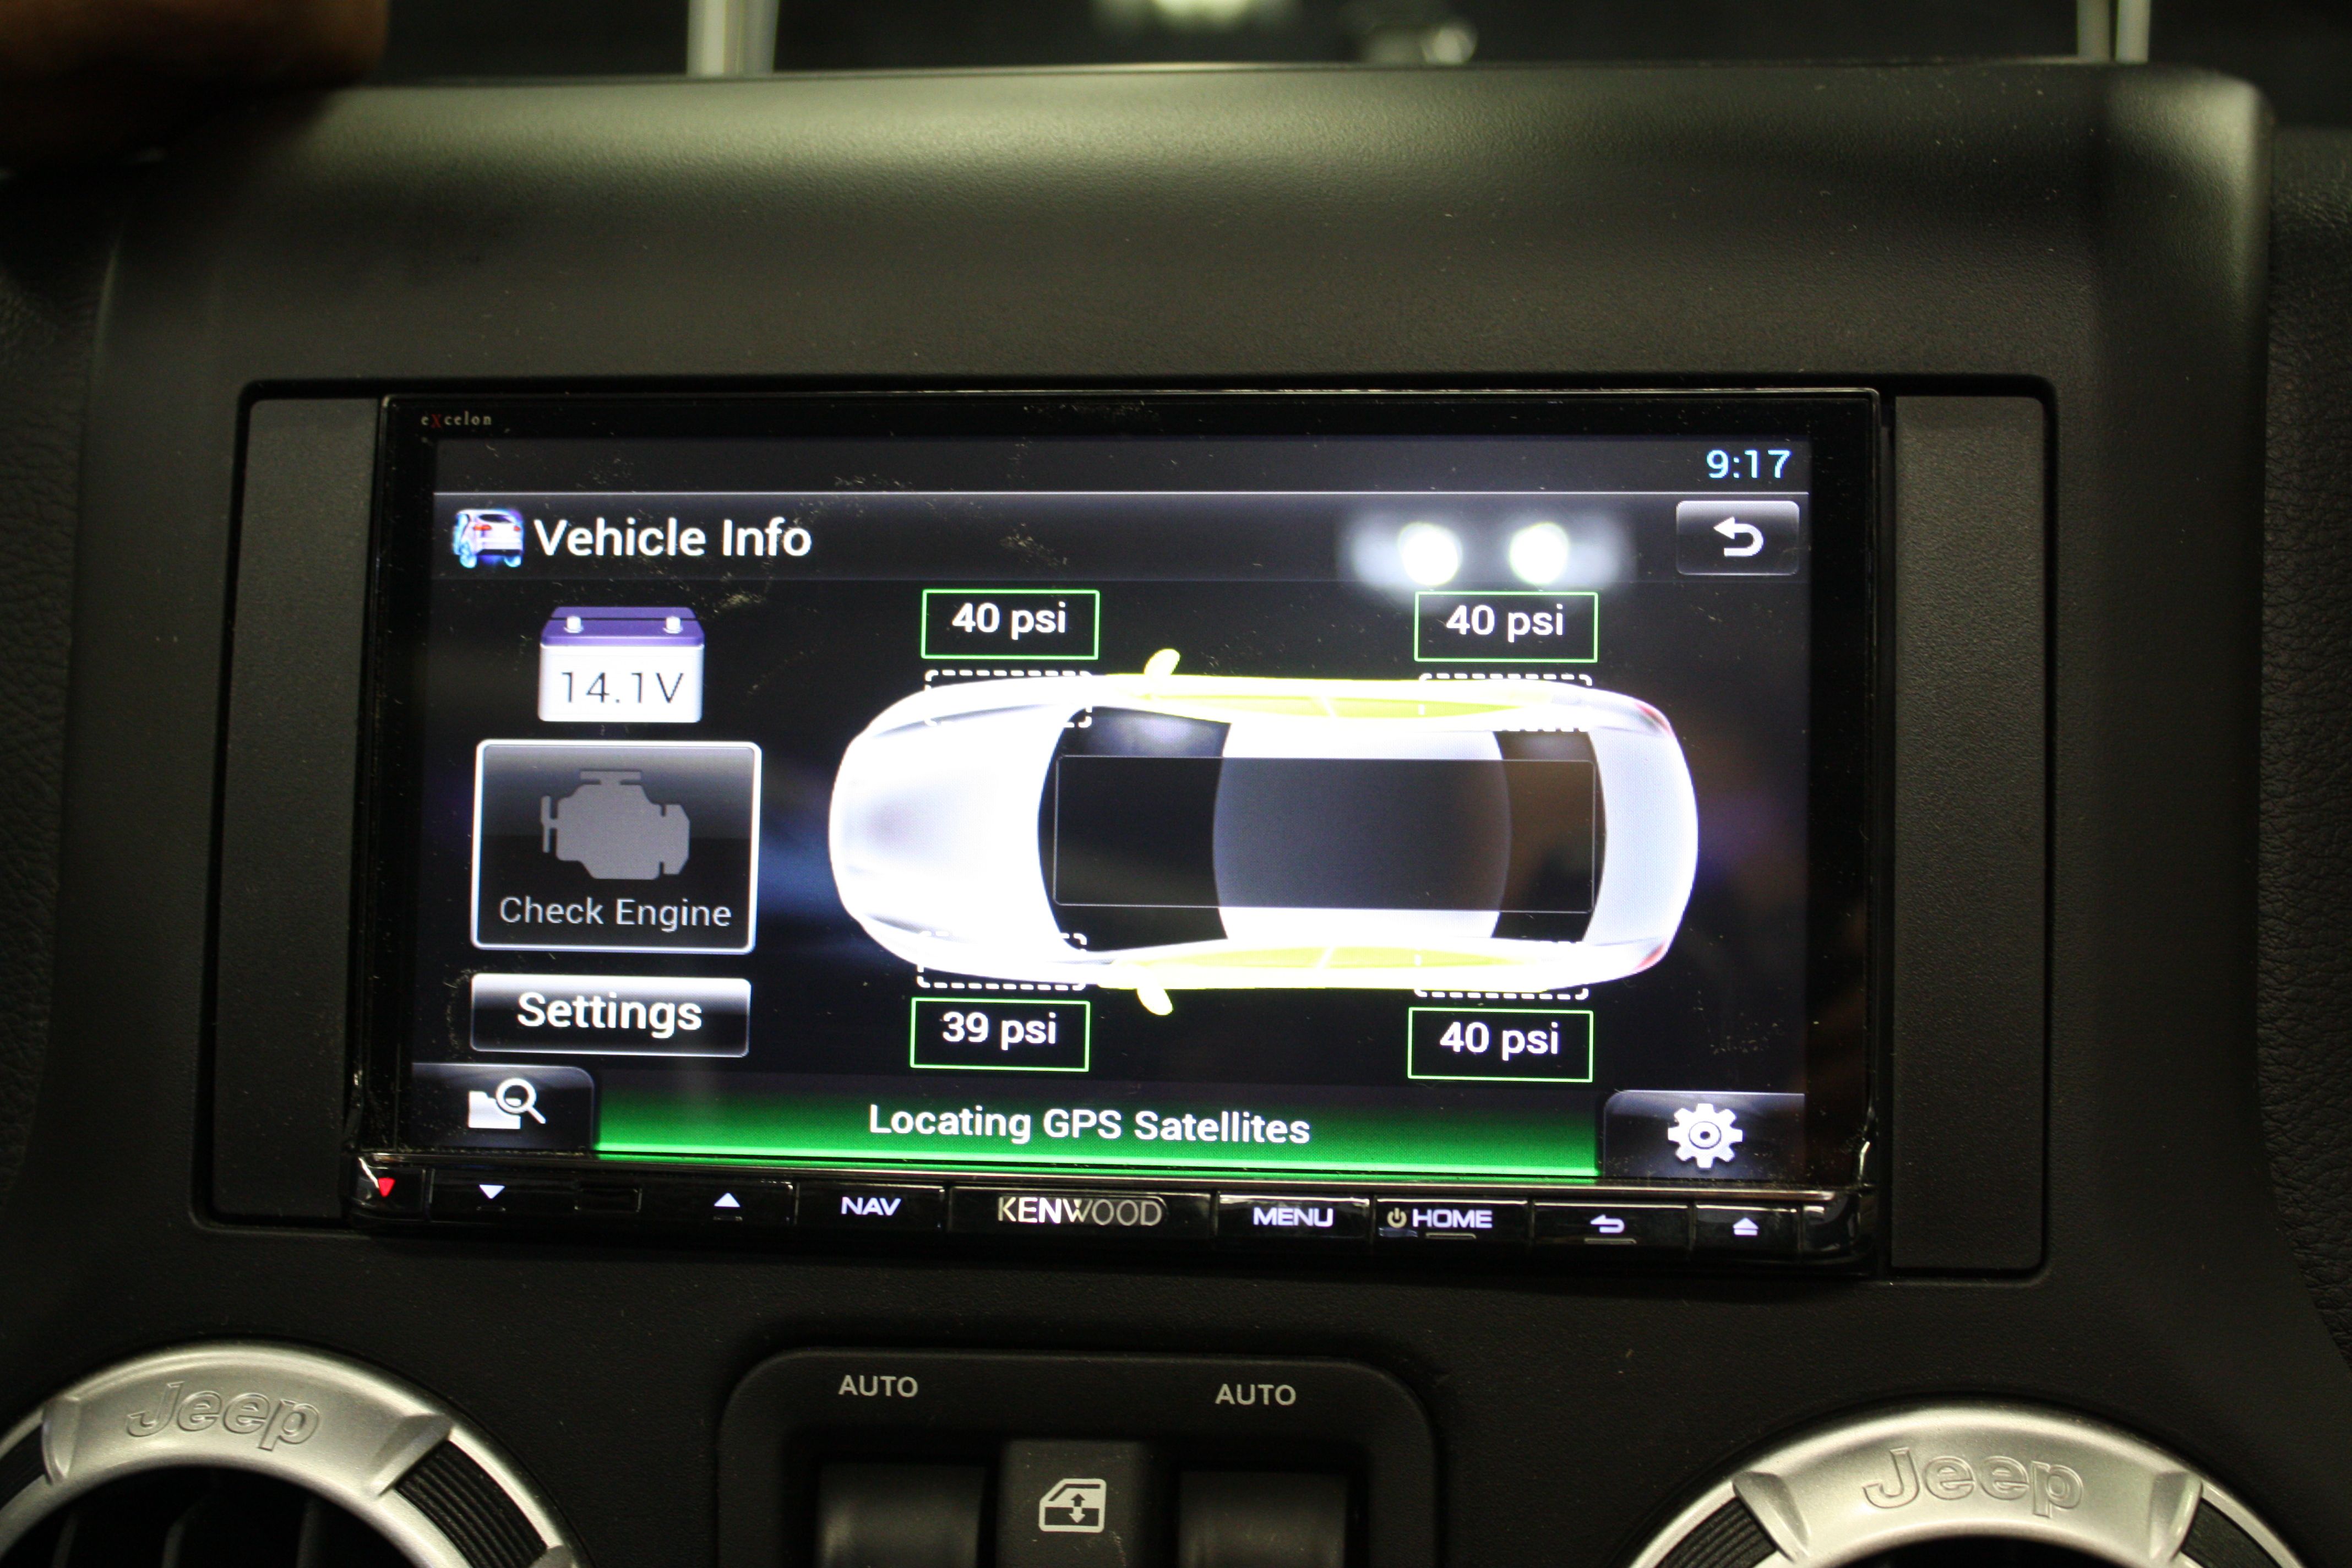
Kenwood connected to iDatalink Maestro RR in Jeep
Kenwood was also the first company to start working with the iDatalink Maestro interfaces and I’ve found for most vehicles, they generally have more features and compatibility when it comes to utilizing this option. Check out a screen shot from a recent Jeep Wrangler installation we did. There was even the option to retain Uconnect if desired (although the customer opted not to in this case), but this gives you an idea of the kind of integration the iDatalink Maestro interface offers (there are two versions of this interface, these features are only available on the RR version and some vehicles require additional cables – check iDatalink Maestro application guide to see what you need for your vehicle).
What About Alpine???
Alpine does have a few new larger models geared specifically towards truck owners (Toyota, GM, Ford). However the platform of those over sized models (X008, X009) is based pretty much on the same user interface and features that exist in their INE-W940 and INE-W957HD.
WYSIWYG
Alpine is easy to use and all about clean lines. What you see is what you get. Many consumers out there will appreciate Alpine’s simplistic design and ease of use. You definitely won’t get lost in any menus on an Alpine stereo or distracted by any bouncy or flashy lights and colors. They’re very straightforward and somewhat subdued. The pages and options are easy to navigate and are relatively responsive compared to some of the more feature packed models mentioned above.
Alpine has created what I lovingly refer to as the non flashy double din navigation units. These models are perfect for consumers that are seeking an upgrade without advertising it. They want a clean and almost OEM fit and finish and it’s evident that Alpine has taken great care designing their user interface. The simple, yet clean look they’ve developed reminds me a bit of Apple’s approach to design and function. This comes as no surprise to me for two reasons. Alpine was the first car audio manufacturer to adopt the iPod and officially work with Apple designing car stereo products that were iPod compatible. Alpine also has previously worked along side OEM manufacturers such as Honda and Acura developing OEM navigation products. I believe these two aspects have greatly influenced Alpine in their overall design and execution of navigation products.
Alpine INE-W940 Car Navigation
Pros
Easy to use 3D Navigation Car Stereo
Clean and simple looking (4 different color illumination options)
SiriusXM Ready
9 Band EQ
SiriusXM Ready
6 Million Points of Interest
Cons
Low voltage RCA preouts (2 Volt)
Lacks HD Radio
Step it up in size and what do you get?
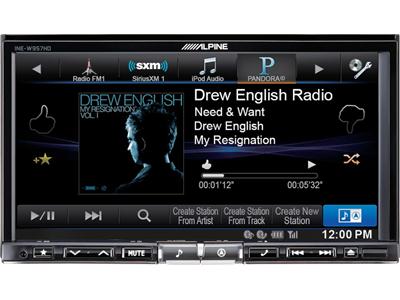
The INE-W957HD double din navigation system adds Junction view with sign post and comes with an advanced GPS positioning sensor (better accuracy). It also features HD Radio and 4 Volt RCA preouts. Pandora control is done via Bluetooth with either iPhone or Android whereas on the INE-W940, iPhone users must connect via USB to control Pandora.
Alpine INE-W957HD Car Navigation
Another really cool feature of this unit unique to Alpine? This model has optical audio out. So for anyone looking to do a full digital audio system, you could technically use this stereo as your source, feed it to either an Audison Bit One or Alpine PXAH800 in conjunction with an Audison amp and digital interface. So for extreme audiophiles out there, this feature alone may sway your decision process.
In summary
To sum it up the same way I sum it up for my customers:
If simplistic design, ease of use and audio control are important to you, go with Alpine.
If sound quality is your bottom line, you prefer Garmin navigation and you’re willing to learn various menus and a sometimes awkward stereo layout – go with Kenwood eXcelon.
If you want a really nice compromise between the two, Pioneer is where it’s at.
I hope you have enjoyed this blog post. I welcome comments, questions and suggestions.
Coming soon, a post about App Mode, Mirrorlink, Car Play and general phone mirroring. Readers, what has been your experience with interfacing your cell phone to your touch screen car stereo?
If you are shopping for a double din touch screen stereo, the Pioneer AVH-X5600BHS is a great option. It offers a lot of features for your money and it performs quite well in several different categories. I will be doing a series of product reviews which focus on several key aspects that should be considered in any double din head unit purchase.
For my Pioneer AVH-X5600BHS Review, I will go over the following:
Ease of use
Bluetooth Functionality
Sound Quality
Display/Appearance
Responsiveness (Processing Speed)
In this double din category, the Pioneer AVH-X5600BHS is a great choice for a variety of reasons. It is packed with loads of functional features such as:
Bluetooth handsfree for calling and audio streaming, feature voice control function
iPod search functionality via included USB pigtail
Pandora control for iPhone users through USB connection or via Bluetooth for Android
8 Band EQ with 3 RCA preouts, 4 Volt
SiriusXM Ready
HD Radio built in
Reverse Camera Input
Rear Aux in
Steering Wheel Control Ready
AppRadio Mode for iPhone (additional parts required)
Various screen adjustments for illumination options, background images, brightness, contrast and angle adjust
Pioneer AVH-X5600BHS Review – Ease of use
In terms of ease of use, the Pioneer AVH-X5600BHS is very user friendly. There is a home button right in the center of the bottom of the screen that will bring you to a home screen which displays a list of all available sources along with access to varies system settings.
Pioneer AVH-X5600BHS Review Home Screen
Each source is clearly labeled with a bright and easily recognizable icon making it easy for users to quickly identify and select sources or setting adjustments.
Once a source is selected, the user has easy access to commonly accessed options and features such as a music search function (magnifying glass icon), audio adjustment menu (EQ icon) and easy phone menu access (smartphone icon).
The Pioneer AVH-X5600BHS also features a nice, large clock which is often a rarity in the car stereo industry.
Pioneer AVH-X5600BHS Review – Bluetooth functionality
Most double din touch screen stereos these days feature Bluetooth and the more popular car stereo manufacturers (Pioneer, Kenwood and Alpine) outsource the Bluetooth technology to industry leader Parrot. Despite all manufacturers using the same technology, the end result is actually quite varied. There is a huge difference in Bluetooth functionality and call quality between a Kenwood double din and a Pioneer double din. This is one category in which the Pioneer AVH-X5600BHS shines.
AVH-X5600BHS Review Bluetooth Menu
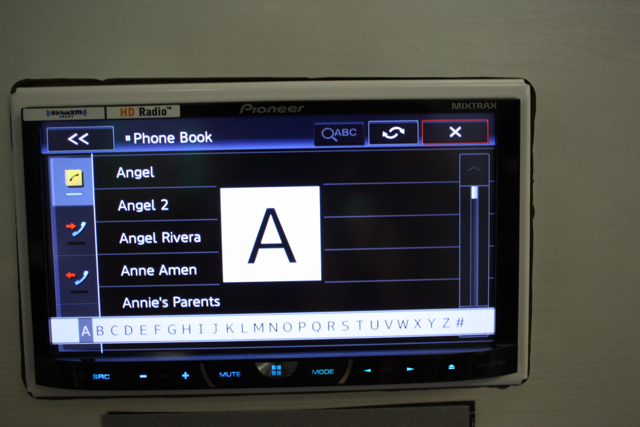
Bluetooth sound quality is clear and the pairing process is simple. Simply identity the stereo model number in your list of bluetooth devices from your phone and the next thing that happens in both your phone and the stereo will confirm you want to pair. After that, depending on what kind of phone you have you may need to change certain permission settings to allow phone book transfer. Additionally, there is a voice prompt button on the Bluetooth menu of the Pioneer. Depending on what type of device you have, tapping that button will prompt the voice dial feature of your cell phone. Once you are paired up, you can access the contacts menu which displays all of your contacts, received calls and dialed calls along with a convenient alphabet search option.
Pioneer AVH-X5600BHS Review Bluetooth Contact Menu
The Bluetooth audio streaming feature is also very convenient and quite functional. Depending on what device you are using and what app, you may see artist name and song title information displayed or you may see “No Data” displayed.
Pioneer AVH-X5600BHS Review – Sound quality
Sound quality is often a relative term. I tell my own customers that everyone has differently shaped ears and different hearing abilities. Some require more top end frequency to identify detail and clarity whereas others have highly sensitive ears and require less.
The Pioneer AVH-X5600BHS does have an 8 band EQ which will help users to tweak and adjust frequency bands to their taste and individual liking. With everything flat, I’ve always identified Pioneer to be clean, but not very vibrant or articulate in sound reproduction. Subtle nuances are more easily identifiable and warmer tones are heard in Kenwood eXcelon products for example (this may be one pro for Kenwood, but they also have a lot of cons which will be identified in a later post on the Kenwood DDX8901). The other very important detail I tell customers is this. If you can’t hear the difference, don’t pay for it.
Pioneer AVH-X5600BHS Review EQ
In my experience, the average every day consumer will not hear the difference in sound quality between these two models. They will also most likely be far better off going with the Pioneer that performs well in the features they are interested in.
The Pioneer AVH-X5600BHS does feature 3 RCA preouts for aftermarket amplification with 4 Volt sensitivity. If you are looking to expand and build a nice quality aftermarket stereo system with amplifiers and upgraded speakers, the Pioneer AVH-X5600BHS will definitely support it.
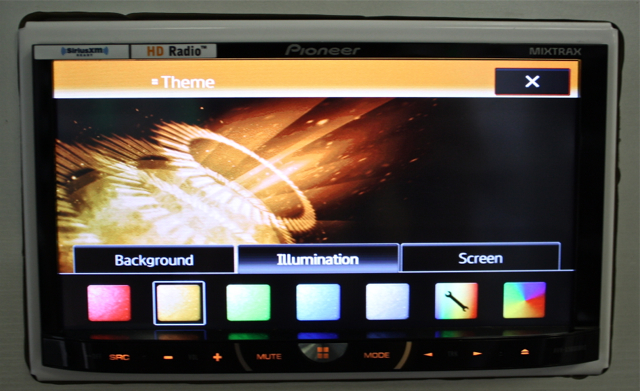
Pioneer AVH-X5600BHS Review – Display/Appearance
It is quite obvious this is an aftermarket head unit, but in terms of aesthetics, the Pioneer AVH-X5600BHS is quite versatile and customizable.
Several different angle adjustments on the 7″ motorized screen (great if you have a sloping or angled dash)
Brightness and Contrast adjustments with two different settings (one for when headlights are on and when for when headlights are off)
Dimmer adjustment (can adjust how much the display dims when headlights are on)
Multicolor illumination options for buttons and background
Multiple background images to select from including user uploaded
Pioneer AVH-X5600BHS Review Appearance Menu
Pioneer AVH-X5600BHS Review – Responsiveness
In terms of processing speed, the Pioneer AVH-X5600BHS is quite responsive. There is virtually no lag time or request to “please wait” when accessing various features or search functions of this stereo. This is particularly applicable to the iPod search function. Almost immediately upon pressing the quick search icon, a list is displayed featuring methods of search, “Playlists, Artists, Albums, Songs, Podcasts, Genres, etc”. Another tap of the desired method search and the screen quickly populates with a choice of selections. Users can scroll through the list or select the alphabet search function to quickly access their desired selection.
Pioneer AVH-X5600BHS is responsive in music search and other various functions
Pioneer AVH-X5600BHS Review – AppRadio Mode
This is an area in which I believe this unit is somewhat quirky. I would not recommend buying this model based solely on it’s AppRadio integration features. This is still a relatively buggy technology and it does require additional accessories to function. AppRadio mode is only available for iPhone users. iPhone 4/4s users will require the additional CD-IU201S and iPhone 5 users will require the CD-IV203 and Apple® Lightning to VGA Adapter.
In AppRadio mode users have the ability to launch and control select apps from the screen of their Pioneer stereo (once AppRadio Mode is launched from iPhone). Additionally, for other unsupported apps, users have the option to select the hands on icon and simply mirror audio and video from the iPhone to the stereo speakers and monitor. The only downside to this is users must select and control the app from the phone itself.
One word of advice – if you purchase this model stereo, you’ll also want to buy yourself a PAC TR7. This is a handy little interface that bypasses the parking brake wire. If you want to use AppRadio Mode without the parking brake engaged (which most most consumers are going to want to do) this part is necessary.
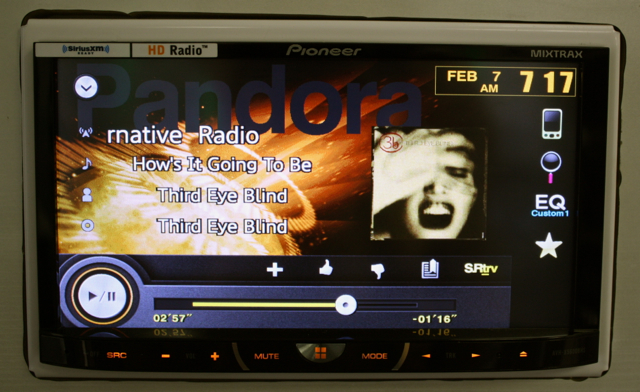
Aside from AppRadio Mode, this model will control Pandora via USB for iPhone users or via Bluetooth for Android as shown below.
Pioneer AVH-X5600BHS Pandora Control
Pioneer AVH-X5600BHS Review – In conclusion
In conclusion, the Pioneer AVH-X5600BHS performs quite well in several different categories and is one of the more popular double din touch screen stereo models in our shop due it’s features, versatility and overall performance.
Kenwood, Pioneer and Alpine are three names that have been in car stereo for more than 20 years (truthfully it’s probably more like 30+ years at this point, but who’s counting really?). They’ve all been around a very long time and have all built very successful brands. Each brand has several different single din head unit models to choose from, but some are more focused on sound quality and performance than others.
In this industry, it’s not uncommon for quality to vary from year to year based on manufacturing decisions, marketing decisions and overall business direction. More and more companies are willing to cut costs and cut corners in order to improve their bottom line. With this in mind, it’s important for me to be aware of who is being consistent and who is slacking off. In this industry, it is necessary to re-evaluate brand quality and performance on a yearly basis within each product category.
Kenwood and Alpine have been fairly consistent over the years and Alpine especially has made some serious effort in getting back to focusing on sound quality and audio control (equalization tools). Yet, they’re still coming up short compared to what Kenwood produces in terms of sound quality and audio control capability. In previous years, Pioneer made a concentrated effort in the sound quality category with their DEH-80PRS. However, in recent years, Pioneer has focused largely on their double din category, app integration and has apparently dropped their focus on sound quality and equalization control in their single din head unit category. As a result, I have omitted Pioneer from this review.
Kenwood eXcelon vs Alpine – the findings
I recently spent some time comparing three top of the line single din head units from Kenwood eXcelon and Alpine: the KDC-X998 the CDE-HD149BT head unit (kind of a carryover from last year) and the CDE-154BT head unit (newest receiver in Alpine’s line up with the latest EQ features Alpine is offering).
On each single din head unit, I set the EQ’s to flat and made sure to turn things like bass boost and loudness off. The result was that the Kenwood KDC-X998 out performed the Alpine in terms of sound quality. The Kenwood eXcelon head unit was much warmer, more vibrant, had greater detail, clarity and overall richness compared to the Alpine dingle din head unit models. Despite having the same voltage preout (4v), the subwoofer and bass response was much tighter and more pronounced in the Kenwood eXcelon model. All equalization features aside, Kenwood eXcelon produces a better sounding head unit than Alpine.
Kenwood and Alpine are remaining consistent and true to their roots. Alpine has consistently produced what I consider an easier to use product, however they’ve consistently had a sound that emphasizes the upper end frequency range that can come off as almost tinny in comparison to the Kenwood eXcelon product. I believe Kenwood eXcelon has the best sounding single din head unit.
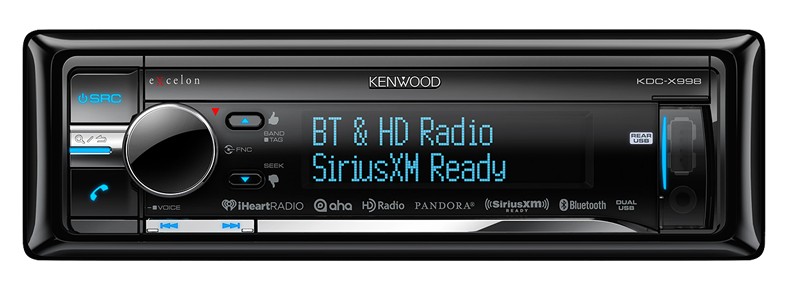
KDC-X998 – Best Single Din Head Unit 2014
Unfortunately, we can’t have it all. There is a trade off for achieving better sound quality. This head unit comes with the familiar Kenwood eXcelon compromise – it’s not the easiest thing to use. It may even behave a bit quirky at times (get to know where the reset button is), but when it cooperates (which is most of the time), boy does it sound freaking awesome! Well worth any learning curve and occasional quirkiness in my opinion – if sound quality is truly what you’re after.
Sound Quality Audio Control Features
The KDC-X998 head unit is loaded with helpful sound control features, many of which you may find surprisingly beneficial. One such feature I was impressed with is “Channel Level Adjustment” under the Pro set up. This feature allows you to lower output of each individual channel separately. This feature is extremely helpful if you have a vehicle with an awkward or unbalanced speaker set up. Some vehicles, like early model GM’s, have a large size variation between front and rear (example 4×6 in lower front doors, 6×9 in top rear shelf). This kind of control would have been really helpful in balancing out my sound stage in my old car, a 2000 Pontiac Grand Am.
Additional equalization features include:
13 Band EQ
Digital Time Alignment for Front, Rear and Sub OR Tweeter, Mid and Sub (no rears)
High Pass Filter and Low Pass Filter – extremely adjustable and typically much better quality than what you might find on your outboard 4 channel amplifier (30/40/50/60/70/80/90/100/120/150/180/250 hz with adjustable slope 6/12/18/24 db – when using Tweeter setting crossover choices are 1/1.6/2.5/4/5/6.3/8/10/12.5 khz)
Awesome DSP Processor allowing for features such as Drive EQ (helps to compensate for road noise frequencies), Supreme (I don’t know from a technical standpoint exactly what Supreme is doing, but whatever it does, it does it right – I would leave this one on), Sound Realizer and Space Elevation (good if your speakers are low in the doors and no separate tweeters)
Easy preset equalization option for the less tech savvy allowing listeners to simply select Car Type, Listening Position, Speaker Size/Location, even preset Equalization based on genre of music.
RECALL option – I love this. How many times have you brought your car in for service only to find all of your settings have been erased because the battery was disconnected while your car was being serviced? With this feature you can preset all of your hard work and easily recall your fine tuning efforts.
Best Sounding Single Din Car Stereo Head Unit 2014
Standard Features
Aside from sounding awesome, this single din head unit comes with all the standard features you would expect at a very reasonable price.
Front OR Rear USB
Front Aux
Bluetooth for handsfree and audio streaming
Front, Rear and Subwoofer preouts, 4 Volt
Multicolor illumination
Pandora, Aha & iHeart Radio control for iPhone via USB or Android via Bluetooth Audio
SiriusXM Ready
HD Radio
Steering Wheel Control Ready
Voice Dial – Pressing and holding the phone button prompts the voice control feature of your smart phone so you can easily and safely make phone calls (“Call home…”)
Where are all the buttons?
If you know how to use an iPod Classic you can figure out how to use the KDC-X996
Okay, so there’s not a lot of buttons on the face of this head unit which definitely creates a clean look, but can make controlling the thing somewhat daunting. Looks can be deceiving, it’s actually not as difficult as it appears. You pretty much control everything through the volume knob.
It’s very much like using an iPod Classic with the volume knob acting as both the spin wheel and center select button. Your back button is the “Search” button located directly to the left of the volume knob. With that in mind, it’s not that intimidating and navigating the various menus and audio options becomes pretty easy.
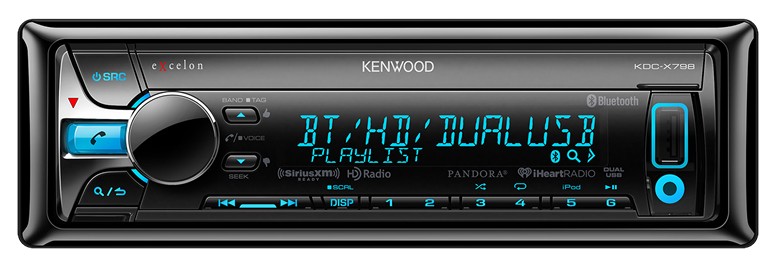
Disclaimer – If you are admittedly somewhat tech phobic and ease of use is just as important to you as sound quality, this probably isn’t the right Kenwood eXcelon head unit for you. Ease of use lovers out there, don’t despair. Consider the Kenwood eXcelon KDC-X798.
Although this head unit lacks the advanced equalization features of the KDC-X998, the KDC-X798 is still part of the Kenwood eXcelon family and sound quality is still at its core. Equipped with a basic 3 band EQ, the KDC-X798 head unit is able to provide rich, warm and vibrant sound reproduction and maintains that familiar Kenwood eXcelon punch on the subwoofer preout.
Best Single Din Head Unit Alternative – Ease of use and sound quality are at the heart of the KDC-X798
I wish Kenwood would produce a top of the line model like the KDC-X998 with the ease of use of the KDC-X798. For whatever reason, their top of the line models have always been a bit more difficult to use than their more entry level options. I don’t know the process Kenwood uses to make their design decisions, but I can tell you what sounds good and it’s the Kenwood eXcelon head units. Please keep in mind, ease of use is a relative term. It’s just like anything else, you just have to try it, learn it and get used to it – especially if sound quality and equalization control is important to you.
So there you have it! Kenwood Excelon once again has the best sounding single din head units for 2014. What do the readers think? Is it worth getting over “ease of use” for sound quality and equalization control?
In this particular write up I am focusing on VALUE. There are a lot of double din head units out there (and I have a full write up on 7 different models between Kenwood, Pioneer and Sony found here), but in this particular post I am really looking at bang for buck, features and quality.
The majority of double din head units sold in my showroom are either the Pioneer AVH-X2600BT or Kenwood DDX371 and both get the job done very effectively. These are our two main entry level double din touch screen head units to choose from and I will tell you the pros and cons of each just as if you were in my own shop.
Why go double din?
With the price of these head units coming down each year, it becomes a better option for more and more people that may not have originally entertained the idea of a double din head unit for their car. I say if you have the room in your dash, go for it. You can check www.metraonline.com and follow their application guide to see if there is a double din kit for your car.
Search phone contacts easily on a nice double din touch screen head unit.
It is just so much easier to access your music files, search your iPod, search your phone contacts from a large touch screen vs a tiny one or two line dot matrix single din display. There is also the added benefit of having the option to add a back up camera too!
The Pioneer AVH-X2600BT and the Kenwood DDX371 are both considered slightly above entry level in the double din line up. Both come with bluetooth whereas truly entry level double din head units typically do not even come with bluetooth.
Both the Pioneer double din and Kenwood double din discussed here come with a lot of features for your money. Despite their similar features, there are some additional costs to the Pioneer that you would probably have been largely unaware of until it came time to install the unit.
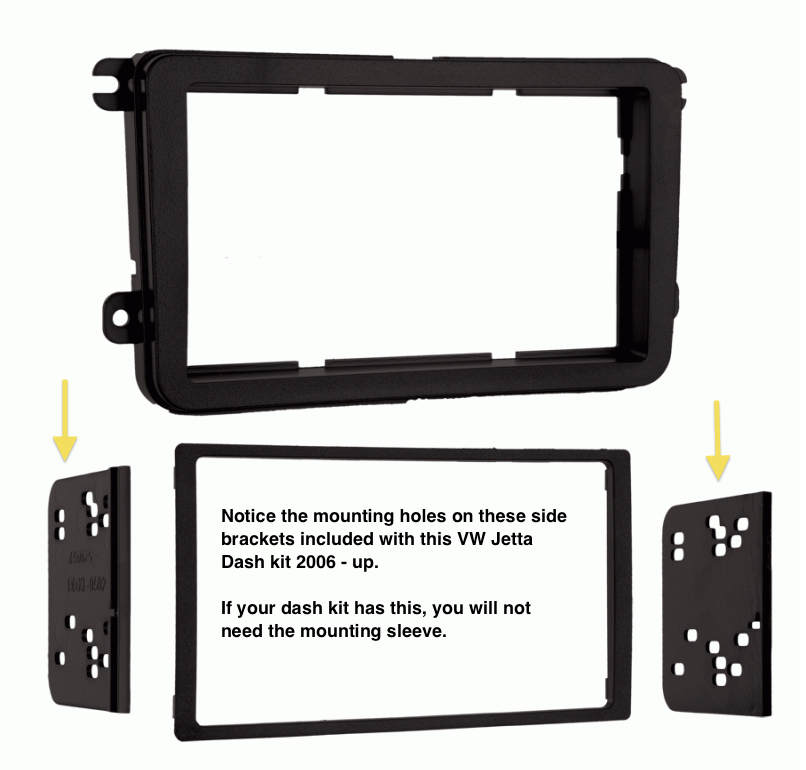
The Pioneer does not come with a mounting sleeve and trim ring. This is an additional part with an additional cost IF your vehicle requires it. That’s the ADTVA133, not every car requires it – check your dash kit and see if there are side mounting arms like those pictured in the 2006 up VW Jetta Kit here.
Do you need a mounting sleeve?
Both products feature an App Mode, however both require additional parts and a compatible phone and each has their own limitations.
With the AVH-X2600BT and the necessary adapters (listed below in bullet points), iPhone users can launch compatible apps on screen in App Mode and alternatively have the option to mirror their iPhone when selecting iPod as a source and selecting the hands on icon on the lower right. In this mirroring mode, you must launch and control the app from the iPhone itself, but audio will be heard and video will be displayed on screen. Depending on which iPhone you have, the cost of these additional cables and accessories can quickly add up.
Pioneer also offers Mirrorlink capability which requires a Mirrorlink compatible phone and additional adapters (CD-MU200). Additionally, in this model, Mirrorlink is only listed as supporting USB MTP music playback. Mirrorlink compatibility seems to be hit or miss. Sometimes phones that are produced as Mirrorlink certified can end up becoming incompatible after something as simple and common as a software update to the phone’s operating systems. So although the feature is listed, it’s not one I would count on working. There are too many variations and too little standardization on Mirrorlink phones for Pioneer to really ensure compatibility.
Kenwood’s app mode is limited to iPhone 4/4s users and a Garmin Navigation app priced at $49.99. It also requires an additional cable, the KCA-ip202. Another slight limitation, if you’re running IOS 5.1.1 or greater you will be limited in search and control of music or video stored on your iPhone to things like pause/play, track forward/back. However if you just use a standard apple to usb cable and connect for music purposes, you have full search and control capabilities.
With both models, if you choose to utilize their respective app mode, you’ll either need to have the parking brake engaged or you need to find another way to address the video safety bypass. With Kenwood, you can simply ground out the parking brake wire. With Pioneer on the other hand, you will either need to rig up a switch that you’ll have to flick every time you start it up OR you can purchase a PAC Audio bypass called a TR7. I highly recommend the TR7 if you go with the Pioneer.
Confused yet? Here’s the easy breakdown to summarize the difference between these two decks. Depending on what features are important to you, you will find one is more suitable over the other.
Pioneer AVH-X2600BT Best Double Din for the Money?
Pioneer AVH-X2600BT Pros
Excellent Bluetooth Handsfree call sound quality
Mutlicolor illumination, various background illumination/graphic choices
Esthetically attractive home menu and user interface (it’s pretty)
Mirrorlink Capable (CD-MU200 required and Mirrorlink phone required – According to Pioneer, this allows you to access music and phone from your stereo)
Pioneer AVH-X2600BT Cons
Only 2 Volt Preout (not good for sound quality if you’re adding amplifiers)
Requires tricky parking brake bypass or additional TR7 interface
No Volume Knob – Volume rocker instead, however this double din is Steering Wheel Control ready.
Does not come with Double Din Sleeve and Trim ring, designed for iso mount only – if your car does not have iso mount kit option you will need additional parts (think VW Jetta 2002 – 2005).
NO SiriusXM compatibility – This unit is not Sat Ready and I know that can be a deal breaker for some, but you can stream Bluetooth Audio with your phone using Pandora or other music apps that sound WAY better anyways – SiriusXM is majorly compressed audio, like 32 kbps (yuck). That compression rate is fine for talk/entertainment, bad for music.
DDX371 – Best Double Din for the Money?
Kenwood DDX371 Pros
Volume Knob – Many consumers find this much easier to use even if their car is equipped with Steering Wheel Controls (which by the way both radios support with additional SWC interface)
4 Volt Preouts for Front, Rear and Sub (Provides better sound quality when using external amplifiers connected through RCA)
Easy Parking Brake Bypass
Comes with mounting sleeve and trim ring if needed
Poor Bluetooth Sound quality for handsfree calling – Kenwood has not updated the Bluetooth processor or mic in this unit – it’s the same as last years model and if you’re on the phone a lot, the Pioneer definitely has better sound quality for handsfree calling. You may get complaints like “you sound like you’re under water”, “are you in a tunnel or something?” or plain old and pissed off “I can’t hear/understand you, call me later” Click. If you’re using the Bluetooth mainly to stream your music, this may not be a concern.
Slower searching on iPod when connected to USB compared to the Pioneer – not by a lot, maybe 1-2 seconds, but for many consumers every second counts and when I show them the difference on our display, that makes their decision. If you’re the type of consumer who will just leave their iPod on random anyways and skip tracks, that won’t really effect you – same if you’re using Bluetooth audio as you’ll mainly be controlling/selecting music from your phone and just streaming it wirelessly to the stereo.
Extremely limited App Mode Feature – designed only for iPhone 4/4s users, mainly for Garmin app priced at $49.99, requires KCA-ip202 accessory – limited music search and control if operating on anything newer than IOS 5.1.1
My thoughts on Pioneer’s App Mode with the AVH-X2600BT
App Radio Mode isn’t perfect. It’s kind of quirky and if you have an iPhone 5, the end result of all those required adapters is a pretty ugly looking pigtail. The end coming off the required VGA adapter is so short, that you usually can’t avoid seeing it and the bulky connector attached to two other cables. If you can hide it in the glove box or center console, that’s great.
Most customers are interested in App Mode for the navigation purposes. In most cases, my customers feel they are better off investing that accessory money in a nice cell phone mount. This way they can glance at their cell phone for a visual map while hearing the audio prompts through their stereo via Bluetooth Audio. This is also a more esthetically pleasing option as this can be done without unsightly wires and the other route cannot. Panavise makes some great vehicle specific brackets and to those brackets, you can add a nice phone specific holder from Pro Clip.
For the best phone mirroring, I will discuss several options on the market and the soon to be released software update for select Pioneer double din radios (AVH-4000NEX) that will be featuring the much anticipated Apple Carplay integration. Check here for the latest update on Pioneer Carplay.
In Summary
App Modes aside – If you are concerned about sound quality and plan on using external amplifiers go with the Kenwood DDX371. Additional features that may sway consumers to Kenwood would be the volume knob and ability to add SiriusXM. Also – If you don’t give a damn about people trying to call you when you’re listening to your tunes – the Kenwood DDX371 may be the better choice for you.
If you have to talk to people on your cell phone while you’re driving, the Pioneer AVH-X2600BT is the better choice for you, it is much more functional in this aspect. Additionally, if you can benefit from App Radio Mode and enjoy browsing for music quickly and easily – go with the Pioneer AVH-X2600BT.
If you’ve found this article helpful and plan on buying either model, please support Car Stereo Chick by purchasing through her affiliate link below. Thanks for reading!
Trying to figure out what Pioneer iPod cable I need nowadays….Seriously, have you seen this cross reference chart?
What iPod cable do I need for my Pioneer head unit??
What iPod cable do I need for my Pioneer head unit?
All joking aside
Apple really did throw a curve ball for a lot of companies by changing to the new lightning port. I really do have to reference this chart quite often to figure out exactly what iPod cable I need for what Pioneer head unit I’m selling depending on what device I’m hooking up and for what purpose. So for everyone out there wondering what friggin iPod cable they need for their Pioneer head unit, check out that chart!
As far as the lapse in posts, responses, etc. – Business has been demanding and my intentions for this blog had to go on the back burner. Eventually, I realized my goal of trying to help answer everyone’s questions was a pretty unrealistic goal. I really wish I could help everyone out there. I wish there was enough time to answer every question emailed or posted and return every phone call I receive at the shop from readers, but in reality, it’s just not possible. I really appreciate everyone reaching out for my expertise, but my time is limited on this earth. My loyalty and priority has to be with my local customers who support my business and make this blog even a possibility.
No doubt I will continue to make posts about new products which are finally hitting the market (CES 2013? Yeah, totally missed that – didn’t even get to read about! Sad, but true). You will also see more posts highlighting the various and unique installs we do at our shop on a daily basis. Check back soon for new product reviews and installation showcases.
Coming up next, the Alpine PXA-H800 processor vs the Audison Bit One. John just finished installing one and I have yet to take a listen to it. Has Alpine finally produced a processor close to what their F#1 status equipment could achieve? I’ll find out and post about it soon enough. In the mean time, for all you nostalgic car audio collectors out there, I happen to be selling our store’s Alpine F#1 Status DVI-9990 head unit and PXI-H990 DSP processor on eBay, you can bid on that or just check it out here.
Car stereo manufacturers often brag about their equalizer. Plastered in bold lettering on the outside of the box you will see phrases like, “3 band parametric EQ” or “7 band pro audio equalizer” “advanced 13 band EQ”.
Are you wondering what difference an EQ can make?
The 13 bands of equalization in the Kenwood DNX9990HD can turn your listening experience into a dream if you know how to use it or a nightmare if you haven’t a clue about what it can do.
I want to equalize the misbehaving sine (wave).
A lot of people assume if a stereo has an EQ than it must sound really good. Not necessarily. High quality sound reproduction still requires a high quality digital to analog convertor. If you can start out with a good quality head unit that sounds good while listening with the EQ flat, then it can only sound better after correcting for imperfections in your listening environment. If it sounds unpleasant without any EQ adjustments, consider checking things like phase on your speakers, crossover adjustments on any aftermarket components speakers (tweeter level), crossover settings on any aftermarket amplifiers or maybe even just the quality of the audio components you’re using.
I got a lot of flack from readers for comparing the Pioneer DEH-80PRS to Kenwood’s KDC-X996 while listening at flat. I did this for a very good reason. An equalizer is not there to improve the inherent sound quality, detail or ability of a stereo’s DAC to reproduce lively, natural sound (For those that don’t know, DAC stands for digital to analog convertor or what I like to refer to as “what takes the data on your CD or iPod and converts it to the audio that you hear”).
I’ll say that again because I’m sure I may have surprised or confused many readers out there. An equalizer is not able to improve or enhance a receiver’s ability to reproduce audio in a more detailed or lively manner. When properly adjusted, it can appear to sound as though it added more life and vibrancy, but in reality, you’ve simply corrected and accounted for imperfections created by the overall acoustic environment. Basically the closer you can start to perfection, the easier it will be to get there. So make sure you start with a head unit that sounds pretty darn good without tweaking anything.
Get your tools ready. No tools? An iPhone will work too.
Now that I got that out of the way, let’s talk about how you can properly use an EQ to improve and correct the sound in your car audio system. Before you can begin tuning the audio system in your car, you will need a tool to measure the sound in your vehicle. How can you correct or improve the sound it if you don’t know where the imperfections lie? Although my husband John and I both have an excellent ear for music and can generally tune by ear much of the time (interestingly, we’re also both able to pick up and play instruments by ear as well), for perfection, you really have to measure what you’re attempting to correct. And to measure and analyze sound, we use a few different tools.
One of which is a real time analyzer, also known as an RTA. Years ago, an RTA was this big, bulky analyzer that we had to set up in a car with a mic stand positioned in the drivers seat. Thanks to awesome technology, these tools are now easily accessible to anyone. These days we can accomplish the same thing using an app on our iPhone. I like to use one of two apps on my iPhone. Both are made by Studio Six Digital.
JL Audio Tools is a free app which includes an RTA
JL Audio Tools is a free app which includes an RTA (Real Time Analyzer), SPL meter and speaker polarity testing (phase). The more advanced Audio Tools app provides additional features such as signal generators, audio scope, delay finder and many more acoustical analysis tools. Either app can be downloaded from iTunes. Besides the app, you will need some pink noise. I find the Audio Tools app to be more convenient because it comes with a built in pink noise generator.
Pink noise is equal output of a large range of frequencies, typically from around 20 hertz (slightly below human hearing) to 20,000 hertz (slightly above human hearing) and everything in between. The equalizer on a car stereo represents a division of bands of these frequencies. For example, a 3 band EQ may be referred to as representing Bass, Mid and Treble. Bass may represent frequencies of 60 – 200 hertz, Mid may represent 400-2,500 hertz and treble may represent 8,000 – 15,000 hertz. The more bands, the finer the division of frequency groups, meaning the greater control you have over correcting and tweaking imperfections.
Analyze this.
So let’s do a little analyzing. Here is a screen shot of a real time analyzation of pink noise played through my iPhone.
RTA screenshot using JL Audio Tools for EQ tuning
Here is an ideal curve drawn by my lovely husband John who also used to be a judge for IASCA (International Auto Sound Competition Association). Notice his rules, No more than 3 DB change in adjacent frequencies. I’ll address that shortly.
Plotted ideal RTA Curve
So if I were to try and overlap a proper curve over our RTA analysis, it would look something like this:
Ideal curve overlapped over RTA
Excuse the poor drawing. I’m using Paint here, not the easiest thing to draw with. Notice the dB increments on the RTA are in increments of 10 vs on John’s drawing he had increments of 3 .John pointed out that you don’t want more than a 3 dB difference between frequencies. The larger the gap, the more displeasing the sound. Listener’s fatigue occurs when there are large gaps between frequencies. Your brain is actually trying to correct for any gaps or overages it’s hearing and it gets tired and irritated doing so. To correct these gaps and overages, we can use our equalizer.
Okay, so how do we fix this?
So in this example, it’s safe to say we need to bring the bass down or almost equal to the mid range band. If we have a 3 band EQ, that will adjust a range of frequencies equally (remember we said roughly 60-200 hertz?). That won’t help with the large gap between 63 and 50 hertz or the even larger gap between 40 and 50 hertz. So how do you correct this? You need a larger range of individual frequency bands to adjust. If you had a 31 band EQ, that would be no problem. You could go to the exact frequency that is unbalanced and correct it. A 13 band gives you a nice range of control as well. A 3 band EQ is extremely limited.
If there are any external factors that can be adjusted to correct the problem, try tweaking those first. Examples would be adjustments you could make on your aftermarket amplifier like gain, crossover or bass boost. Other possible tweaking areas would be subwoofer placement or installing a sound deadening material like Dynamat. After you’ve addressed any controllable external factors, see if the large gap still exists. If it does, the only thing you can really do is this. Adjust the center frequency of your bass, mid or treble that needs balancing, then make your bandwidth narrow, then make your level adjustment (Huh?).
If I lost you there, check out this example:
Suppose we were able to bring the gap between 32 and 63 hertz to a reasonable level through adjusting gain and/or bass boost settings on our subwoofer amplifier. Now we can lower our bass level and thus reduce the level of frequencies ranging from 32 to 200 hertz to about where they should be, slightly sloping down towards 200k. Remember these level adjustments are done equally among the range of frequencies in that band.
Next we can adjust our mid range frequencies on our basic 3 band EQ. Notice that 250k is at a much higher level than the other mid range frequencies in that mid range band. How do we narrow in on the small gap that exists in such a wide band? In the mid adjustment menu on our basic head unit there should be the option (hopefully, if you didn’t cheap out too much) to select the center frequency. This is the frequency your adjustment range is centered on.
Our choices for center mid frequency usually range from 400 – 2500 on head units that have this option. We can then select 400 hertz as that is the option closest to the frequency that needs adjusting. Next we can select a narrower bandwidth. This adjustment narrows the band of frequencies we’re adjusting when we actually boost or lower the mid level. That means rather than boosting or lowering a wide range of mid frequencies equally (like a range of 400 – 2500 hertz) we’re centering our adjustment closer to the imperfection located at 250 hertz. It’s far from perfect as it will also adjust 400 hz, but if we lower that narrowed mid adjustment slightly, we will be able to bring 250 hertz down to a slightly closer level of the other mid range frequencies.
Once we’ve brought that mid range frequency a little more into balance with the other mid range frequencies, we would want to lower the treble slightly to try to get as close as possible to the ideal curve.
That’s how you can tune with a very basic EQ and you can see how limited your control is for true correction. When you actually have 13 or more bands to work with, you have much better control over correcting imperfections in the given acoustical environment. EQ’s can allow you to remove large peaks and valleys between frequencies which can create harsh and unpleasant sound reproduction. When used properly, they can correct and smooth out the overall tonal qualities of your car audio system. When used improperly, they can make your hi fidelity components sound harsh, hollow, tinny or too bright. So use your RTA and pink noise and set your EQ properly. You will be rewarded with the sweet sound of perfection.