In the shop this week – Mercedes CLS 63 – Stealth K40 Radar Detector and Stealth Custom Subwoofer
This week in the shop we had the pleasure of working on a client’s 2014 Mercedes CLS AMG. For this vehicle, our task was to install both a K40 radar and laser system as well as fabricate a stealth custom subwoofer enclosure. We had previously installed a JL Audio amp and subwoofer over the Winter, however the enclosure was pretty big and took up a large portion of the trunk. Like most consumers, this client wanted the benefits of an amp and sub, but he didn’t really want to see it.
K40 radar and laser systems are usually pretty stealth as it is, but for this particular Mercedes we took integration and stealthiness to the next level by installing a Mid City Engineering K40 instrument cluster interface. This interface eliminates the need for the K40 LED indicator lights and instead displays warnings in the instrument cluster of the vehicle.
Aside from the K40 system and stealth custom sub install, we had one other task to accomplish. We planned to do a frequency sweep to investigate an inherent rattle that was baffling Mercedes engineers. Prior to us working on this vehicle, the client had been experiencing an annoying and inconsistent rattle coming from the rear shelf. After several failed attempts to identify and eliminate this rattle, the dealership called in Mercedes engineers who also failed to identify and repair the problem. A frequency sweep would be the easiest way to reproduce the rattle, identify where it was coming from and then repair it.
John focused on the K40 installation first. We sell and install and lot of K40 systems at our shop. There are several combined reasons for why we love the K40 systems.
Performance
Reliability (Funny side story – I can’t remember the last time I had a defective K40 product – On the other hand I sent out an Escort system for repair back in December. Turn around time for Escort is usually 6-8 weeks. This time they lost the parts and kept giving me the run around every time I tried to follow up. I finally just received it this week only to find out they sent back the wrong laser shifters. Consider reliability and customer service when choosing your Radar system.)
Discreetness
Exterior discreetness will be the same from brand to brand as most companies have radar receivers that can be hidden behind bumpers and laser shifters that are small enough to be blended into the vehicle’s front grill.
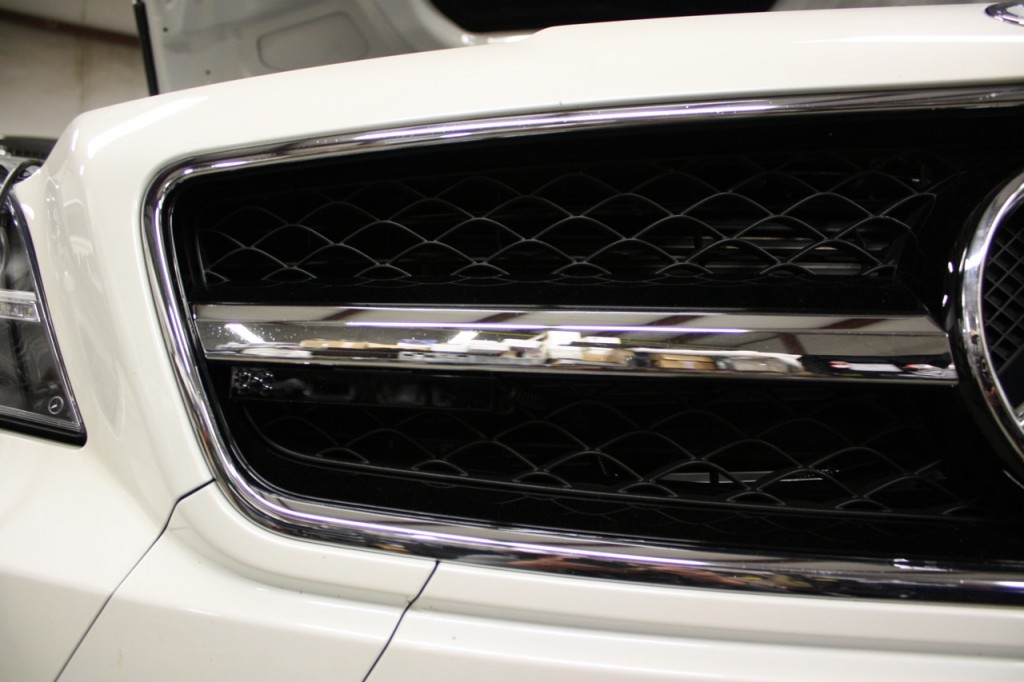
Mercedes CLS 63 AMG K40 Laser Install
When you step back from the vehicle you really can’t see the left and right laser shifters. They really kind of blend into the front grill.
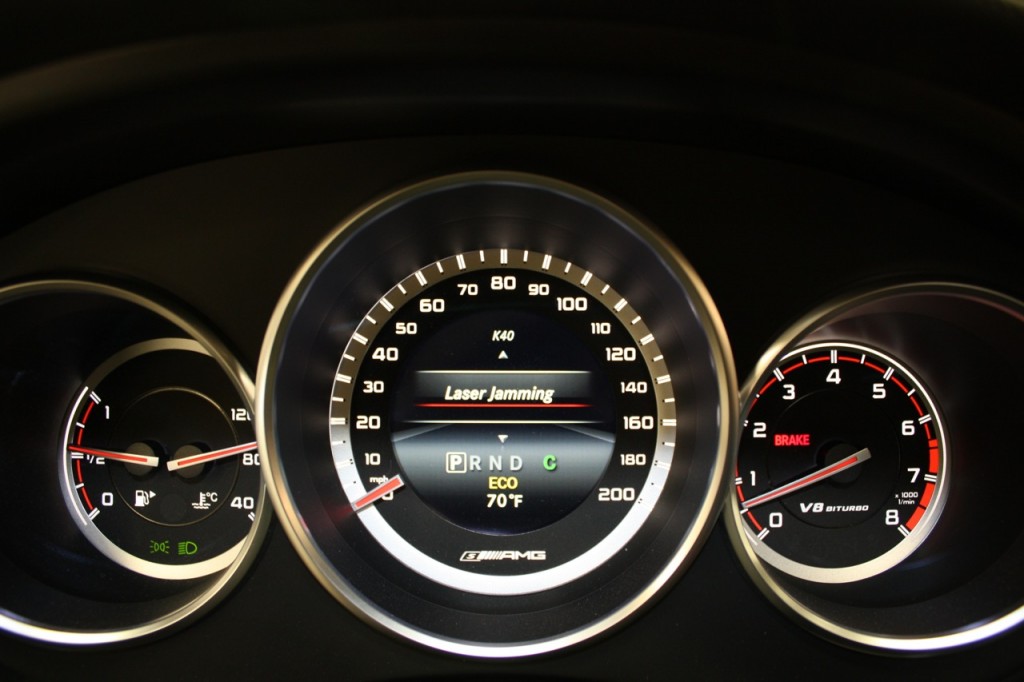
The coolest part about this install is what you see inside. Normally with K40 you have two small LED indicator lights as your display. One indicates for front, one indicates for rear. Additionally, there is a hidden speaker that announces the alerts and a wireless remote control to change settings and turn the system on and off. For an even more discreet and integrated installation, we installed a Mid City Engineering K40 instrument cluster interface. Check out how freaking cool this is.
K40 Mercedes Instrument Cluster Interface
No LED’s are needed with this setup, your display is right in front of you integrated into your factory instrument cluster. Mid City Engineering has a few different models listed on their website, but give them a call if you don’t see your application listed.
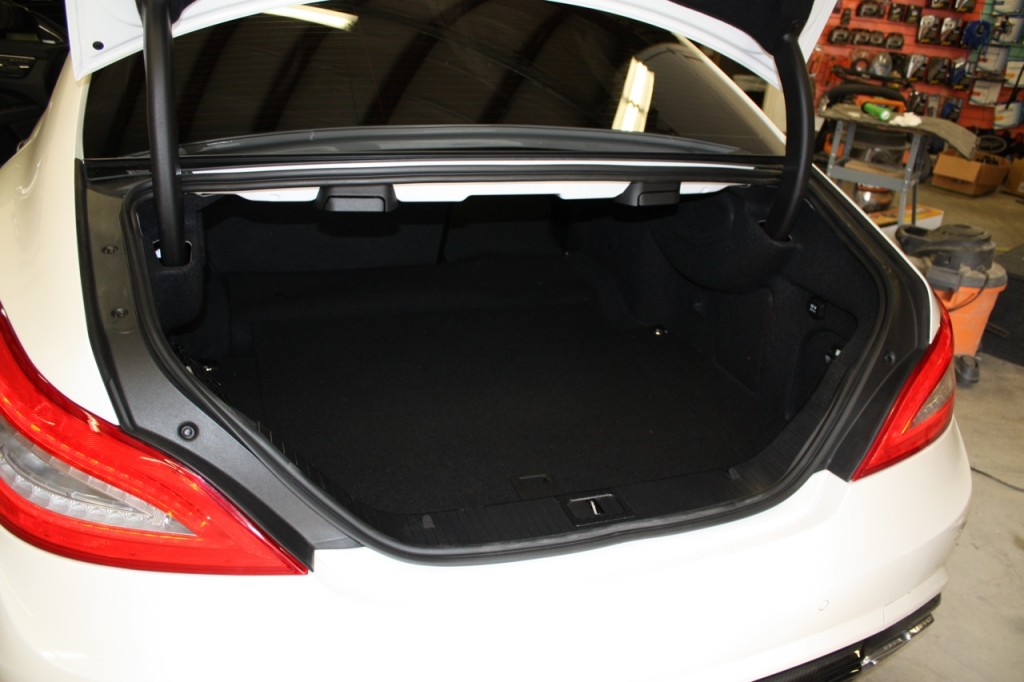
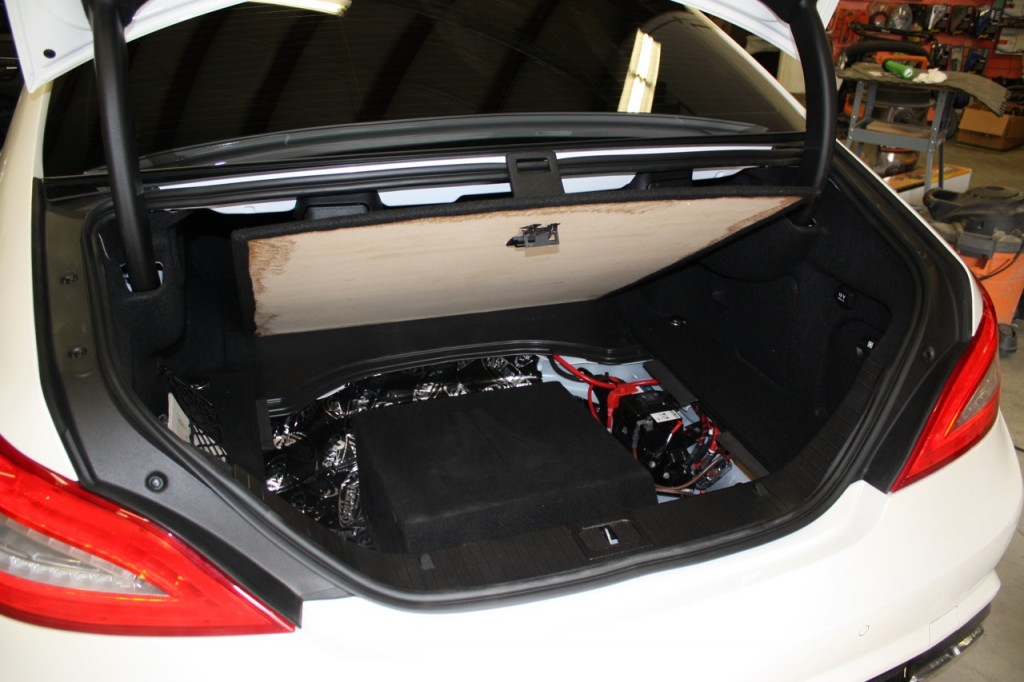
Mercedes CLS AMG Stealth Sub – Factory Trunk Appearance
Check out this trunk. Would you believe we’ve got a 12″ W6V3 subwoofer enclosure in there?
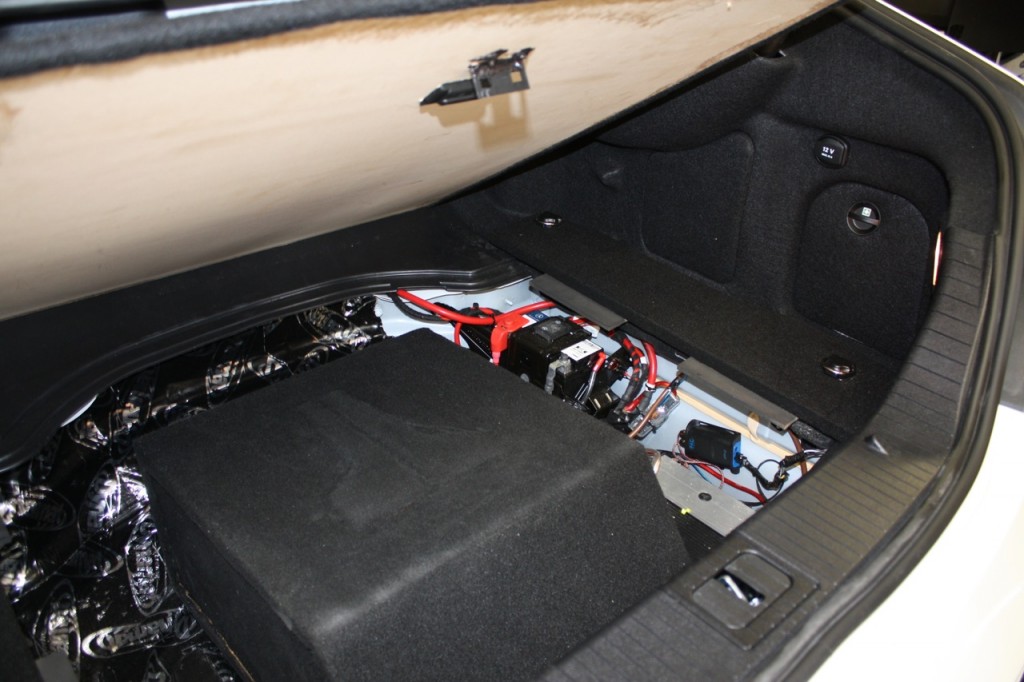
Mercedes CLS AMG Stealth Custom Sub Install
Looks pretty stock, right?
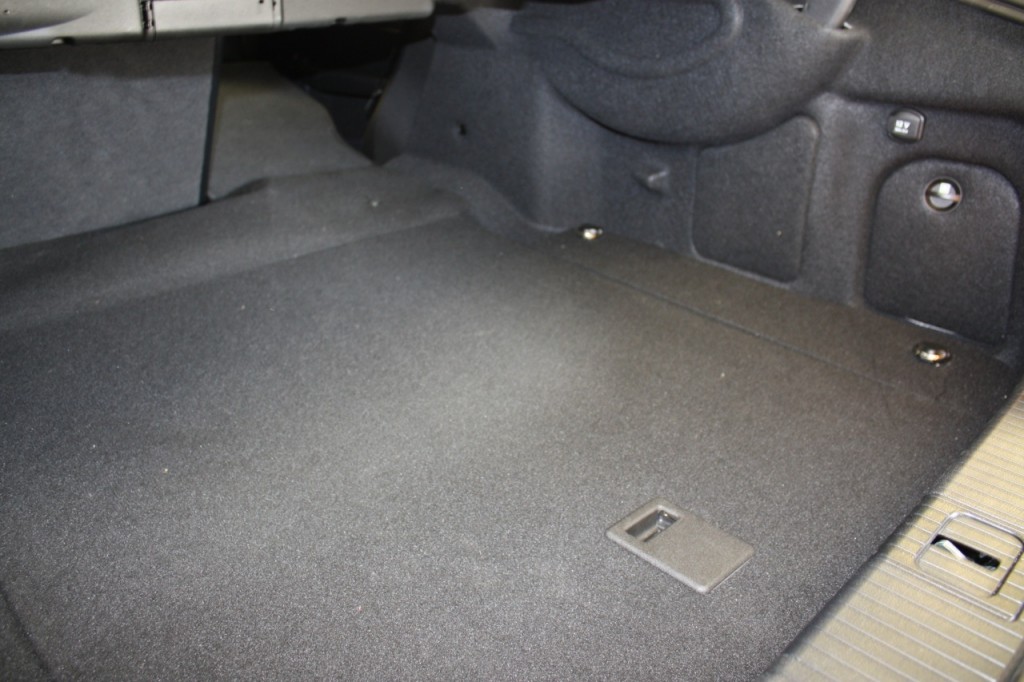
Mercedes CLS AMG Stealth Custom Sub Install
Disclaimer – We did sacrifice the inflate a spare to accomplish this.
Mercedes CLS AMG Stealth Custom Sub Install
John built a down-firing sealed enclosure for the 12W6V3 and remade the entire trunk floor as it needed to be raised up 3/4″. He removed the factory hardware from the original trunk-liner and attached it to his newly fabricated trunk-liner.
Mercedes CLS AMG Stealth Custom Sub Install
He also dynamatted the entire trunk well while he was in there.
Mercedes CLS AMG Stealth Custom Sub Install
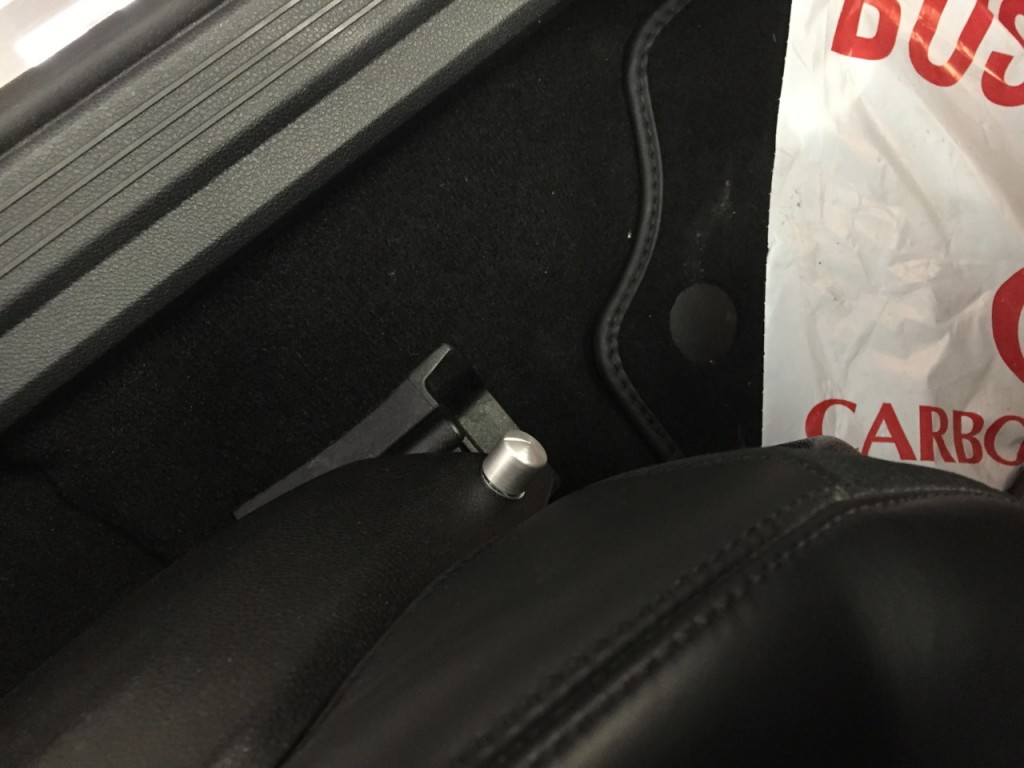
The JL symbol on the top of the box is a foam inlay he made before carpeting the enclosure. Whenever adding an amp and subwoofer to a factory installed audio system, it’s always a good idea to install a bass knob or subwoofer control knob. In this particular vehicle, John mounted it towards the bottom left side of the driver’s seat panel. It’s discreet, yet easy to access.
To identify the rattle that eluded Mercedes engineers, John played a frequency sweep and then listened and located the rattle in the rear shelf. The culprit was a control box mounted on top of the deck lid bolted from the bottom. Even though it was securely mounted, it needed sound dampening material underneath it.
This was a thorough and meticulous installation designed to be discreet without sacrificing performance. This vehicle now sounds fantastic and has the added benefit of radar and laser protection, yet you’d never know it from appearances. If you’re in the vicinity of Brookfield, CT (Fairfield County) and in need of a polished and discreet installation for your vehicle, contact us today to see what options are available.
Car Stereo Installation Accessories – Want to Know What the Pro’s use?
Car stereo installers have a reputation for being somewhat finicky and, for lack of a better word, particular (okay, you could say they’re primadonnas). They only like to use specific products, tools and accessories when installing car stereo electronics and accessories. They have to have these wire ties, this kind of electrical tape, these crimp connectors, this brand steering wheel control interface etc. I do all the ordering at our shop so trust me, if I order something they don’t like I hear about it. If I order something they like I hear about it. If we’re missing something they like, I hear about it. You get the picture.
I decided to put a list together of the most common and revered car stereo installation accessories used in our shop. These are our top 5 car stereo installation accessories. These are the installation accessories our installers use every day and refuse to install without.
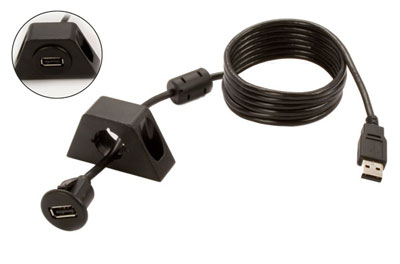
Car Stereo Installation Accessory #5 – USB flush mount port
This little accessory is very handy and highly recommended for anyone installing a stereo with a rear USB port.
USB Flush Mount Port
Sure, you could just route the USB over to the glove box and just have it kind of hanging out in there. That’s easy to install, but not necessarily convenient. You would have to reach over to the glove box every time you want to connect your phone or iPod.
Instead, you could do something cool like flush mount the USB port in a more convenient location such as your dash or center console. The USB port is pressure/snap fit. All you have to do is drill and/or file out a hole slightly smaller than the port itself and route the USB extension to your stereo’s rear USB port.
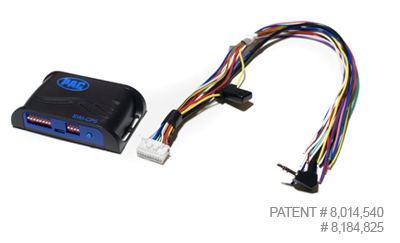
Car Stereo Installation Accessory #4 – Pac Audio SWI-CP5
The Pac Audio SWI-CP5 is one of the easiest steering wheel control interfaces to program and also one of the most versatile. Aside from being a steering wheel control interface, the Pac Audio SWI-CP5 can also provide Retain Accessory Power (RAP). This interface is compatible with vehicles equipped with LAN, LIN, CAN, Class II, Analog or Serial Data SWC.
Pac Audio SWI-CP5 Programmable Steering Wheel Control
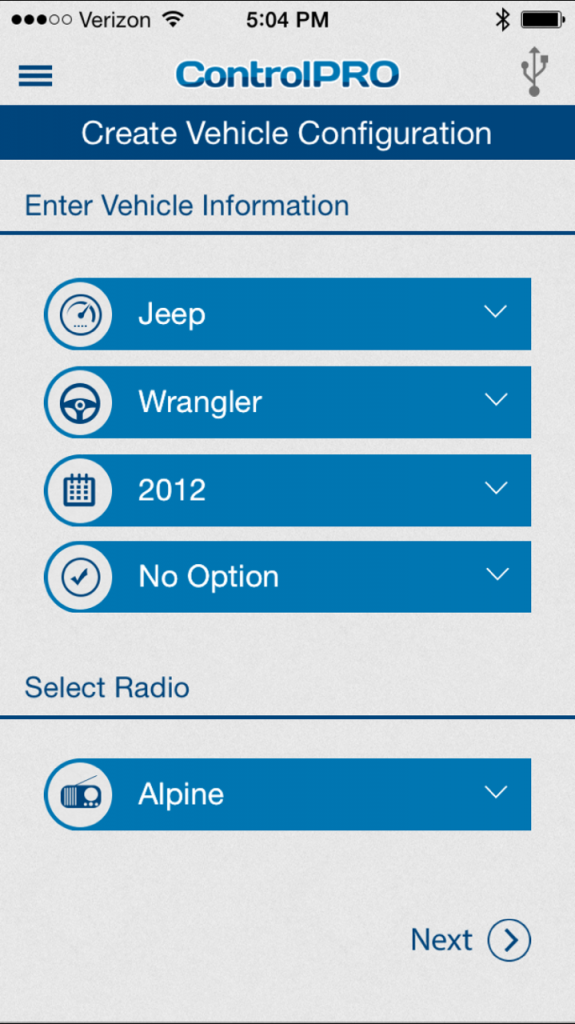
What’s probably the coolest thing about it is you can program it using your iPhone or Android. If you don’t like the whole app idea, more traditional programming can be done via PC, USB drive or you can even manually program from the device itself. However, programming via the app is extremely easy and the process is pretty self explanatory once you get the app open.
PAC Audio SWI-CP5 Programming via Smart Phone
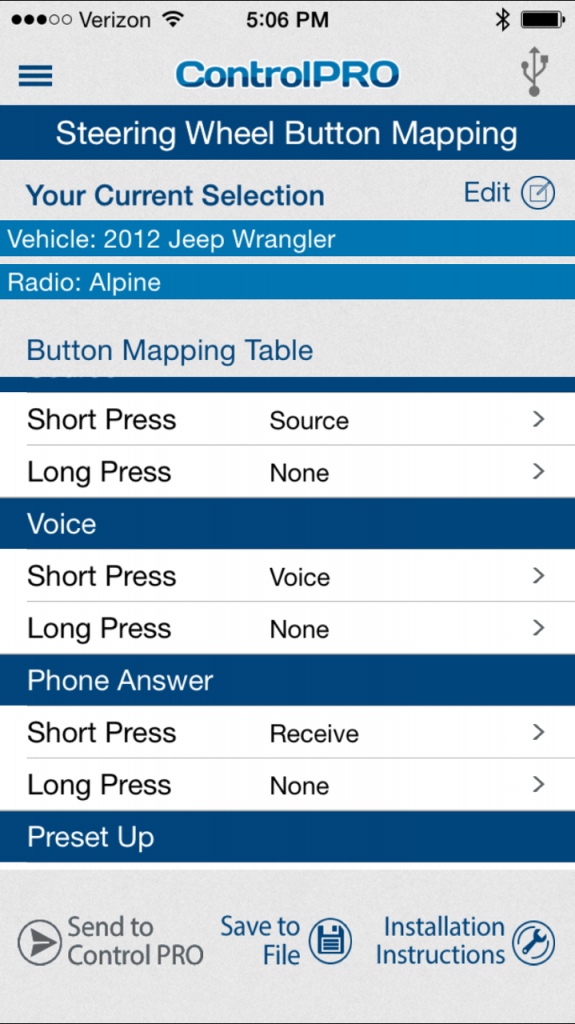
It’s really easy to re-map existing buttons for new functions. You can even add two functions per button; one function for a short press and another function for a long press. This is an awesome feature for vehicles that may only have 5 steering wheel control buttons like Mode, Volume Up, Volume Down, Track Up, Track Down. You can assign additional functions through a long press, thereby adding the ability to Answer, Hang Up, or prompt Voice Control by simply pressing and holding one of the steering wheel control buttons.
What if you have a factory Voice Control button and you want to re-use that feature with your new stereo? Check out how easy it is to re-map a Jeep Wrangler’s Voice Control button to work with this Alpine stereo’s Voice Control feature.
PAC Audio SWI-CP5 Remapping Buttons
You can see the default setting for an Alpine stereo in a 2012 Jeep Wrangler shows no function for the factory Voice Control steering wheel button.
PAC Audio SWI-CP5 Re-assigned Voice Control
Simply tap the feature you want to change and select the function you want to assign to it. Voila. Now your factory Voice Control steering wheel button will control your Alpine stereo’s Voice Control feature. It’s that easy.
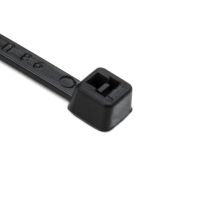
Car Stereo Installation Accessory #3 – Hellermann Tyton 18 lb 8″ Wire Ties
A good quality wire tie is an absolute must for any car electronic installation. Over the past 30 years our shop has tried numerous brands and models of wire ties. However we have found (like most things in life) you get what you pay for – wire ties are no exception to this rule.
Hellermann Tyton 8″ 18lb Wire Ties
The Hellermann Tyton 8″ 18 lb wire ties are our favorite (manufacturer part # T18L0M4). They’re not cheap, but they’re good quality and worth every penny. It’s important to have wire ties that are not thick and bulky so they are easy to work with, but at the same time, they also need to be strong and be able to withstand extreme heat and cold.
The Hellermann Tyton T18L0M4 have an operating temperature range of -40 degrees Fahrenheit to 185 degrees Fahrenheit. This might seem extreme, but in an area like Connecticut we see some pretty extreme temperatures. We have many negative dips in Winter and extreme highs in the Summer of around 100 degrees or higher. At our shop, we offer lifetime warranty on installation and we really don’t want our wire ties failing – ever. We expect our wire ties to last as long as the vehicle lasts. Cheaper wire ties will simply crack over time especially after being exposed to excessive heat and cold. If you want to use what the pro’s use, get yourself some Hellermann Tyton 18 lb 8″ wire ties.
Car Stereo Installation Accessory # 2 – Scotch 3M Super 33+
The number two car stereo installation accessory is something most people never even give much thought to, but they should. Having a good quality electrical tape can make ALL the difference in a car stereo installation.
3M Super 33+ – The electrical tape for professionals
There’s a reason Scotch 3M Super 33+ is rated the number one seller in the electrical tape category on Amazon – it really is the best electrical tape out there and it is the choice of professionals across various industries. It’s strong, it’s flexible, it’s easy to work with and it lasts. Do not waste your time and money on cheap electrical tape. After 30 years of installing, we have found no better electrical tape than Scotch 3M Super 33+.
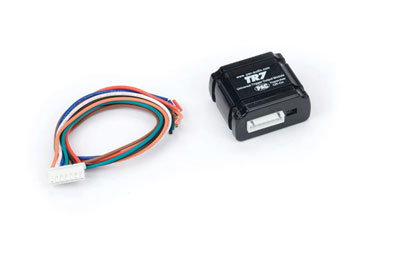
I talk about the TR7 a lot of this blog because most of the double din head units on the market will require a TR7 to access full head unit functionality (all but Kenwood that is – you can still just ground their parking brake wire. Please don’t be duped by anyone trying to sell you a Kenwood parking brake bypass. Yes, they’re out there and it’s a complete and utter rip off!).
PAC Audio TR7 – more than just a parking brake bypass
The TR7 comes pre-programmed for the video bypass, however, it’s much more than a simple video bypass tool. This handy little car stereo accessory is programmable for various other functions. Its list of features and functions is quite long and diverse making it a staple car stereo installation accessory in every shop.
Check what this versatile little interface can do:
Low voltage trigger
Supplies a 12 volt remote output for an aftermarket amplifier when used with a stock head unit that does not have a remote output. Use the TR-7 to supply a 12 volt output from a 5 volt remote source, like from Ford radios. Use on some vehicles that have a negative antenna output and convert to a positive output.
Alpine/Pioneer/Clarion video bypass
This will bypass the parking brake video procedure common in most double din touch screen head units. PAC Audio warns: It is dangerous (and illegal in most states) for the driver to watch the TV/Video monitor while driving the vehicle. The driver may be distracted from looking ahead and an accident could occur. Install the TR-7 only in RV and Marine applications where there is no parking/hand brake to interface to. Do not install the TR-7 where the driver may be able to view the monitor when driving.
Latching outputs
Turn on headlights, neon lights or radio from an alarm with a momentary output or from a momentary switch. Upon a number of pulses within a user programmable time, the outputs will latch. Upon a number of pulses within a user programmable time the second time, the outputs will unlatch. You may program how many pulses to latch and unlatch. Use to turn on aftermarket driving lights by using existing parking light switch.
Double pulse output
Pulses outputs twice when trigger from a constant or pulsed signal. Use for alarm applications where the unlock wire needs 2 pulses to unlock all doors.
Closed loop circuit
Good for monitoring trailers on hitches by triggering an aftermarket alarm if the trailer is disconnected from the vehicles hitch. Also monitors stereo equipment in vehicles.
Pulse extender/delayed turn off
Upon a constant or pulsed trigger, the TR-7 will turn on the outputs. As soon as the trigger is disconnected, turned off or at the end of a pulse, the timer will count up to the number of seconds recorded, at which time the outputs will turn off. Good for turning on headlights at night for convenience. Extend alarms output from 1 second to 3 seconds for Mercedes vacuum door locks
Linear actuator controller
Open/close amplifier racks from a momentary source like from a alarm’s negative output. Sequence is : Start, Stop, Reverse, Stop.
Door lock pulse generator
Good for automatically locking and unlocking door locks when ignition is turned on and off.
Channel splitter
Split 1 channel from an alarm to 2 outputs. Both outputs are user programmable for pulse, latched or timed output.
Pulses to timed output
Upon a number of pulses within 5 seconds, the outputs will turn on and delay for the amount of programmed time, then the outputs will turn off.
Turn on pop delay
Delayed amp turn off
Upon a constant trigger, all 3 outputs are user programmable to delay before turning on outputs or turning on instantly then delay before turning off outputs. Good for situations where you need more than 1 timer but on a different timer period, without having multiple modules.
So many uses in one little part! It’s no wonder the TR7 is one of our favorite car stereo installation accessories.
Now You Know
So there you have it. The top 5 car stereo installation accessories used by professional installers. This list may not be sexy or sophisticated, but it’s downright practical and informative. Using these tried and tested accessories in your car stereo installation will make your life (and your install) much easier. Thanks for reading! I hope you enjoyed this post.
Each week I get installation questions from people all over the world and it’s my pleasure to help. Often times, the questions I get asked have already been answered somewhere on this blog, but I understand it can take time to find that information and understand how it pertains to your application. I thought it’d be cool to pick one of the more common questions I get each week and answer it via a video post. This way it will be easier for anyone with a similar question or application to find an answer. Just post a comment here or email me at [email protected] with the subject “Question of the week”.