
Stereo wire harness cut?
Estimated read time: 5 minutes 45 seconds. Want to read later?
Maybe you just bought a used car and it’s got a nice discount because there’s a big old whole in the dash where your stereo should be. Or maybe you should have taken off the detachable face off that nice aftermarket radio you had in your car because someone decided to steal it from your car last night. Whatever the case may be, you are now in the process of trying to put a new stereo in your car, but there’s no harness, it’s been cut. And the factory wiring harness is in no way close to universal. So how do you figure out what’s what?
Tools you will need: A battery popper, a multimeter, wire strippers, electrical tape, thin masking tape and a marker.
What is a battery popper you ask? It’s a fancy little contraption that anyone can make using some speaker wire and any old battery that works (AA, AAA, D, 9V, whatever). You take your speaker wire and tape the negative side to the negative side of the battery. Then you take the positive side of the speaker wire and tape it to the positive side of your battery. Now you have a battery popper.

You can then take this little device and hook it up to speaker wires to determine what’s what. When you get a pair of speaker wires, you will hear that speaker make a rustling or popping sound. Don’t worry, it won’t hurt the speaker. Next up is the multimeter.

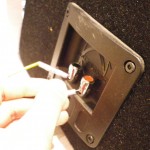
The 1st thing you have to figure out is switched 12 volt power, constant 12 volt power, ground, and illumination if equipped. You will need your multimeter to figure this out. What you need to do is take the negative probe of your multimeter and put it to a known ground point in the car, you can usually find one in the radio chassis or near by.

Then take your positive probe of your multimeter and measure it against a possible power wire in the stock harness. Switch your multimeter to DC Voltage. Once you get a 12 volt reading (with the car’s ignition off), then you know you’ve got 12 volt constant or your Yellow wire. Use your masking tape and marker to mark this wire so you know what it is.

What if none of the wires in the dash give you 12 volts? Then you probably have a blown fuse in the car. If someone left bare wires in the dash and a power wire touches another wire, ground or metal in the car, the fuse for the radio and possibly other accessories in the car would blow. So, don’t despair if you have no power reading, you probably just have a blown fuse.
So check your fuses if that happens, and remember that sometimes they look okay, but they’re really not. You should use your multimeter to test fuses. Put one end to each side of the fuse and put your multimeter to the ohms position. If the fuse is good, you will get some type of reading. If you don’t get any type of reading or fluctuation, you know the fuse is bad. Separate all the wires in the dash, replace the fuse, and continue on where you left off, easy as that.
Once you’ve got your constant power reading and know what wire that is and you’ve taped it off and labeled it, you can move on to finding switched 12 volt power. Do the same thing you did to find constant. Put your negative probe of your meter to ground and the positive end probing a suspected switched power wire. Then see what happens when you turn the car’s ignition on. This wire shouldn’t read anything until you’ve turned the ignition on and it should stop reading when you turn the ignition off. When you’ve found switched 12 volt power, the meter will read 12 volts only after the ignition has been turned on. Once you’ve found this, you will know that’s your Red wire for your head unit. Tape it off and mark it with your marker so you know what it is.
During the whole process, make sure you are using your electrical tape to tape off the bare ends of the wire once you’re done testing it. We don’t want those wires touching each other and popping any fuses.
To find ground, put your multimeter on the ohms setting. Put your negative probe on the chassis for ground. Then take your power probe and probe the suspect wires for a ground. When it reads 0, or close to it, you’ve got ground. Remember to tape off the bare wire with electrical tape and mark it with your masking tape and marker so you know it’s your ground wire.

For illumination, you will be taking the negative probe from your multimeter and putting it to ground, and your positive probe will be checking each wire. With your positive probe on a bare wire, turn the parking lights on and off. Test each wire in this manner. If your car has an illumination wire, and you get the right wire when testing, your multimeter will read 12 volts when you’ve turned on the parking lights. If you get nothing, don’t worry about it, it just means there is no illumination or dimmer wire for the radio harness.
At this point you should have mostly speaker wires left over. With your multimeter, first measure all of them ignition on and off to make sure there is definitely no power going through those wires.
Next you are going to get your speaker popper tester. Pick a wire and put the negative wire from your speaker popper tester to it. Now, go through each leftover wire with your positive wire of your speaker popper tester. Once you get a pair of speaker wires you will hear that speaker rustling and popping.
Now you will know whatever pair of wires you have in your hand is the “left front speaker wires” or “right rear speaker wires”, or whatever pair you heard. To figure out what’s positive and negative, you will really need a partner. You can do it without one, but it will be more time consuming and unless you have a good ear, might be hard to correct if you get it wrong. So try to get someone to help you out here.
While you pop the speaker, have your partner look at the speaker. If the speaker moves outwards, you have positive and negative correct. If the speaker sucks back in and moves inwards, you have positive and negative reversed. You have to do this for each pair of speaker wires. If you get one speaker out of phase, it will make the whole system sound kind of funky and hollow and it will definitely be lacking in bass.
One you determine a pair of speaker wires and you determine what’s positive and what’s negative, electrical tape off the bare wires and use your masking tape and marker to note what’s what.
It’s very important that you have your phase correct! When you have a pair of speakers and you have positive and negative correct on the left side, but reversed on the right side, what happens is they put each other out of phase. This cancels out certain frequencies (this is how noise canceling devices work). It leaves a hollow sound, and very little bass. So take your time to get it right, it will be well worth it in the end.
After identifying all of your speaker wires, it’s always a good idea to take your multimeter and measure the impedance of all of the speakers in the car. Assuming you aren’t dealing with a factory amplified Bose system, all of the car speakers should read around 4 ohms. This is important as aftermarket head units are only designed to power 4 ohm speakers.
Once you’ve identified all of your wires and you are positive your car speakers are all 4 ohms, get to it and start wiring up your aftermarket radio. Enjoy!

17 Comments
Hi,
I have a 2001 chevy silverado factory harness that was recently cut out and stolen along with my deck. So now I’ve installed a new deck that is hard wired and it works fine while sitting still but as soon as I drive, the stereo dies! It will then come back on when I come to a stop.
Any suggestions?
Could possibly be a bad ground, but I would also try to test the voltage too just to make sure you don’t have an issue with your car battery. Aftermarket electronics want 12 volts minimum. A car will start/run on less than that, but will freak out the electronics.
Hi. I have a99 Nissan Frontier. The cassette deck was bad so I bought a 1990 clarion cassette deck to replace it. I cut the factory harness out ( I realize now that was a mistake) I found a wiring Chart for the frontier and used it to wire the clarion in. I did not ground the new stereo, it was working well without being ground so I just capped the wire and that was it. 2 days later my battery was died. Any ideas as to what could have gone wrong here?
Sounds like maybe you had it connected to constant power vs accessory. Was probably only working because it was weakly grounded through the antenna connection. Other than that if you had it wired correctly for power the issue is probably totally unrelated.
Great guide. I have one question if you hooking up a hi to low converter to a standard radio but there are no rear speakers installed how would i know polarity of the wires coming out of the radio?
I would look it up on my mechanic software (OnDemand – subscription based), but if that’s not an option, you can always purchase schematic access for your own car from All Data DIY. Or if you know the polarity of the front speakers, and they’re full range, you could always get the audio signal from those.
I wish I had seen this earlier today. But in fairness it was a nice trip back to being a teenager in the 80’s just ghetto twist wiring everything with tape electrical tape everywhere. In fairness we did use a multi meter to find 12volt, it was just the whole constant AND ignition 12v that threw us.
Blew a fuse, may have killed the head unit as it just constantly makes a disc seek noise now, but it does load and eject discs, no fascia lights tho.Also none of the wiring colours make any sense so it’s completely random whether or not they will be in phase.
But that’s what you get for not reading guides like this. Thanks a lot Annie!!
Thanks RD, wish it could have helped you earlier!
My stock harness in my 95 f150 has more wires than my new 2012 sony stereo takes. what do i do with the extra wires? cap them off? or can i just pull them out of their connectors (there is 2)
Hi AJ,
It’s possible some of those wires were for an optional CD changer or something that you’re obviously not using OR they could be for a stock amp. If everything works, cap/tape them off.
I’m not sure if you still have the original Ford harness plugs. Ford has many different wire harnesses, many of them look similar but have additional harnesses. If you have the original connectors, you can check Metra’s website to see the various harnesses and see if maybe you need a different harnesses.
Thank you very much, saved me.
I’m so happy I could help! 🙂
This will definitely soumd stupid, but in your article you say turn the ignition on. Does that mean to leave the car battery hooked up while doing these tests? Or will I still get a 12v reading for switched power with the battery unhooked? Im new to electrical and car audio, so im gonna have a fun time with this project.
Hi Mike, I tell everyone, there are no such things as stupid questions. Stupidity lies in assumptions, not asking and therefore not knowing! Yes, you would want the battery connected whenever testing for a switched power source.
howdy
thanks for a great article.
my problem is fitting newish unit to 89 ford laser. radio uses a constant voltage line – yellow cable ( runs a clock, )however, makes a farting sound when powered down. Only works if speaker harness is reinserted at back of unit each time
just wondering if you could PLEASE advise me the problem, if you know the answer.I would reaklly appreciate it,
regards
steve
Hi Steve,
I’m not familiar with the Ford Laser, we don’t have them in the US. But it looks like the equivalent to a Ford Escort over here, which is a pretty basic system. All car harnesses will have (or should have) a constant power wire for memory (the yellow one) and a switched power wire (the red one). I’m wondering why you have to reset the radio each time, I think that’s what you mean by unplugging the speaker harness and plugging it back in. Are you certain you have 12 volt power? Just so I am clear, so I can point you in the right direction.
1) You have constant power, so the radio retains memory/clock etc.
2) you have switched power, so the radio turns off with the key and turns on with the key
3 ) but you get a turn off pop whenever you turn the car off
4) when you turn the car on, you have no sound/power until you unplug the wire harness from behind the stereo and plug it back in?
Does the car have a separate amplifier powering all the speakers from the factory? Is everything original in the car, except for the aftermarket stereo? If so, it sounds like there’s a stock premium system that is common grounded which would explain the issues you are having. Check to see that there are separate positive and negatives for each speaker in the car at the stock radio harness. If not, there is probably a stock amp that is common grounded and needs to be bypassed.
Hope that helps!
I NEVER EMAILED ANY ONE ,BUT I HAVE TO SAY THANK YOU . I HAVE A 1990 JAGUAR WITH 8 SPEAKERS & TWO TWEETERS . I’M GOING TO TRY TO IDENTIFY ALL THE WIRES YHANK U AGAIN B.J.M.