JBL GX602 Review

JBL GX602 Review

Sweet!  Free set of JBL GX602 speakers to review – Wait, can I even sell these in my own shop?

JBL GX602 Review
JBL GX602 Review

I really didn’t know what to expect when the folks over at Harman graciously offered to send me a sample of their JBL GX602 speakers for review.  As a small car audio shop owner, I was aware of the brand, but never had any real hands on experience with the product.

For those of you that don’t know, Harman is huge in the car audio industry.  Like really, really huge.  Their family of brands includes (but is not limited to) JBL, Infinity, Harman Kardon, Becker, Mark Levinson and the more recently acquired Bang & Olufsen.  Their audio and infotainment products are used in more than 80% of the world’s luxury vehicles.

These guys are serious about understanding and implementing the science behind good sound.  They spend a lot of time and money in research, design, development and product testing. They even have a state of the art facility in Northridge California called the multiple listening lab specifically created for loudspeaker research and testing. This facility houses a one of a kind invention called a speaker shuffler specifically created for their own double blind product testing.

You may be wondering, “Well if they’re that big and that serious about car audio, why don’t you carry JBL in your store?”. Well, until recently, JBL was sold almost exclusively to large retailers like Best Buy or Crutchfield.  Thankfully, once again Harman is seeing the value in small independent shops like mine and they are changing their distribution model. I’m pretty happy they are making this shift because these speakers do rock and I gotta have them in my shop.

JBL GX Series – Best Entry Level Car Audio Speakers

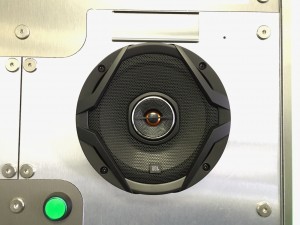
After installing these in our sound board and turning them on for the first time, I was pleasantly surprised.  To the point where I grabbed my husband John and said, “Babe!  You gotta take a listen to these – they’re really good!”.

JBL GX602 Review Display Board
JBL GX602 Review – On My Display Board

The JBL GX series speakers definitely made an impression on me.  For a variety of reasons, I feel these are the best entry level car audio speakers I have heard.  When I say entry level, I mean the land of $99.95 6.5″coaxial car audio speakers.

Efficiency and Output

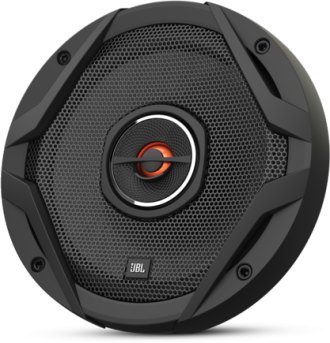
The JBL GX602 speakers are incredibly efficient – surprisingly efficient.  Increased efficiency means these speakers will play pretty loud with minimal power. Harman attributes this to their patented Plus One Woofer Cone technology.  This design creates up to 35% more surface area on the woofer cone.  The increased surface area equates to higher efficiency and sensitivity.  In audible terms, there is an undeniable difference in output between the JBL GX602 and the leading competitors entry level 6.5″ speakers.  In other words, they’re louder than their competitors.  This also has to do with the fact that these speakers use dual 3 ohm voice coils creating a nominal impedance of 2.3 ohms.  Standard car audio speakers are single voice coil 4 ohm.  The slightly lower impedance allows slightly more power to flow from the head unit or amplifier to the speakers.

Balance and Clarity

They’re not just loud, they’re clear and tastefully balanced.  I auditioned the JBL GX602 speakers with a variety of music. From Sheryl Crow’s “We Do What We Can” to Mark Ronson’s “Uptown Funk” and a little bit of Nelly Furtado’s “Fresh Off The Boat”.  Over a variety of genres and songs, the JBL GX series speakers consistently performed in a loud, clear and accurate manner without any level of harshness.  I was surprised at how smooth they were considering their “in your face” presence.

Directional Tweeter

JBL also uses a special tweeter deflector which helps to direct and disperse top end detail to the driver.  I LOVE this feature.  I usually use this line to up-sell a customer to component speakers, “What good are tweeters if they’re aimed at your ankles?”.  That’s essentially what you’re doing with a traditional coaxial speaker mounted in your door.  However, with JBL’s tweeter deflector, this is less of an issue.  For the customer who can’t make the investment into components (or doesn’t feel like installing them), this little feature really helps to direct that sound stage up to where the driver can hear it.

JBL GX602 Review – Should you buy them?

I love these speakers for the customer who:

  • Is interested in doing a full system on a limited budget (head unit, speakers, amp/sub).  These customers will benefit from the sound quality of these speakers and the increased efficiency.  A subwoofer will add depth and punch and really compliment the range the GX series are capable of.
  • Is replacing blown stock speakers.  Perfect for when a customer walks into my shop and they just want to replace blown or dry rotted stock speakers, but they still want to keep the stock head unit.  Other brands are less efficient and depending on the stock stereo, they may actually end up being quieter than the original stock speakers.  These speakers are an ideal upgrade for anyone with a stock stereo looking to upgrade speakers.
  • Wants it loud, but can’t afford an amp.  If you’ve already blown your aftermarket speakers, but you are not willing or able to invest in a 4 channel amp, you should buy these speakers.  They will play louder than many competitors speakers all due to that increased efficiency and 2.3 ohm load.
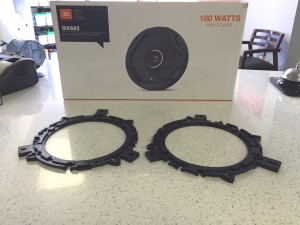
  • Interested in value.  These speakers include gasket tape, speaker mounting adapters, screws and hardware. The gasket tape and mounting adapters could otherwise add another $20 to your install.  The fact that they are included shows these speakers are a great value.
JBL GX602 Review Speaker Adapters
JBL GX602 Review- Speaker Adapters, Gasket Tape and Hardware Included.

JBL GX Speakers – Coming soon to Sounds Incredible Mobile

Although I only listened to the JBL GX602’s, the GX series is offered in a variety of sizes from 3.5″ to 6″x9″ and everything in between.  After listening to these speakers I emailed Harman,” Wow- I gotta have them”.  I look forward to meeting my JBL rep next week and carrying the JBL GX speakers in my own shop. What do you guys think?  What kind of experience have you had with JBL products?


Stock stereo harness cut? No problem.

Testing wires when your radio harness has been cut

Testing wires when your radio harness has been cut
Using a multimeter to test wires

Stereo wire harness cut?

Estimated read time: 5 minutes 45 seconds.  Want to read later?

Maybe you just bought a used car and it’s got a nice discount because there’s a big old whole in the dash where your stereo should be. Or maybe you should have taken off the detachable face off that nice aftermarket radio you had in your car because someone decided to steal it from your car last night. Whatever the case may be, you are now in the process of trying to put a new stereo in your car, but there’s no harness, it’s been cut. And the factory wiring harness is in no way close to universal. So how do you figure out what’s what?

Tools you will need: A battery popper, a multimeter, wire strippers, electrical tape, thin masking tape and a marker.

What is a battery popper you ask? It’s a fancy little contraption that anyone can make using some speaker wire and any old battery that works (AA, AAA, D, 9V, whatever). You take your speaker wire and tape the negative side to the negative side of the battery. Then you take the positive side of the speaker wire and tape it to the positive side of your battery. Now you have a battery popper.

Tool for testing speaker wires and phase
Plain old AA battery with speaker wire electrically taped to it and probes crimped on = Battery Popper

You can then take this little device and hook it up to speaker wires to determine what’s what. When you get a pair of speaker wires, you will hear that speaker make a rustling or popping sound. Don’t worry, it won’t hurt the speaker. Next up is the multimeter.

Multimeter
Trusty multimeter


The 1st thing you have to figure out is switched 12 volt power, constant 12 volt power, ground, and illumination if equipped. You will need your multimeter to figure this out. What you need to do is take the negative probe of your multimeter and put it to a known ground point in the car, you can usually find one in the radio chassis or near by.

Negative probe to ground
Put your negative probe to ground and get ready to test for your constant power, switched power, ground and more.

Then take your positive probe of your multimeter and measure it against a possible power wire in the stock harness. Switch your multimeter to DC Voltage. Once you get a 12 volt reading (with the car’s ignition off), then you know you’ve got 12 volt constant or your Yellow wire. Use your masking tape and marker to mark this wire so you know what it is.

Using a multimeter to find constant power.

What if none of the wires in the dash give you 12 volts? Then you probably have a blown fuse in the car. If someone left bare wires in the dash and a power wire touches another wire, ground or metal in the car, the fuse for the radio and possibly other accessories in the car would blow. So, don’t despair if you have no power reading, you probably just have a blown fuse.

So check your fuses if that happens, and remember that sometimes they look okay, but they’re really not. You should use your multimeter to test fuses. Put one end to each side of the fuse and put your multimeter to the ohms position. If the fuse is good, you will get some type of reading. If you don’t get any type of reading or fluctuation, you know the fuse is bad. Separate all the wires in the dash, replace the fuse, and continue on where you left off, easy as that.

Once you’ve got your constant power reading and know what wire that is and you’ve taped it off and labeled it, you can move on to finding switched 12 volt power. Do the same thing you did to find constant. Put your negative probe of your meter to ground and the positive end probing a suspected switched power wire. Then see what happens when you turn the car’s ignition on. This wire shouldn’t read anything until you’ve turned the ignition on and it should stop reading when you turn the ignition off. When you’ve found switched 12 volt power, the meter will read 12 volts only after the ignition has been turned on. Once you’ve found this, you will know that’s your Red wire for your head unit. Tape it off and mark it with your marker so you know what it is.

During the whole process, make sure you are using your electrical tape to tape off the bare ends of the wire once you’re done testing it. We don’t want those wires touching each other and popping any fuses.

To find ground, put your multimeter on the ohms setting. Put your negative probe on the chassis for ground. Then take your power probe and probe the suspect wires for a ground. When it reads 0, or close to it, you’ve got ground. Remember to tape off the bare wire with electrical tape and mark it with your masking tape and marker so you know it’s your ground wire.

Finding ground with a multimeter
Using a multimeter to find ground in your stereo wiring harness.

For illumination, you will be taking the negative probe from your multimeter and putting it to ground, and your positive probe will be checking each wire. With your positive probe on a bare wire, turn the parking lights on and off. Test each wire in this manner. If your car has an illumination wire, and you get the right wire when testing, your multimeter will read 12 volts when you’ve turned on the parking lights. If you get nothing, don’t worry about it, it just means there is no illumination or dimmer wire for the radio harness.

At this point you should have mostly speaker wires left over. With your multimeter, first measure all of them ignition on and off to make sure there is definitely no power going through those wires.

Next you are going to get your speaker popper tester. Pick a wire and put the negative wire from your speaker popper tester to it. Now, go through each leftover wire with your positive wire of your speaker popper tester. Once you get a pair of speaker wires you will hear that speaker rustling and popping.


Now you will know whatever pair of wires you have in your hand is the “left front speaker wires” or “right rear speaker wires”, or whatever pair you heard. To figure out what’s positive and negative, you will really need a partner. You can do it without one, but it will be more time consuming and unless you have a good ear, might be hard to correct if you get it wrong. So try to get someone to help you out here.

While you pop the speaker, have your partner look at the speaker. If the speaker moves outwards, you have positive and negative correct. If the speaker sucks back in and moves inwards, you have positive and negative reversed. You have to do this for each pair of speaker wires. If you get one speaker out of phase, it will make the whole system sound kind of funky and hollow and it will definitely be lacking in bass.

One you determine a pair of speaker wires and you determine what’s positive and what’s negative, electrical tape off the bare wires and use your masking tape and marker to note what’s what.

It’s very important that you have your phase correct! When you have a pair of speakers and you have positive and negative correct on the left side, but reversed on the right side, what happens is they put each other out of phase. This cancels out certain frequencies (this is how noise canceling devices work). It leaves a hollow sound, and very little bass. So take your time to get it right, it will be well worth it in the end.

After identifying all of your speaker wires, it’s always a good idea to take your multimeter and measure the impedance of all of the speakers in the car. Assuming you aren’t dealing with a factory amplified Bose system, all of the car speakers should read around 4 ohms. This is important as aftermarket head units are only designed to power 4 ohm speakers.

Once you’ve identified all of your wires and you are positive your car speakers are all 4 ohms, get to it and start wiring up your aftermarket radio. Enjoy!